
Most Next.js blogging tutorials assume you want to build a blog system from scratch, and it’s often the wrong solution for existing production apps. However, if you already have a Next.js application, the real challenge is adding a blog without rebuilding content infrastructure or forcing non-developers into Git workflows.
In this guide, we’ll discuss some common ways of adding a blog to Next.js apps and dive into the pros and cons of each method.
Table of Contents
- TL;DR
- The Problem with Building a Blog into Your App
- A Simpler Approach: Add a Blog to Your Next.js App via Rendered API
- Step-by-Step: Adding a Blog to a Next.js App with DropInBlog
- How DropInBlog API Rendering Works
- Comparing Next.js Blogging Approaches
- When Using DropInBlog’s API Makes Sense
- SEO + Performance Considerations
- Choosing the Blog Creation Method That Works Best for You
TL;DR
The three most common approaches for adding a blog to a Next.js app are the following:
MDX (file-based): This approach gives you maximum flexibility, but content updates become engineering work.
Headless CMS: In this scenario, you get a strong editorial workflow, but it requires more infrastructure and maintenance.
Starter templates: This approach is useful for new projects, but not logical for working production apps.
Rendered API: This is the fastest way to add a blog to an existing Next.js app.
The Problem with Building a Blog into Your App
The two most common ways to add a blog to a Next.js app are through an MDX-based setup or a headless CMS. These, however, come with their own set of issues.
MDX-based Blog Setup Tradeoffs
MDX-based setups offer flexibility for developer-maintained blogs, but have a lengthy setup. Since they require a custom blog architecture, you’ll have to build and maintain the logic and templates for your blog’s index page, categories, and individual blog post pages.
You should be prepared for technical challenges when using third-party packages to avoid instabilities. If the package you’ve selected isn’t well-maintained or has compatibility issues, it could break your entire MDX setup.
Every change you make to your blog posts is treated like an app update because you’re actually changing your app’s code.
While great for developers, this approach can create bottlenecks in content publishing workflows for non-developers.
For every new post you create, you need to create a new .mdx file, save it into your code repository, and redeploy your app for your blog post to go live. For non-developers, these constant code changes can affect your app’s stability.
Headless CMS Blog Setup Tradeoffs
When you create a blog for your Next.js app with a headless CMS like Contentful or Sanity, your blog content lives inside a CMS, separate from your codebase. However, you’re in charge of the delivery layer. You’re responsible for rendering, routing, metadata, caching/revalidation, previews, and the connection between the CMS and the frontend.
Most headless CMSs aren’t free, so if you choose a paid service, you’ll have an additional cost on top of your Next.js hosting and database/storage fees.
A headless CMS setup has many moving parts that need to work together, including your app, the CMS, webhooks, API keys, and production environments. If you only need a simple blog, a headless CMS setup might be more complex than necessary.
A Simpler Approach: Add a Blog to Your Next.js App via Rendered API
Instead of building an MDX-based blog or using a headless CMS and starter templates to build a blog system, you can integrate one into your existing Next.js app. To do that, you can use DropInBlog’s API.
Here’s how this blog setup works:
Your blog system is decoupled from your app. When you update your content, you’re not deploying your app.
Your blog is managed through an external dashboard – DropInBlog’s admin panel. Creating and managing content this way is easy and particularly useful if your blog is managed by non-developers.
Your app no longer handles the entire publishing system. Your Next.js frontend only needs to pull the blog content from the DropInBlog API and display it on the site.
Step-by-Step: Adding a Blog to a Next.js App with DropInBlog
Before you begin the blog integration process with the DropInBlog API, make sure you have the following:
An existing Next.js app (Version 15 or 16).
A DropInBlog account (you can create one for free with a trial).
A blog ID and API key. These are available on the Code & Layout page of your DropInBlog account.
Step 1: Install the Packages
Open your Next.js project and run this command in your terminal to install the required packages:
npm install @dropinblog/react-nextjs @dropinblog/react-core
Note: You need to install both packages.
Step 2: Set Up Environment Variables
Create a file called .env.local in your project root.
Inside the file, add the following two lines:
DROPINBLOG_BLOG_ID=your_blog_id_here
DROPINBLOG_API_KEY=your_api_key_here
Replace “your_blog_id_here” and “your_api_key_here” with your actual blog ID and API key. To access these, go to the Code & Layout page of your DropInBlog account and select API Keys on the right.
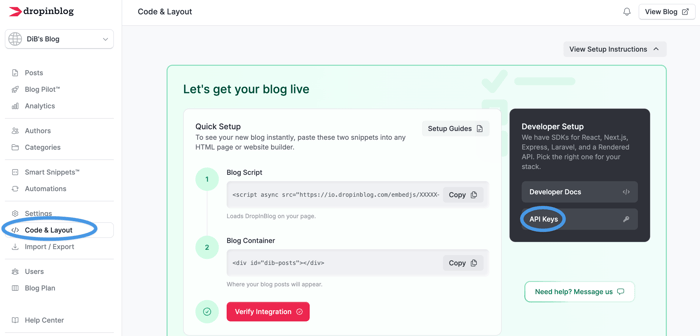
On the following page, you’ll see the option to generate your API key and copy your blog ID.
Once done, replace the two placeholder values with your credentials.
Step 3: Run the CLI Installer to Create All Blog Pages
At this point, you should run the installer command that matches the routing system your app uses: App Router or Pages Router.
For App Router, run this command in your terminal from the root folder of your Next.js project:
npx dropinblog-nextjs install --router app
For Pages Router, run this command:
npx dropinblog-nextjs install --router pages
When you run this command, the routes for your blog will be automatically created, including:
/blog— main post listing/blog/page/[page]— pagination/blog/category/[slug]— category pages/blog/category/[slug]/page/[page]— paginated category pages/blog/author/[slug]— author pages/blog/author/[slug]/page/[page]— paginated author pages/blog/[slug]— individual post pages/blog/sitemap.xml— blog sitemap/blog/feed— RSS feed/blog/feed/category/[slug]— category RSS feeds/blog/feed/author/[slug]— author RSS feeds
These routes are stored as files inside your Next.js project, and you can easily access and modify them.
Step 4: Run the App
The final step is to open your terminal and run the following command:
npm run dev
Once that’s done, you’ll see something like this:
Local: http://localhost:3000
Append “/blog” to the URL and run it in your browser to view your live blog.
How DropInBlog API Rendering Works
When it comes to rendering behind DropInBlog’s API, this is what happens when someone visits a blog page:
The user's browser requests /blog/my-post-title.
The Next.js server makes a call to DropInBlog's Rendered API.
Instead of raw data, the API responds with fully rendered HTML that can be inserted into your Next.js page.
Next.js delivers that HTML to the browser in the initial response.
Now, here’s why this rendering approach works well for existing Next.js apps:
Reduced frontend implementation work: You don’t need to map raw data into components, build rendering pipelines, or convert MDX files into HTML. With DropInBlog’s API, your Next.js app simply fetches pre-rendered blog content and returns it as part of the page response.
Server-rendered content delivery: Search engine crawlers can see the content in the initial HTML response because the DropInBlog SDK renders the blog content server-side in your Next.js app. This makes blog pages easier to crawl and index while keeping the rendering model consistent with modern Next.js applications.
Less ongoing maintenance: With DropInBlog’s Rendered API approach, you don’t need additional tools to turn written content into a webpage or display reusable blog components. Instead, the blog layer stays separate from the app itself and your app immediately gets pre-rendered content that can be quickly displayed to the end user.
Comparing Next.js Blogging Approaches
| MDX / File-based | Headless CMS | Rendered API / SDK-based (DropInBlog) | |
|---|---|---|---|
| Setup time | High | Medium-high | Low |
| Admin interface | None | Yes | Yes |
| Rendering | Build-time (SSG) | SSG/SSR/ISR | Server-side (SSR) |
| Maintenance | High | Medium | Low |
| Flexibility | Full control | High | Moderate |
| Works with existing apps | Yes, with effort | Yes | Yes – designed for this |
| Publishing workflow | Git + redeploy | CMS + API delivery | CMS + rendered delivery |
When Using DropInBlog’s API Makes Sense
DropInBlog’s rendered API approach works best for teams that already have a production Next.js app and want to add a blog without building and maintaining a separate content infrastructure. However, it’s not ideal for every architecture or editorial workflow. Here’s what you should keep in mind when deciding whether to use DropInBlog’s API.
DropInBlog’s API is a good fit for you if:
You already have a Next.js app, and you want to add a blog to it without building the infrastructure.
You want to quickly create a blog for your app.
You want to use server-side rendering without building the rendering pipeline yourself.
Your content team doesn’t consist of developers, and you need an easy-to-use admin interface.
DropInBlog’s API isn’t a good fit for you if:
You need deeply custom content types or complex relationships between content.
You want complete control over how every element is rendered.
You have advanced editorial workflows (multi-stage approvals, version control over drafts, etc.).
SEO + Performance Considerations
When choosing the blog integration method for your Next.js app, here’s what you should keep in mind regarding DropInBlog’s API:
Server-Side Rendering
DropInBlog’s SDK uses server-side rendering by default, so the blog content is available in the initial HTML request. This helps search engines index blog content directly from the initial response without relying on client-side JavaScript execution. The latter approach may affect page indexing as search engine crawlers don’t see the content right away, which can negatively affect indexing consistency and crawl reliability.
URL Structure
Creating a Next.js blog with DropInBlog’s SDK gives you a clean URL structure that looks something like this:
/blog
/blog/your-post-slug
/blog/category/name
This gives your blog a predictable and search-friendly URL structure, and you don’t have to build the URL logic yourself because the SDK creates it for you.
Sitemaps and RSS
With DropInBlog, the CLI installer automatically generates blog sitemaps and RSS feeds, so you don’t need to manually configure them inside your Next.js app. This reduces setup complexity and helps search engines and feed readers discover new content more reliably.
Page Metadata
The metadata, such as title tags, meta descriptions, and canonicals, comes from DropInBlog, and it’s rendered into the <head> part of your blog pages, while still allowing you to customize or override it inside your Next.js app when needed.
Caching and Performance
Because the blog content is server-rendered HTML, your Next.js app can still use standard caching strategies and CDN delivery. This helps keep blog pages fast without requiring a custom rendering pipeline.
Choosing the Blog Creation Method That Works Best for You
You don’t have to build a blog system to add a blog to your Next.js project.
Using an MDX-based blog setup gives you a lot of control over every aspect of your blog, but it also means you have to build everything from a blog homepage and category pages to sitemaps, metadata, and publishing workflows.
The headless CMS setup is another great option thanks to its flexibility. While you get an admin panel that makes publishing content easier, you still need to both configure and maintain certain aspects of your blog, like webhooks and API keys.
For existing Next.js apps, the rendered API approach can be a much simpler alternative to building and maintaining a custom blog infrastructure. It also has an admin interface where you can easily add blog posts and fine-tune your blog’s settings without touching application code.
You can test it right away and have a live Next.js blog in minutes.
If you have any questions about adding a blog to your app with DropInBlog’s Rendered API, our team is here to assist you.
Happy blogging!


