Welcome! You probably have a lot of questions about DropInBlog and might not know everything our blogging tool can do. Don’t worry – this DropInBlog review will introduce you to our platform's core capabilities and some of its robust features.
Table of Contents
A Simple Setup
Before we show you everything that’s possible with DropInBlog, you should know that setting up a blog with DropInBlog is as easy as it gets.
After signing up, you’ll get two lines of code that are unique to your account.
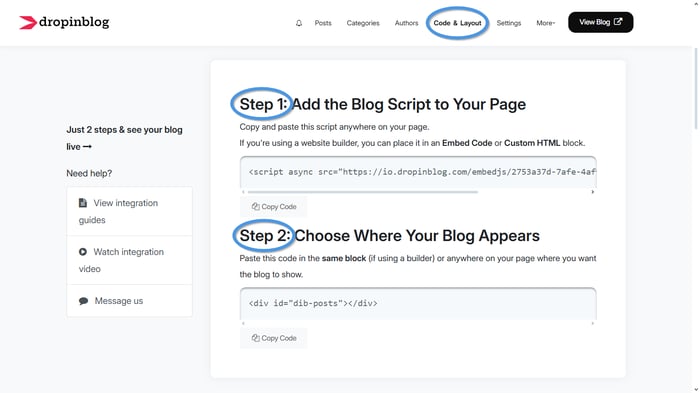
All you need to do is add this code to your website. That’s it!
To help you out even further, we’ve created dozens of step-by-step tutorials showcasing how to connect DropInBlog to (almost) every platform.
Moving Your Posts Over to DropInBlog
So, you’ve landed on this page and want to learn more about our blogging tool, but you’re worried about transferring your content from another blogging platform? Worry not! We know that switching platforms can be a lengthy (and stressful) process, especially if you have hundreds of posts. This is why we made importing posts to DropInBlog super straightforward.
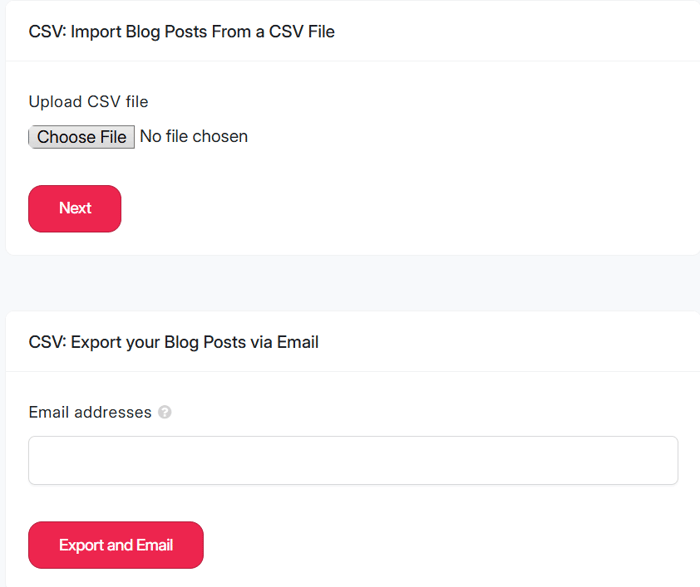
You can use the import feature (1) to move your posts from platforms like Shopify and WordPress, and if you want to create a backup of your posts, you can use the export feature (2) to email yourself a full copy of them at any time.
The Looks
Let’s move on to what your blog posts look like.
The Familiar Look – Inheriting Your Design
When you open your blog homepage, the first thing you’ll notice is that your blog looks familiar. If you look at the header and footer of your blog, you’ll notice that they match the header and footer of your main website.
We wanted to make your website and your blog cohesive. To do that, we made your blog inherit your website’s CSS. Without any tech talk, that just means your blog will automatically take on the same look and feel as your main website.
Speaking of maintaining a coherent look, the inherited CSS applies not only to your current design and website platform… but also to any changes you make in the future. DropInBlog is platform-agnostic, meaning that if you rebuild your site or change platforms, you can take your blog with you and it will automatically adapt to the look and feel of your new website design. 💪
And while we’re on the topic of website design, you should know that you can also tweak your blog’s design to make it your own.
Design Customizations
DropInBlog allows you to fully customize the look and feel of your blog. Within the Design Customization section of your admin panel, which you’ll find under the Code & Layout tab, you can select and change your blog’s primary font family and size. You can also change the color of your CTA buttons and links by selecting one of the colors from a palette or adding your custom color hex code.
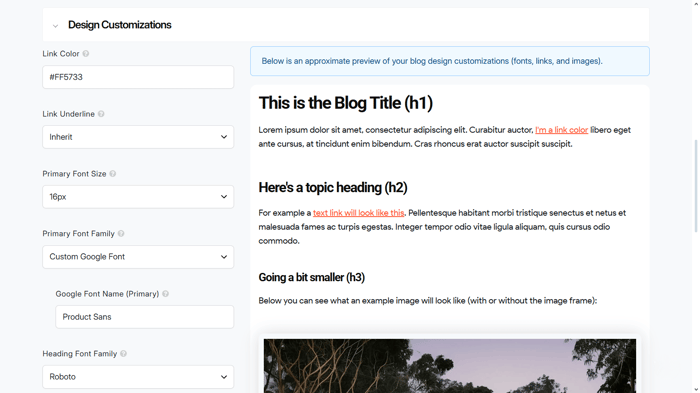
If you’re looking to make bigger changes, you can change your default layout and even add your own custom CSS.
It’s a lot to take in, but we found our users learn about all these options best by exploring them on their own. You’ll see what we mean when you change the color of your CTA button for the first time.
Our part is to point in the right direction, while the DropInBlog journey is all yours.
Speaking of journeys, here’s something you didn’t know before: DropInBlog supports you on your journey to reaching global audiences. How does it do that? We have one word for you – localization.
When you go to your DropInBlog’s Settings page, you can access the Main Settings section where you can adjust the preset wording on your blog. Besides that, this section is where you’ll go to update the interface elements to your locale and language if your blog is in a language other than English.
To take the multilingual experience to the next level, you can use our very own text-to-speech engine – Blog Voice AI™.
Blog Voice AI™
If Blog Voice AI™ sounds familiar to you, that’s because you’ve seen it on our blog. And the way your readers will use this feature is via the built-in player you can display at the top of your posts.
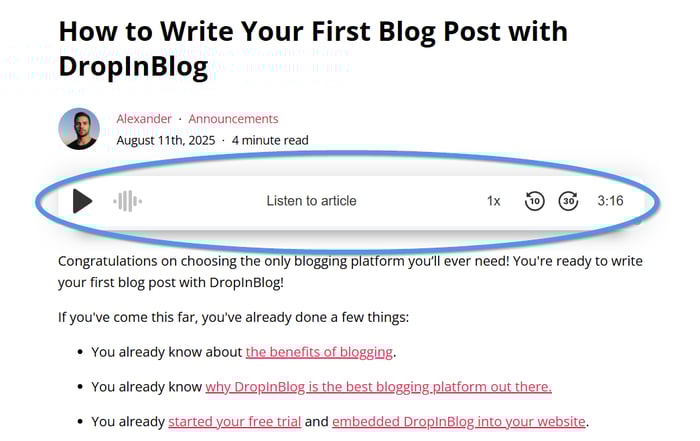
The Blog Voice AI™ feature was designed to let you offer your content in a different format. It turns a blog post into a podcast-like experience. So, if your readers want to hear what you have to say, they can literally do that!
Blog Voice AI™ is available in almost any language, which means that you can not only offer your written content in nearly any language, but you can also complement your blog’s language with an AI voice. For example, if your blog is in French, you can choose a French voice (and, yes, we even have both traditional French and French Canadian accents).
Considering many people have become avid podcast listeners, you can use DropInBlog to reach that audience by making your blog’s written content sound just like a podcast.
Team Members and Authors
Before we show you how to create content and introduce you to our content editor, this DropInBlog review will answer an important question: who can write, edit, and publish your blog posts?
Team Members
You don’t have to add your blog content yourself – you can leave it to your team of writers and editors. Don’t worry – you’ll still have full control over your blog with our user roles and custom permissions.
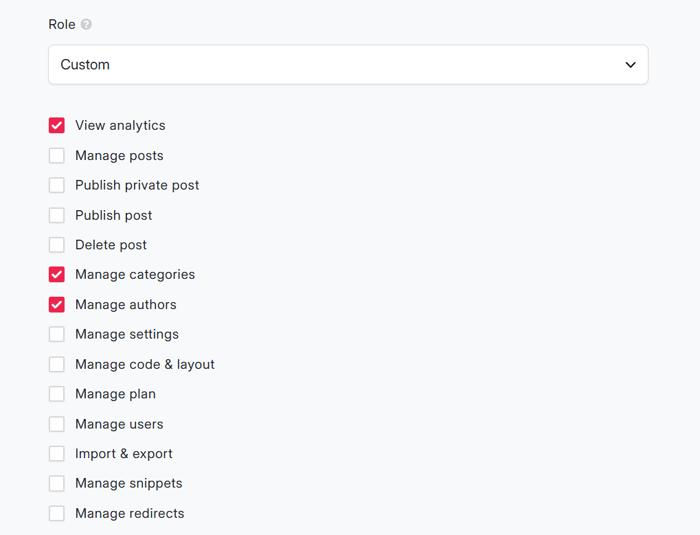
DropInBlog supports user levels, allowing you to add admins, writers, and editors to your blog. You can easily set how each member of your team can help you manage your blog – from granting them full access to your blog account to allowing them only to create blog posts but not publish or delete them.
Apart from managing users, you can also manage authors. So, if you have several people contributing articles to your blog, you can easily create a profile page for each of them. This is why you have a separate tab dedicated to authors.
Authors
We made it easy for you to add multiple authors to your blog. As you'll learn in this DropInBlog review, our blogging tool provides you with everything you need to create comprehensive author bio pages, which is something you should do if you want to follow SEO best practices.
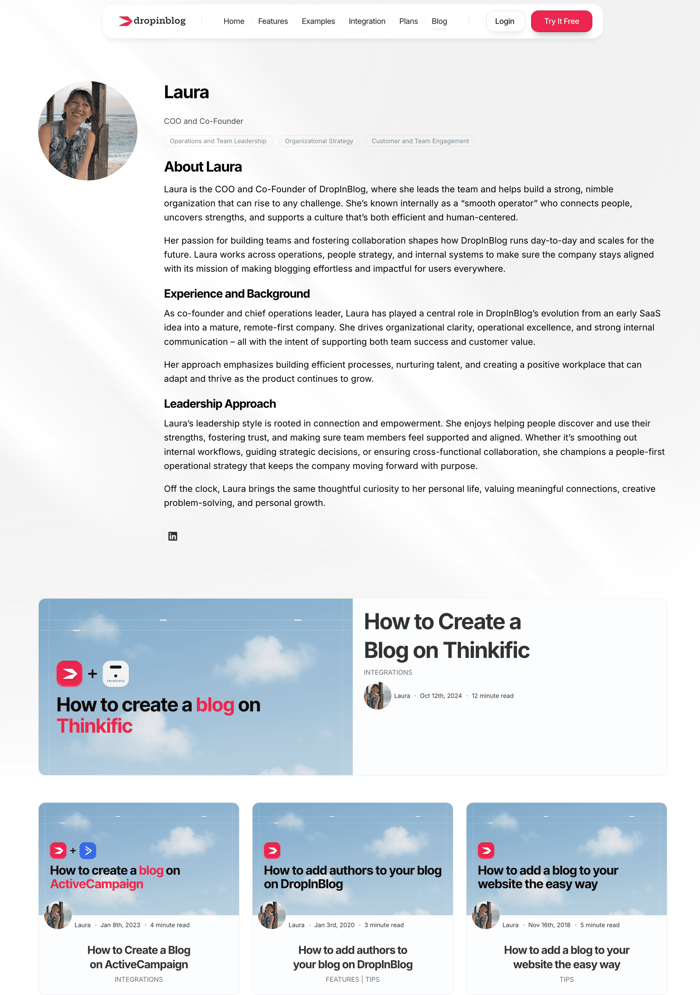
From your admin dashboard, you can access the Authors tab, where you can manage existing author profiles and add new ones. The good news is – managing author profiles is a breeze. What’s even better is that the author profiles you create support schema markup out of the box. You just need to create a profile, and DropInBlog will prepare it for rich results.
You can add a new profile with a click of a button, and then customize it by adding a title, an image, areas of expertise, featured work, social profiles, and a page URL, and, using the content editor, write a bio.
And, as you might have assumed, you can optimize author pages for search engines too by assigning them an SEO title and a description.
Then, when you add an author to your blog, and a curious mind clicks on the author’s profile, they’ll see a page like the one below.
Now that you have an overview of how DropInBlog caters to teams and individual blog owners, let’s move on to the next part of this DropInBlog review that will show you how to come up with topic ideas for your blog.
Generate Post Outlines with Blog Pilot™
DropInBlog makes many aspects of blogging easy, including the tedious task of planning and researching blog topics. When you open your DropInBlog account, on the left you’ll see the Blog Pilot™ tab, which is where we’ve tucked in our AI-powered content planning tool.
Here’s how Blog Pilot™ works:
It analyzes your site to find topics relevant to your niche.
It then delivers suggested topics along with ranking data, such as search volume, and organizes these topics into logical groups.
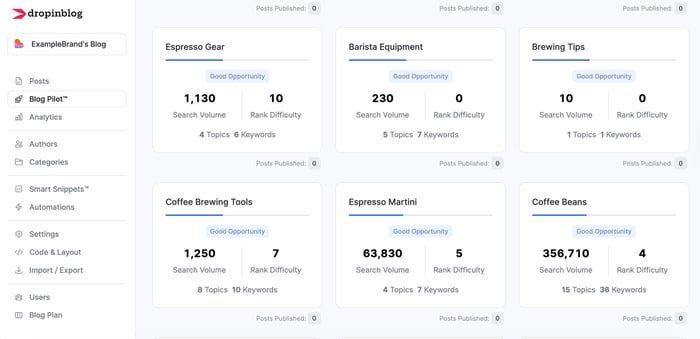
For each topic, you can automatically generate blog post title ideas and an outline.
When you select a title and an outline length, you can move this content into the DropInBlog editor and start writing your blog post.
So, if not knowing what to write about was on the list of reasons why you haven’t started a blog yet, you can now scratch it off the list.
If you already have a content strategy in place and know what you’ll write about, you can also add new blog posts from scratch.
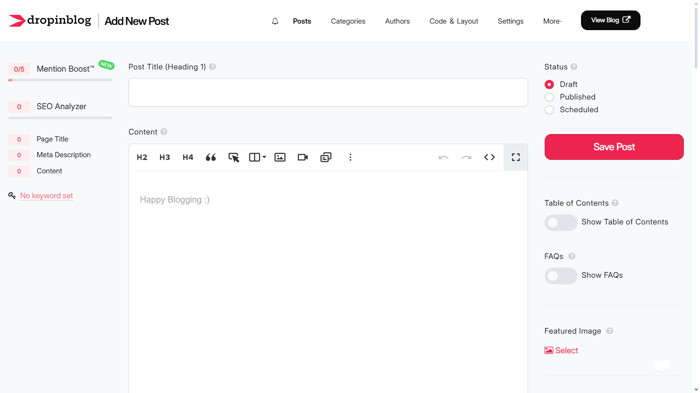
Creating Blog Posts
Adding content to your DropInBlog blog is easy.
To add a new post, all you have to do is visit the Posts tab and click the Add Post button.
Upon clicking the Add Post button, you’ll be taken to the DropInBlog’s editor where you can do anything from adding your blog post’s content to optimizing it for search engines.
Let’s explore the editor’s capabilities and features together!
DropInBlog’s Editor
The DropInBlog editor is pretty intuitive and flexible enough to help you create a blog post just like you imagined it.
To enter the DropInBlog experience, all you have to do is start typing into the content area. Or you can simply copy your content from Word, Notion, Google Docs, and other sources, and paste it into the DropInBlog editor. Don’t worry – the formatting from your writing and word processing tools will be matched to your blog’s formatting. This is possible thanks to DropInBlog's handy copy/paste from anywhere functionality.
Then the fun begins – regardless of whether you’re starting from scratch or you pasted your content from elsewhere.
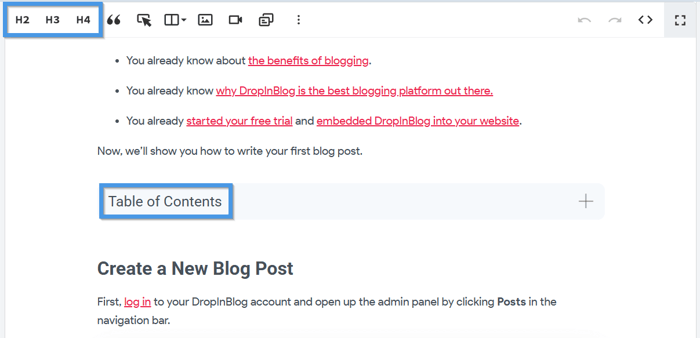
Headings and Table of Contents
You can add headings to your blog post, and while you organize your H2s, H3s, and H4s, a magical process will be happening behind the scenes. A table of contents will be generated from the H2 and H3 headings you add to your post. And, no – you don’t need a plugin to add a TOC to your post. You can turn it on or off with a click of a button.
Call-To-Action Buttons, Video Embeds, Tables, and More
Now, look at the image below, and tell us the first thing you spotted. Was it the big red button?
That attention snatcher you see in this DropInBlog review is a call-to-action button. The purpose of a CTA is to catch users' attention and motivate them to perform a specific action. This action can be anything from inviting your visitors to subscribe to your newsletter to directing them to a specific page to prominently displaying your site’s special deals and offers.
With DropInBlog, you don’t need to manually create your own CTA buttons. You can automatically add them to your blog posts with just a simple click. And we also give you the tools to customize these buttons (if orange isn’t your color).
When it comes to media types you can use to create engaging content, you’ll have everything you need inside the DropInBlog editor. It supports tables, columns, lists, images, and video embeds. It also lets you insert special characters you can insert into your posts, like emdash —, trademark ™, or even emojis. 👍😊✅
FAQ Builder
Another feature you can use to make your blog posts engaging is the FAQ builder. This feature lets you easily add questions and answers to your posts. Just like with TOCs, you don’t need a separate plugin to add an FAQ section to your content. All you have to do is turn the feature on and add your questions and answers using our user-friendly editor.
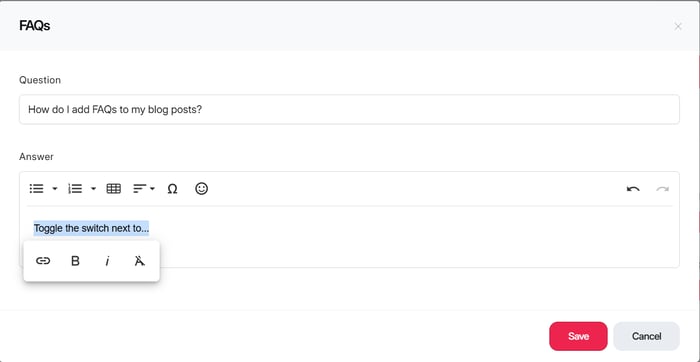
Additionally, FAQ sections help organize important information into an easy-to-scan format for both readers and search engines.
Product Embeds
If you have a Shopify, BigCommerce, or Big Cartel store, you’ll also have the option to embed your store’s products directly into your blog posts. It’s like having windows to your store right in your posts so your visitors can do some window shopping and explore your store’s offerings.
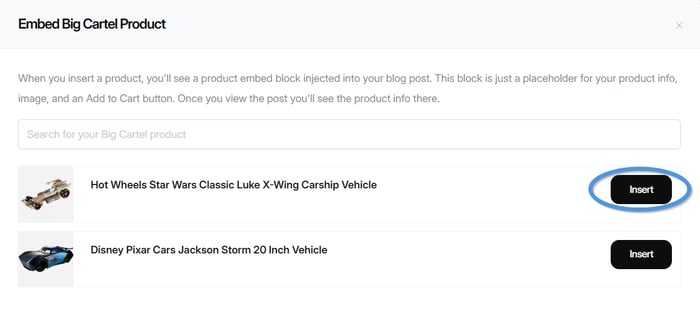
Once they’re ready to purchase something, it’s a snap – because we made it possible for you to take your users from your blog post directly to your store’s checkout page. With this feature you can look forward to higher conversion rates, a great shopping experience for your users, and an extra spot where you can promote your products.
Block-Level and Inline Elements
For those of you who want to know what’s going on under the hood, at the block-level, the DropInBlog editor supports quotes, code blocks, callouts, fine print, and headings which we mentioned before.
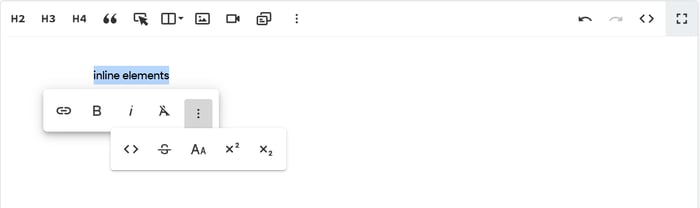
Apart from the block-level elements, you can also add inline elements to your posts. We call them inline because all the changes you make to your text happen on the same line. These inline elements allow you to change how your text looks by italicizing or bolding it, and you can also link your content to internal and external sources.
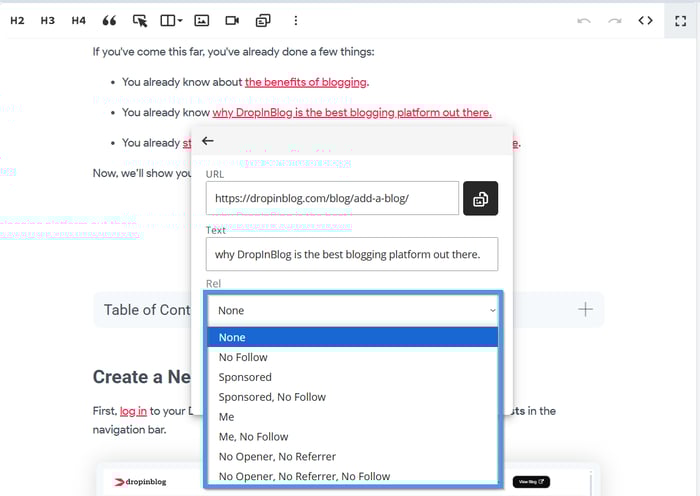
Since we want your blog to rank highly in search engines, we made it possible for you to communicate clearly with them via relationship attributes. These attributes are something each hyperlink has, and they allow you to specify the relationship between your site and the source you’re linking to.
Code View
Before we move away from the content editor and on to the next section of this DropInBlog review, we wanted to let you know that we thought about our advanced users too. If you look at the editor’s top bar, you’ll notice the angle brackets on the right side of it.
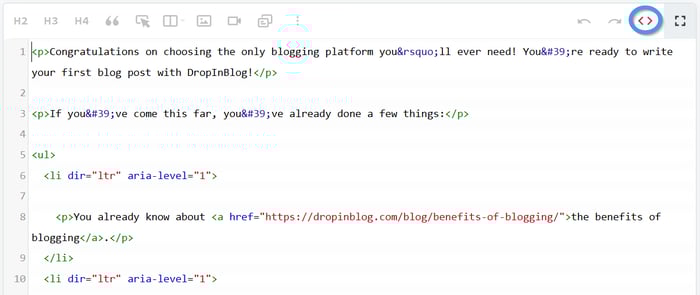
These are your (angled) gates to the Code View where you can add code, or directly edit your HTML.
Apart from all these options within the DropInBlog editor, you can also use Mention Boost™ and the SEO Analyzer to optimize your content. These tools are located under the post editor and will help you get your content ready for regular and AI-based searches.
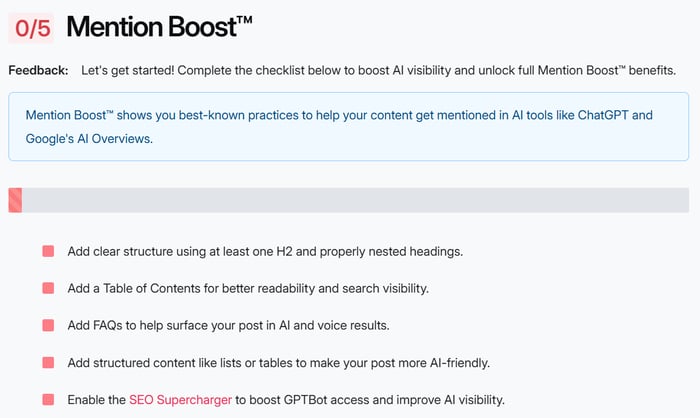
Mention Boost™
Users are now 50% less likely to click on links in search results that have an AI overview, which is why your blog needs to appear in these overviews and other AI-focused searches. DropInBlog has thought about that and launched a tool specifically designed to help you rank in AI search engines.
With the help of Mention Boost™, you can easily make your content AI digestible. All you have to do is follow the tool’s suggestions until you get a perfect 5/5 score.
Once your content is AI-ready, you can focus on the second optimization tool DropInBlog offers – the SEO Analyzer.
The SEO Analyzer
First, what is the SEO Analyzer? It’s an SEO tool that offers as-you-type suggestions on how to optimize your content for search engines.
Where will you find the SEO Analyzer? When you open the DropInBlog editor, right below the content editor, you’ll see a big heading that says SEO Analysis.
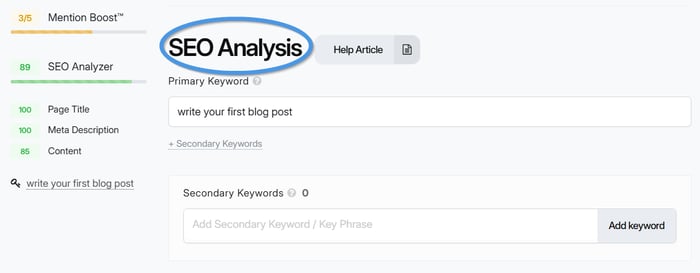
From here, you can use the SEO Analyzer to optimize your blog post for search engines. It will ask you to add your primary keyword, SEO title, and meta description. Once you add this information, you’ll get an overall SEO score, which is a combination of three separate scores: SEO title, meta description, and content score.
The SEO Analyzer doesn’t just give you scores, it offers valuable insight into what you can do to help your content be more visible in search engines.
Have you included your keyword in the filename of an image? How many times does your primary keyword appear in your content? These are only some of the many suggestions you’ll get from our built-in SEO Analyzer. Once you implement all these suggestions, your chances of ranking well in search engines will be much higher.
The SEO Analyzer is only one part of the DropInBlog SEO equation, though. The other part happens behind the scenes, making your content search engine-friendly. Let us give you a sneak peek into the SEO part of your blog that happens in the background.
Speed Optimized Content
To ensure your blog posts are loading at lightning-fast speed, we use lazy loading. That means we don’t load all page content at once but gradually – as users get to a specific part of a post.
Take videos as an example. When you embed a video into your post, it comes with a 450kb iFrame. Instead of burdening your blog with that extra weight, we use a play button and a screenshot of the video. Then, when the visitors click the play button, we put the iFrame back and load the video player. This ensures your blog pages are loading fast!
We also use caching, which stores copies of files and data in a temporary location to serve the content to your blog visitors faster.
Lastly, your audience gets access to static, rendered blog pages, which basically means they can access HTML content files that have already been created. That translates to faster-loading websites and decreased server load.
Structured Data
Another important aspect of DropInBlog blog posts, videos, and FAQs, is that they use schema data. This data helps search engines get the data they need more easily. It can also help search engines like Google and AI tools like ChatGPT understand your content more effectively.
To ensure Google sees your newest content fast, we provide you with a sitemap of blog posts as well.
Sitemap of Blog Posts
You can easily generate a sitemap of your blog posts using our XML sitemap generator.
When you visit your Settings page, all you have to do is click on XML sitemap, to find a link to your sitemap.
It’s that simple!
Published Posts
With DropInBlog’s SEO Analyzer, the platform’s under-the-hood SEO capabilities, and the flexible post editor on your side, you can create great blog posts. But, how do these posts look from your visitors’ perspective?
Let’s find out together!
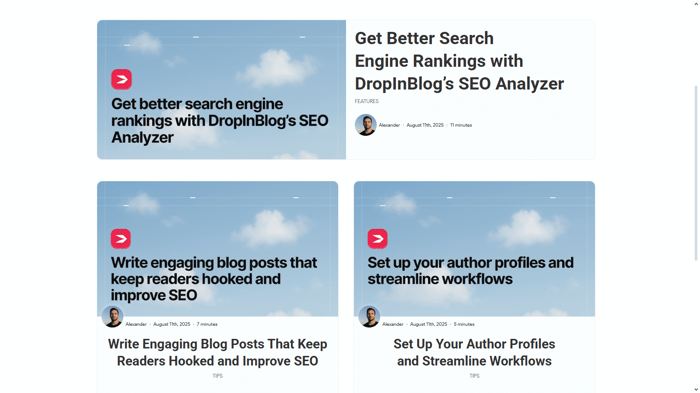
The Homepage
All posts you publish will be displayed on your blog homepage in one of our three layouts: Grid, Basic, or Raw.
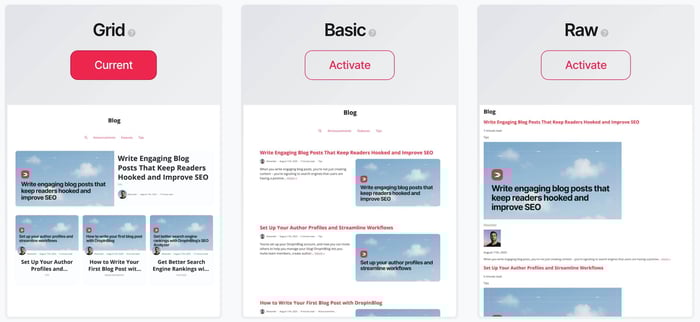
You can even modify one of the layouts, Grid, by turning on the “Feature the First Post” feature. Enabling this feature will give the spotlight to your most recent blog content.
As you can see, you can create a great-looking blog with DropInBlog that’s also really user-friendly. When your visitors come to your blog, they expect to find a well-designed blog. It’s not all about the looks, though. They also expect to navigate your posts with ease.
For that reason, we give you a few features to help you create a blog that’s easy to navigate, and one of those features is Categories. They appear at the top of your blog pages and function like a navigation tool.
Categories
We dedicated a separate page for Categories, which can be accessed from the top menu in your admin account. Is managing categories with DropInBlog easy? Absolutely!
When you first visit the Categories page, you’ll find three default categories: Announcements, Features, and Tips.
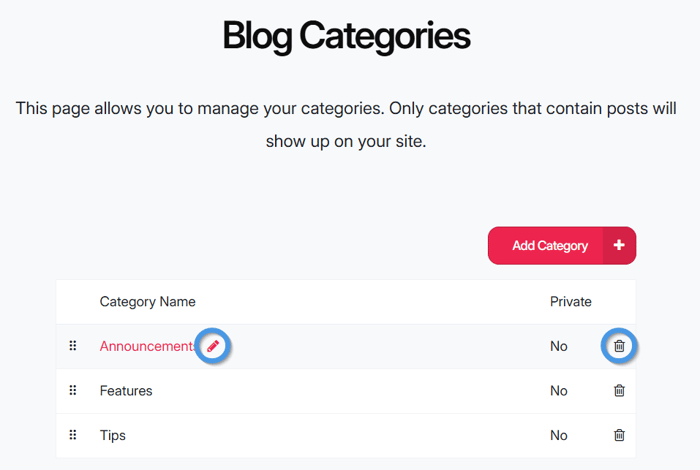
When adding a new category, you’ll have a few options – to add a category name, description, and background image. We also made it easy for you to optimize your blog categories for search engines by giving them an SEO title and a description.
To give you even more options, we created private categories which are only accessible via their URL. And if you have blog posts that you don’t want to be shown on your blog’s homepage, we added category settings that will allow you to do exactly that.
So, if you want to make your content more private, we give you the tools for that. But we also give you the tools to make your content more visible. One of these tools is our blog search functionality, which, like categories, can be displayed at the top of your blog pages, providing a better user experience for your blog’s visitors.
Blog Search
Poor website navigation is one of the top reasons for high bounce rates and low traffic. For this reason, we made it possible for you to add search functionality to your blog.
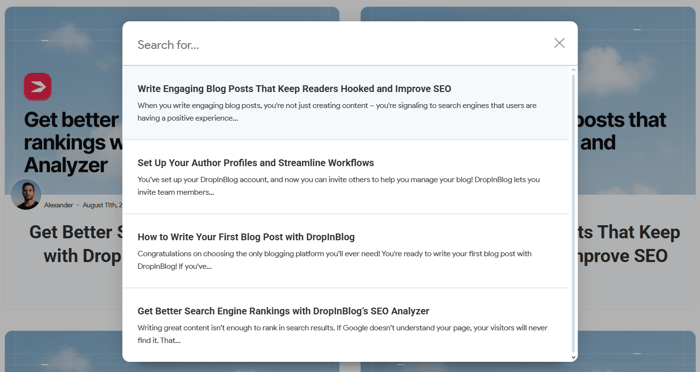
Not only that, we also give you control over the pages on your blog where you want to display the search bar. We found the blog homepage (1) to be the most convenient place for a search bar, but if you want to include it at the top of your blog posts (2), you can do that as well.

Apart from making your blog more intuitive for your visitors, the search bar is also a great tool for improving your blog’s SEO friendliness. After all, DropInBlog is an SEO-friendly blogging tool!
We showed you the blog homepage first, and now we’ll give you a closer look at a single blog post.
Inside a Blog Post
Upon opening a blog post, your readers will probably notice the blog title first.
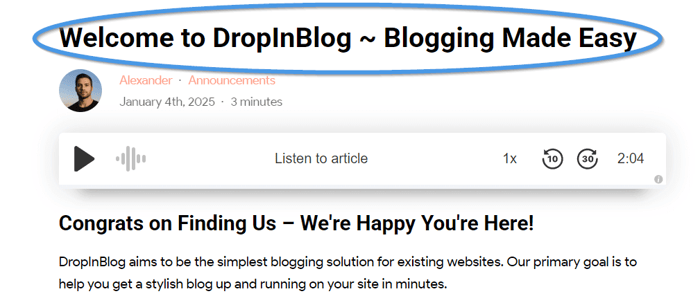
The font family used for blog post headings comes directly from your website’s design (regardless of whether your site is built with Thinkific, Framer, or almost any other platform). And since we know that titles are one of the first impressions users get about your content, we made them easy to spot.
The Post Meta
Below the title, your readers will see what’s called the “Post Meta” – this is the group of elements that tells them a bit more about you and your post.
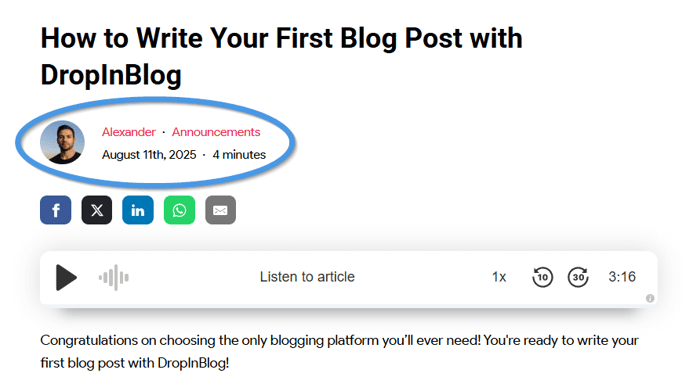
These elements include the post author, along with the author’s image and a clickable link that takes readers to the author’s individual bio page in case they want to read more articles from that author. The added benefit of having author pages on your blog is that they will help you meet Google’s E-E-A-T criteria.
Each of your blog posts can also be neatly organized into categories, which is an excellent way to help your readers navigate your site and easily find the content they’re interested in.
Then, we have the published and modified dates, which are a great indicator of how fresh the content is. If the content is evergreen, your readers will know how long it has kept its evergreen title based on its published date.
If the article talks about the latest stats and news, you can use the Modified at field to inform your readers and search engines about your content's recency. With DropInBlog’s content freshness tool, you can automatically manage your blog’s update visibility, which helps earn your readers’ trust and gives your content a search engine freshness boost.
The reading time lets your visitors know how many minutes they should set aside before diving into the content. And if they lose track of time, there’s a floating read progress indicator showing them how much of the article they’ve read so far. It’s a magical thing with interesting psychology behind it – worth reading about.
Blogging Features and Supported Content Types
The in-between section of your blog posts includes the actual post content, headings that divide it into smaller (logical) sections, CTAs, images, videos, FAQs, Smart Snippets™, and everything else you can add from within the DropInBlog editor.
We give you all the tools you need to organize your content and make it easily skimmable and visually appealing. Want to create a comparison article? Use tables. Want to write a tutorial? Use the File Manager to upload images, PDFs, and text files. Want to write a listicle? Combine headings with ordered and unordered lists.
The DropInBlog editor allows you to format your content the way you want.
Additionally, you can enable our “Highlight to Share” feature, which can help boost your posts’ engagement rates.
Highlight to Share
Do you see the action menu above the highlighted text in the image below? That’s our Highlight to Share feature. It allows readers to copy, and quickly share, selected text via WhatsApp, Telegram, X, LinkedIn, and email.
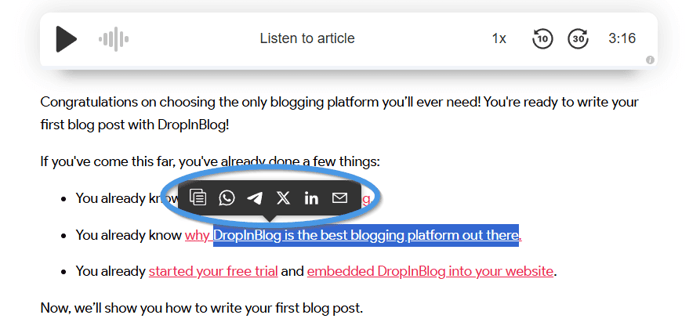
If you don’t want to utilize this feature, you can easily turn it off in your blog settings. In fact, this is true for any of our features – to give you full control of your blog, we made all our features customizable to your preferences.
Commenting System
As you approach the end of the post, you’ll see comments. With DropInBlog, you have the option to connect to Disqus or ReplyBox (via Smart Snippets™). Enabling one of these commenting options is a great way to boost engagement with your readers. The same applies to social sharing.
Social Sharing Buttons
If you want to improve your chances of getting your blog posts shared across social media platforms, you can turn on the Social Sharing feature.
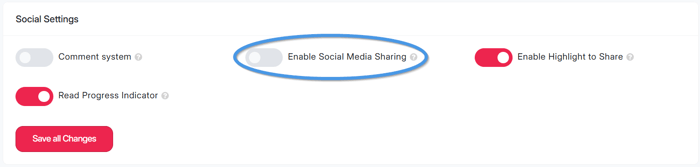
You’ll find this feature under the Social Settings section on the Settings page, and once you turn it on, your visitors will be able to share your content on Facebook, X, LinkedIn, WhatsApp, and Telegram, as well as via email.
Related Posts
Although comments and social sharing buttons will show at the bottom of your posts, there’s one more feature you can get to show at the very bottom of your blog posts page – related posts.
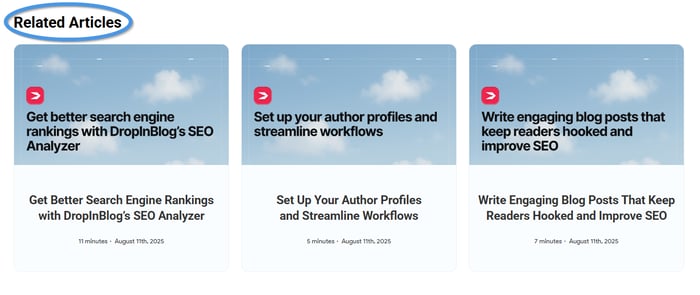
If you want to use this feature, you can easily turn it on from the Settings page. And not just that – you can change the default title of this section, choose the number of related posts you want to be shown, and select the post elements (like featured image and read time) you want to show for each related post.
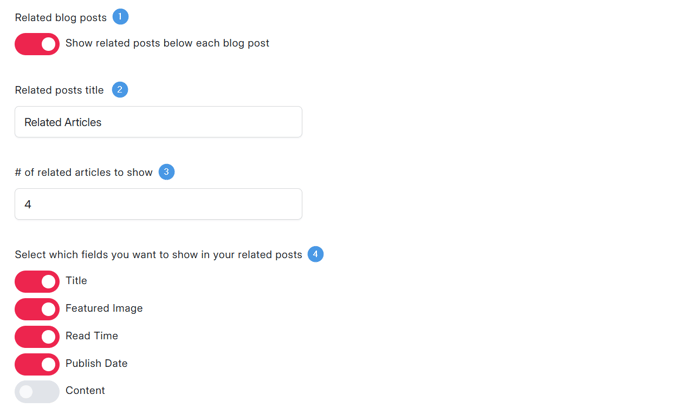
These settings are applied to all your blog posts, but we also made it possible for you to choose related content on a per-post basis.
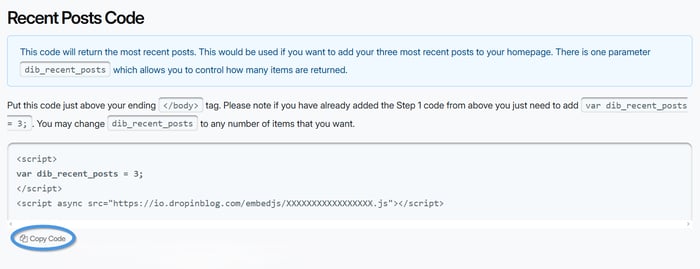
On top of that, you can also display the most recent posts from your blog. This option is more flexible because it lets you show your posts anywhere on your site – not just under a blog post. To do this, you can use a widget code to display your blog posts across your website pages.
Now that you’ve seen how your blog posts will look to your visitors, let us give you a short tour of what you can do behind the scenes – from your admin panel.
Managing Posts
DropInBlog allows you to easily manage your blog content from the Posts page.
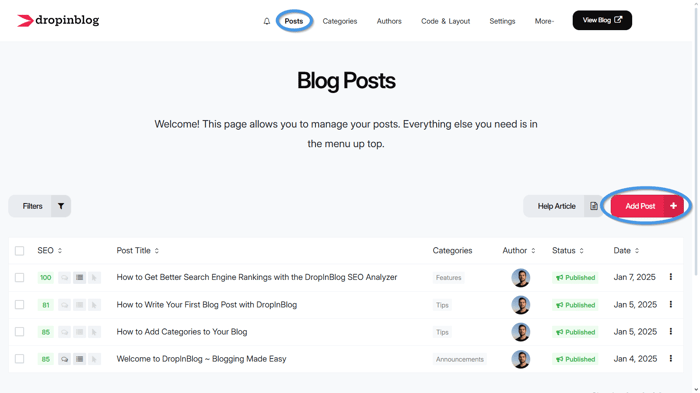
The Posts List
Opening the Posts tab, located at the top menu of your admin dashboard, will take you to the screen you see in the image below.
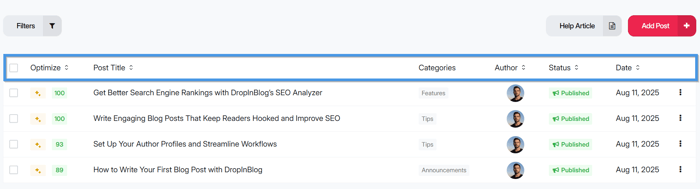
Here, you’ll find information about your posts, including the SEO score, post title, category, author, status, and published date. We already discussed the SEO score you’ll get from the SEO Analyzer, and how to create and manage author profiles and categories. In the next section of this DropInBlog review, we want to tell you a bit more about post statuses, and the options you get within the three vertical dots menu.
Post Status
When it comes to a post’s status, we want you to control when your content will go live. If you don’t feel your content is ready for publishing, save it as a draft. If you’re a fan of the set-and-forget approach, you can choose when you want your posts to be published by scheduling them.
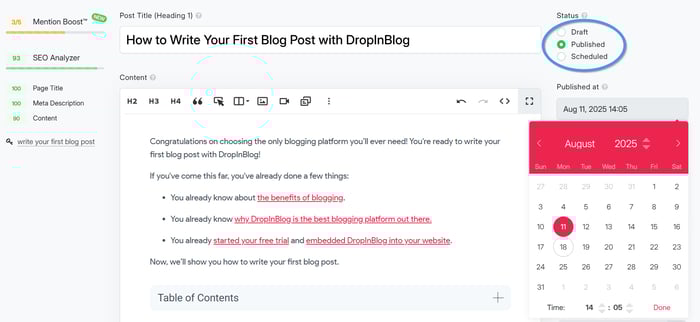
The scheduling feature is also convenient when creating content in batches. It allows you to gradually release your content by setting the desired published dates in the future.
The 3 Vertical Dots (Kebab) Menu
In the right-most part of each entry under your Posts tab, you’ll see a kebab (three dots) menu. It takes up very little space but can be of big help if you want to quickly access the live version of your post.

Using that same menu, you can duplicate or delete a post. Duplicating posts has proven to be an excellent strategy for creating post templates.
And if you want to see how individual posts on your blog are performing – again, the kebab menu on the right will give you access to your post’s Google Analytics data.
If you’re more interested in the big picture and want to know more about all of your posts’ metrics, you’ll just have to hover over the More tab. Here, you’ll find the Analytics tab, which will provide you with useful content metrics such as the number of views and engagement rates.
To display this data in your DropInBlog account, you’ll have to connect your Google Analytics 4 account. If you’re one of the folks who do their own SEO, or you just want to see how your posts are performing, having access to a tool like GA4 directly within your DropInBlog account will come in handy.
Additional Settings
So far, we mentioned a few settings you can control from the Settings page but not all of them. We won’t discuss all the available settings but highlight the most important ones.
The Settings tab is where you’ll find your blog’s URL. Also, this is where you’ll add your API token once you connect your DropInBlog account with Cloudflare, which will give you access to our SEO Supercharger, coming with its own set of benefits such as faster page loading times, dynamic sitemaps, and clean URLs.
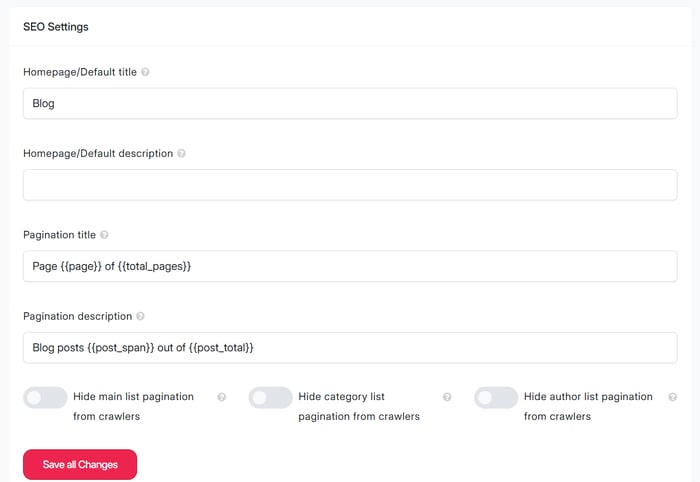
On the Settings page, you’ll also be able to add an SEO title and meta description for your blog homepage. Intrigued? Well, you should be as the Settings page is like a treasure box where you’ll find a bunch of useful…well, settings for your blog.
From this page, you can also control the DropInBlog features you want to turn on for your blog. These features include blog search, related posts, comments, social sharing buttons, and Blog Voice AI™, all of which you can turn on or off at any time.
And if you need to fix old or broken blog post links, the Settings page is, again, the place to go. Here, you’ll find the Redirects section (available to Shopify and Cloudflare users), which is where you can redirect your old URLs to the new ones.
At this point, you might be wondering: is there more?
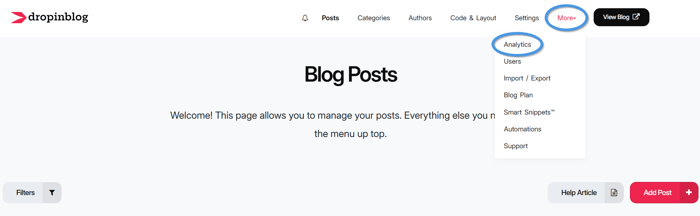
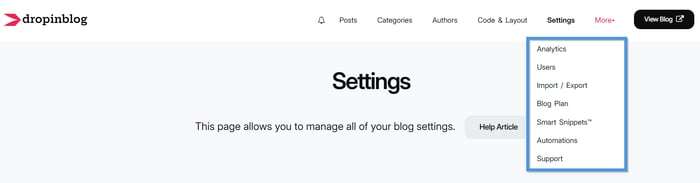
Yes, there’s always more as we’re always working on something new. And there’s the obvious more – under the More tab.
What’s More?
Apart from the Google Analytics dashboard, the More tab will lead you to a few more tools and features that will help you manage your DropInBlog account.
One such feature is Users. As you already know, our blogging platform supports teams. We mentioned user roles earlier but not where you can manage them. As you might have guessed, you’ll find all these settings in the More dropdown under the Users tab. The main options you’ll have here is to select one of the default user roles like editor or admin, but you also have the option to give account permissions on a per-user basis.
From the More dropdown, you can access the Import/Export page, which you’ll access when moving your posts to DropInBlog from another platform or when creating a backup version of your posts.
The same dropdown is where you’ll find the Smart Snippets™ feature.
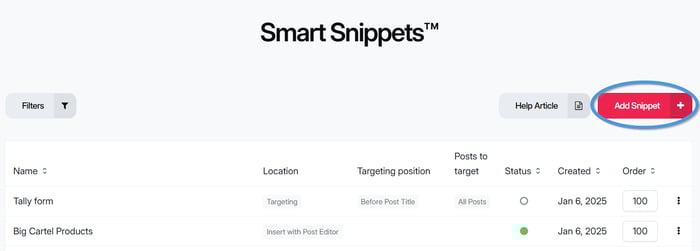
Selecting this option from the dropdown will take you to the Smart Snippets™ page where you can create a new snippet. And if you’re wondering what Smart Snippets™ are, we’ll give you the short answer: reusable content blocks you can use anywhere on your blog. To learn more about this feature, read our feature release blog post.
Apart from all the options we mentioned above, the More tab is where you’ll go to view your subscription plan details and connect your account with Zapier to access automations.
When it comes to Zapier automations, you can use this automation tool to connect DropInBlog to over 1,000 apps to create time-saving workflows. One of these workflows can be to set up an email campaign when you publish a DropInBlog post. Or to create a new post when you add a video to your YouTube channel.
DropInBlog Support
The last option in the More dropdown menu is Support, which will take you to our Support Doc portal. Our support library is there to help you get started with DropInBlog, as well as learn the ins and outs of our blogging platform. And if you have any questions, you always have the option to chat with our customer support team – real (and friendly!) humans standing by to answer your questions.
Wrapping Up
You should now have an in-depth overview of everything that’s possible with DropInBlog, but if you want to learn more about DropInBlog, sign up for a free trial to test all of its features yourself.
We also encourage you to check out DropInBlog examples to see how others are utilizing our cloud-based blogging tool.
And if you have any questions, don’t hesitate to reach out to us.
Happy blogging!