
Table of Contents
Key Takeaways
- The best way to add a blog to your Bubble site is with DropInBlog!
- The free trial and quick setup let you test it in a few minutes.
- DropInBlog has different pricing plans for individuals and teams.
There are three ways to add a blog to your Bubble app. You can build one natively using Bubble's database and dynamic pages, embed a blogging platform through an HTML element, or run your blog on a separate subdomain. Each has real trade-offs, mostly around SEO and how much time you want to spend building.
Bubble doesn't have a native blog. It gives you the pieces to build one, including a database, dynamic pages, and repeating groups, but you're assembling a CMS yourself, and Bubble's dynamic page rendering creates SEO problems that most people don't discover until their posts aren't ranking.
This guide briefly compares all three methods, then walks through the DropInBlog setup in detail.
How to Build a Native Blog in Bubble
Building a blog natively means creating a data type for posts, a page that lists them, and a dynamic page that displays each one, so budget a few hours if you haven't built dynamic pages in Bubble before.
Create a BlogPost data type with fields for the title, body, summary, author, publish date, cover image, and publication status. Store rich-text content in a normal text field, and use Bubble’s built-in Slug property for readable URLs.
Next, create a blog page with a Repeating Group that searches for published posts and sorts them by publish date. Use Link elements to send each post to a dynamic post page, with its page type set to BlogPost.
Then you should add privacy rules so drafts cannot be found publicly. Set the post page’s title, description, social image, and other SEO fields dynamically, and enable Bubble’s sitemap and canonical URL settings.
Why Bubble Blogs Struggle with SEO
Bubble blogs can rank, but they usually need more technical care than a simple static blog. Three things can go wrong:
- Because Bubble relies heavily on client-side rendering, search engines may need to run JavaScript before they can see the full page content. Google can do this, but rendering may be delayed or incomplete if the page has errors, blocked resources, or slow data requests.
- Performance can also be a challenge. Too many plugins, database searches, large images, or page elements can slow down loading and hurt Core Web Vitals.
- Bubble handles basic SEO settings such as page titles, descriptions, Open Graph tags, canonical URLs, and sitemaps. However, more advanced features, such as Article structured data, often require custom JSON-LD or a plugin.
None of this means a Bubble blog cannot perform well in search. It simply means the site needs careful setup, lightweight pages, crawlable links, and regular testing in Google Search Console. But it is the main reason people end up routing their blog through a dedicated platform rather than building it in-app.
Embed a Blog (Fastest Setup)
If your blog is a marketing channel rather than a feature of your app, embedding is the faster path. You skip the database work entirely and manage your posts through a dedicated blogging platform. The standard integration is client-side rendered and indexed by Google, and the SEO Supercharger, included in every plan, can serve static pages and cleaner URLs (see how DropInBlog posts get indexed).
To add a full-featured blog to your Bubble app, you’ll need to have an account on Bubble and subscribe to their Starter plan or higher to have the option of getting your app live. To create a blog, all you need to do is create a DropInBlog account and test the SEO-friendly blogging app using its free trial.
How to Add a Blog to Bubble Using DropInBlog
Step 1: Open Your Bubble App
Log in to your Bubble account and locate your app by selecting Apps from the left-hand side of your dashboard.
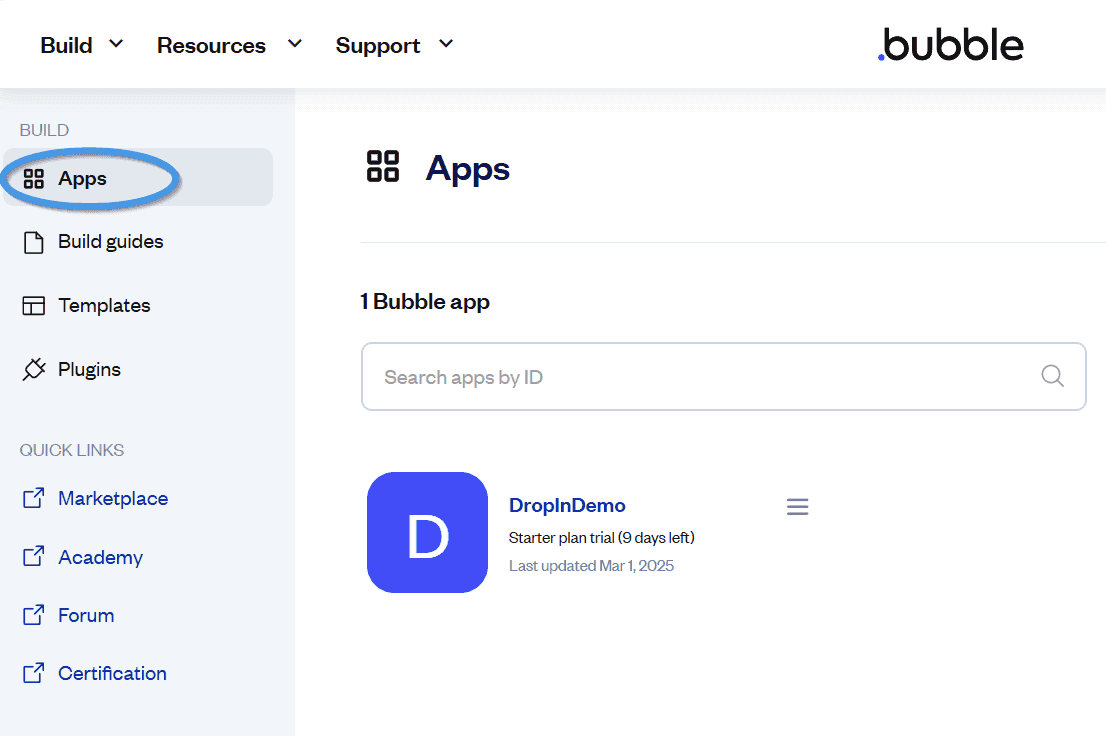
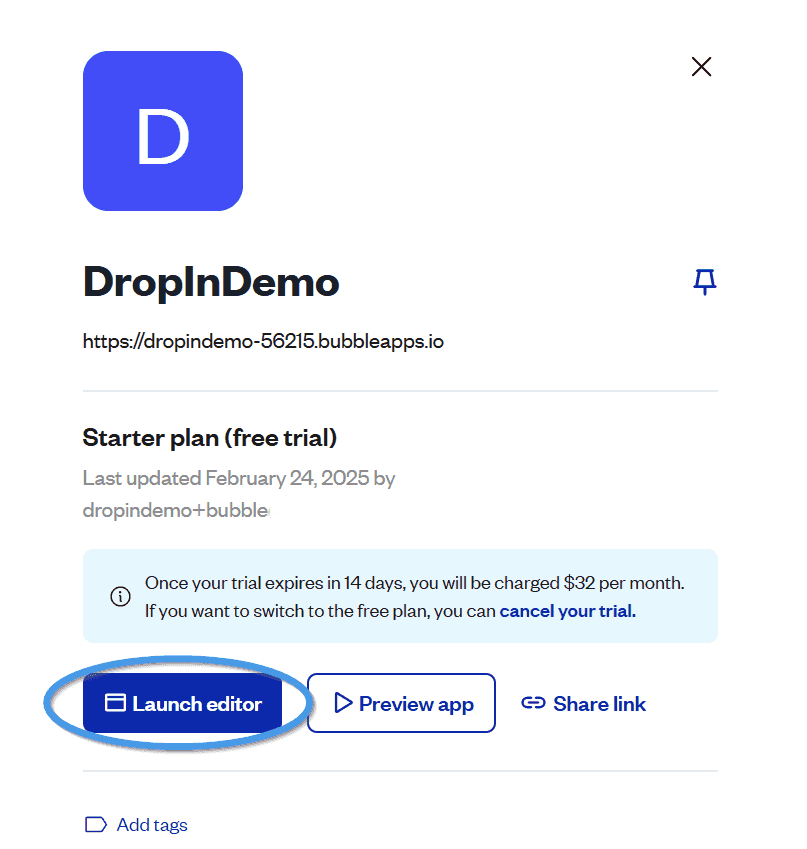
Click on the hamburger menu of the app to which you want to add a blog and select Launch Editor to open the Bubble editor.
Step 2: Add a New Page
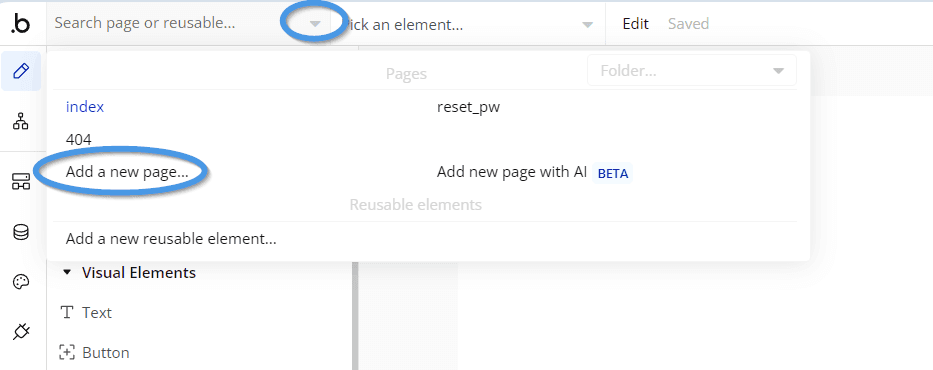
Once in the editor, click on the dropdown in the top-left part of the page, then select Add a new page.
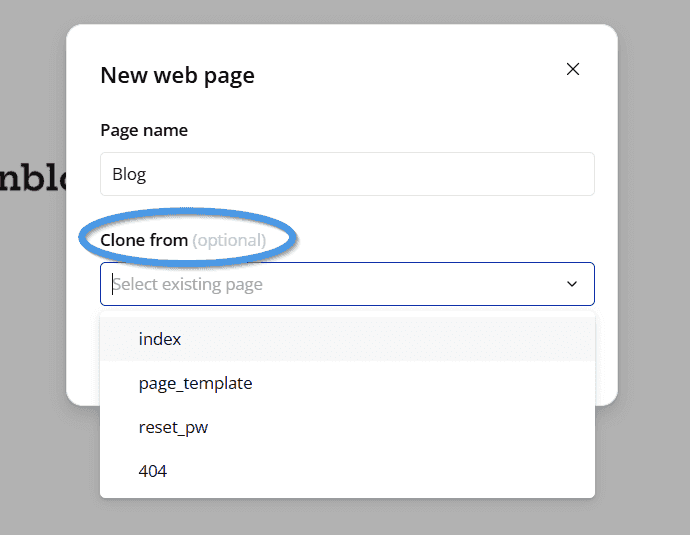
In the popup that opens, type in “Blog,” and if you want to clone an existing page, select it from the dropdown under Clone from.
For this tutorial, we created a page template containing only a header and a footer, and by selecting it, all elements on that page will be added to our new blog page.
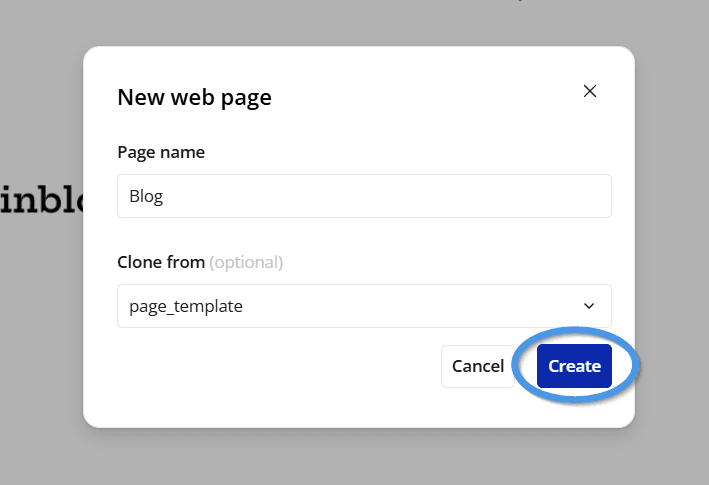
You can also create a blank page and just add a header and footer to it.
Then click on the Create button to add a page.
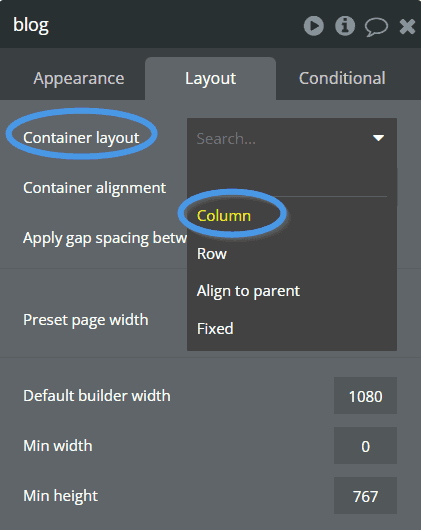
After you create a page, click on it to open its settings.
Then, from the Layout tab, click on the dropdown next to Container Layout and select Column.
Alternatively, you can select the Responsive tab in the top-left corner of the page editor and then click on Make Responsive.

If the layout of the newly added page is set to Fixed, the page settings window will open, prompting you to change it to a different layout.
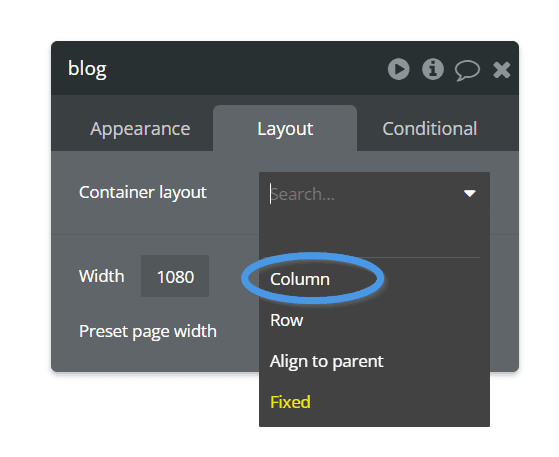
Select Column, and close the settings window.
Step 3: Add the HTML Element
Before heading to your DropInBlog account, look for the HTML element under the Visual Elements section on the left-hand side of the editor.
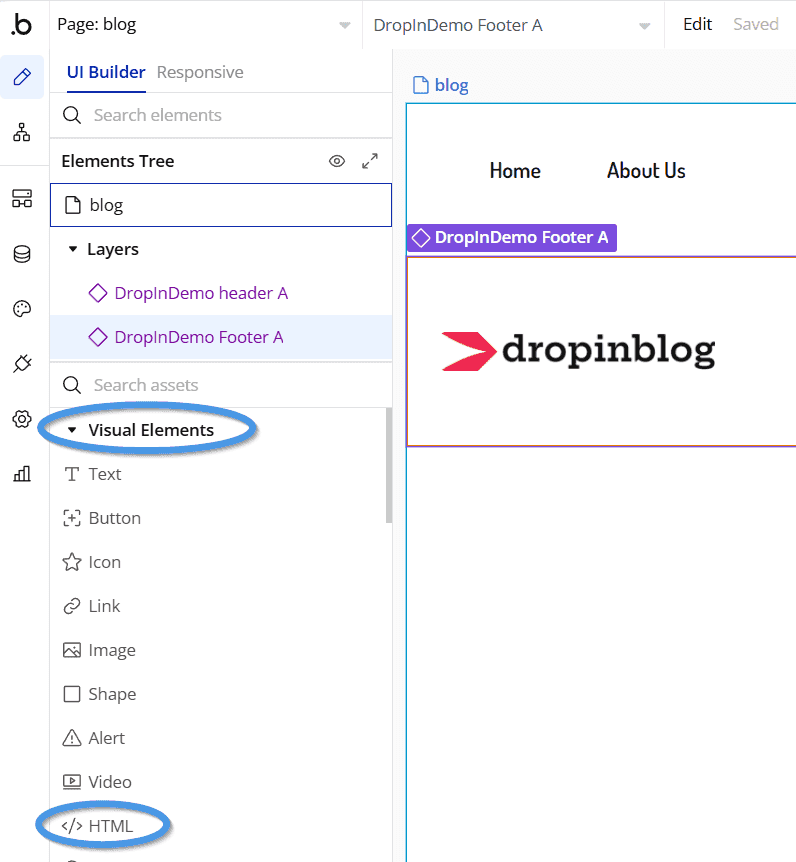
Click on it and drag it onto your blog page between the page header and footer.
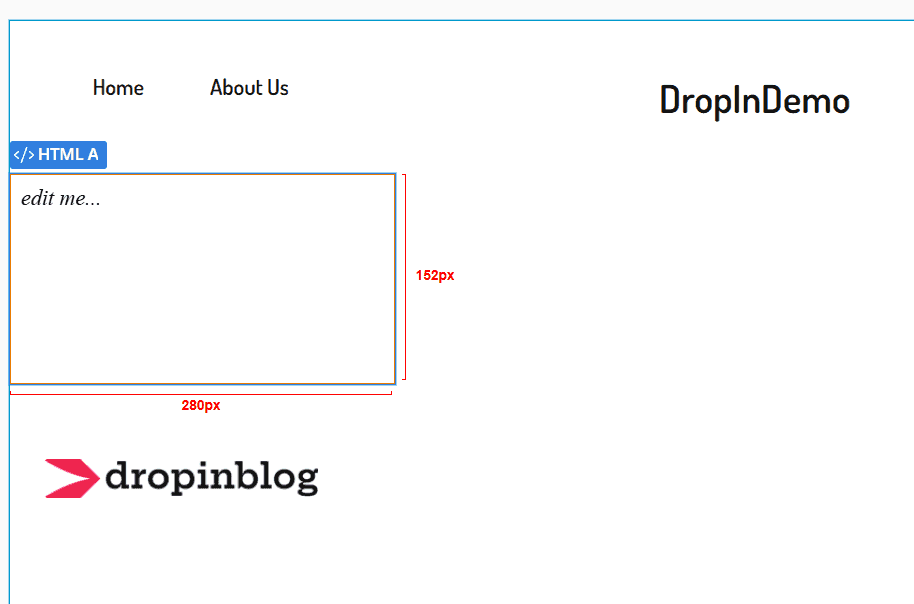
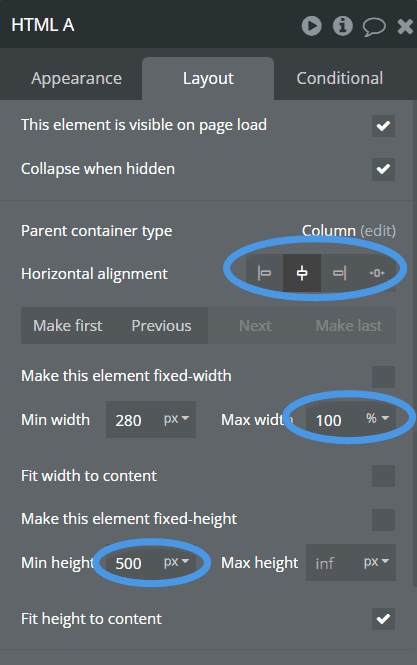
Once you add the HTML element, open the settings window by clicking on the HTML element, and from the Layout tab, adjust its width, height, and alignment.
Set Horizontal alignment to Centered, and uncheck the box next to “Make this element fixed-width.” Then, set the maximum width to 100% and the minimum height to 500 pixels.
Step 4: Add Your DropInBlog Code
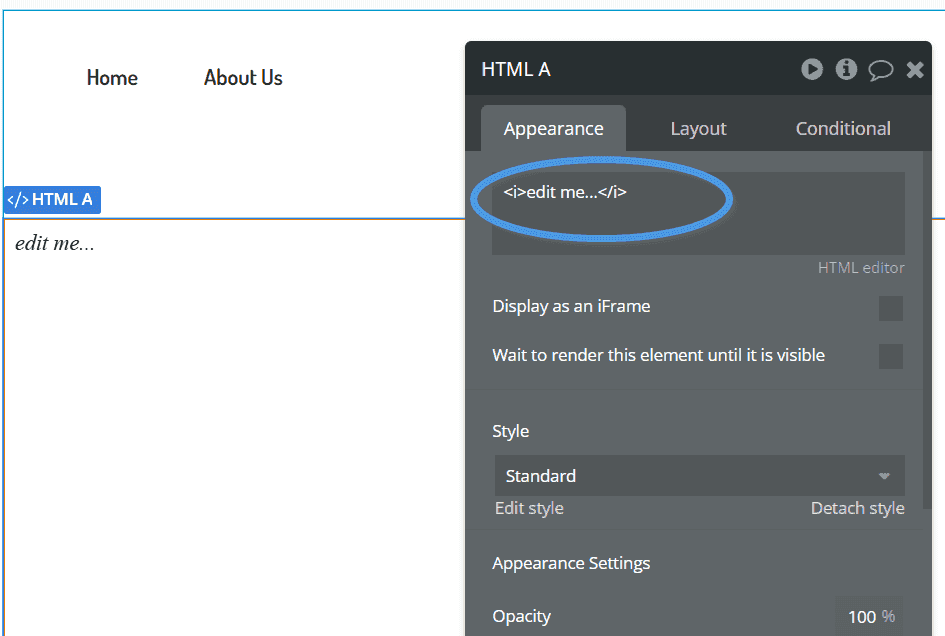
Click on the HTML box you just added to open the settings window.
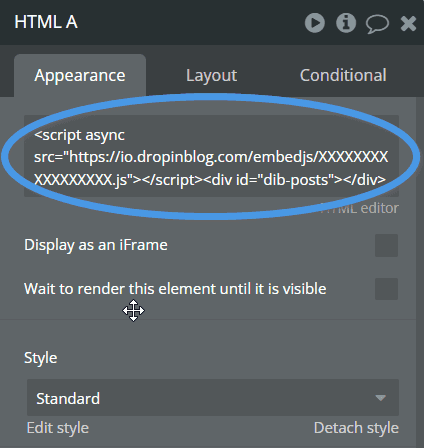
The first box under the Appearance tab is where you’ll paste the two lines of code from your DropInBlog account.
Next, log in to your DropInBlog account and click on the Code & Layout page to access your code.

Under the Blog Code section, you’ll find your two lines of code.
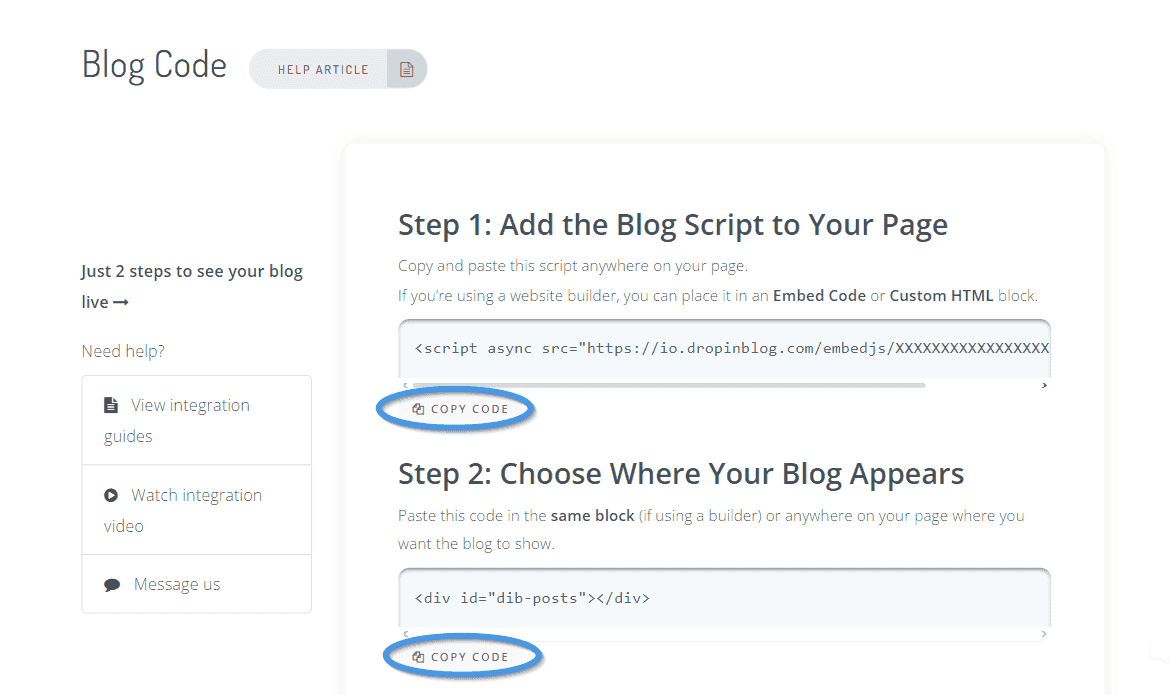
Copy the code under Step 1, then head back to your Bubble app and paste it into the HTML element you previously added. Return to your DropInBlog account, copy the code under Step 2, and paste it into your HTML element.
Step 5: Publish Your Blog Page
The next step is to publish the page you created.
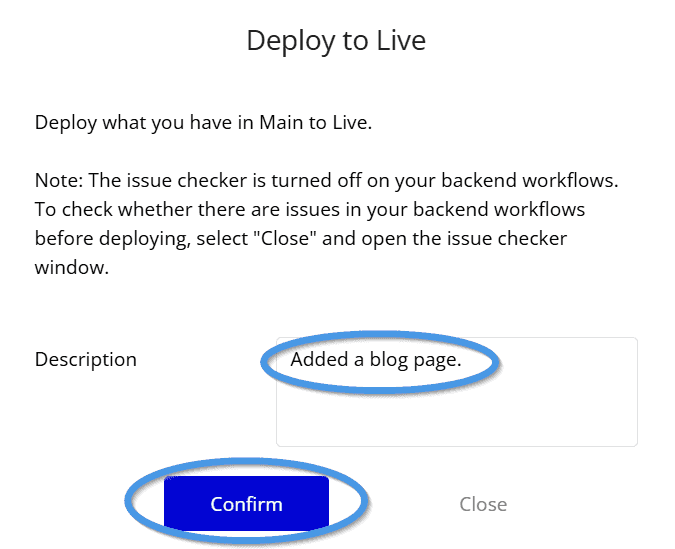
To do that, click on Main in the top-right part of the page, and in the slide-out window that appears, click on the Deploy to Live button.
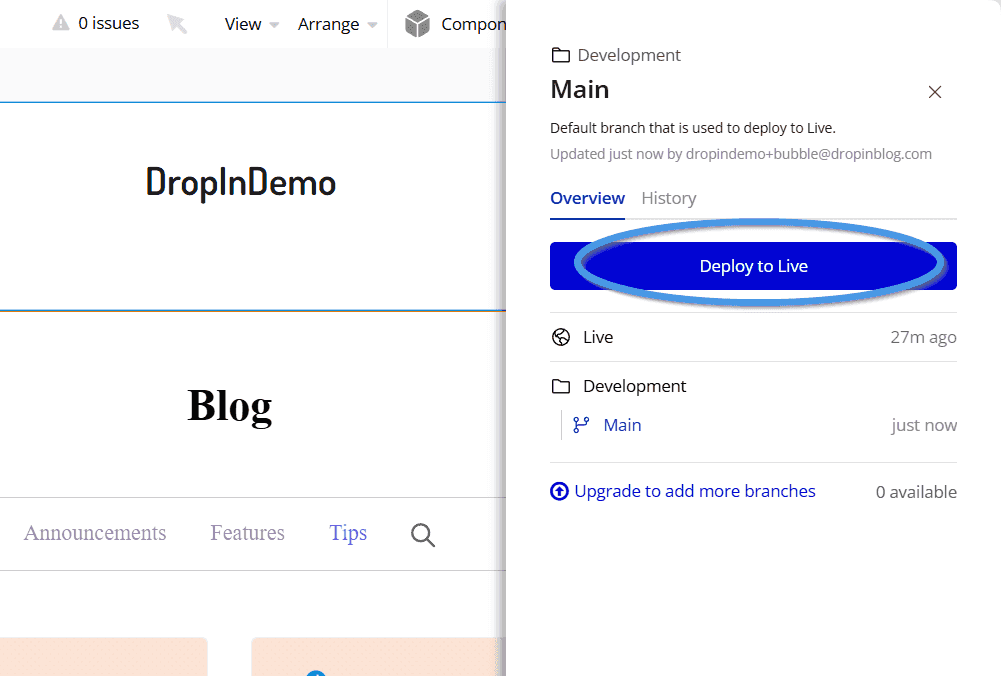
After that, you’ll see a popup window where you should write down the changes you made in case you want to revert your app to the previous state.
In this case, we added a blog page, which is what we’ll put as the description.
Click on the Confirm button to proceed.
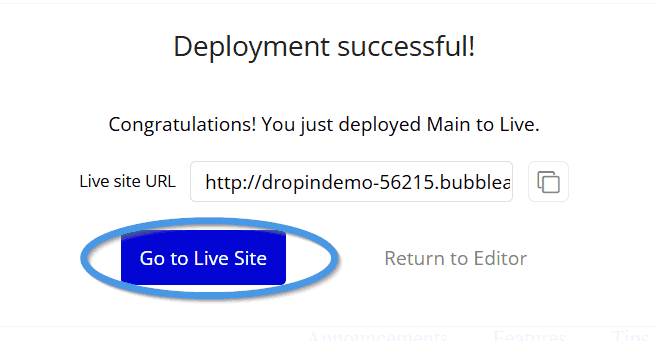
You’ll see a message that the deployment was successful, along with the link to your live site.
Click on Go to Live Site to view your site.
Step 6: Set Up Your Blog Link
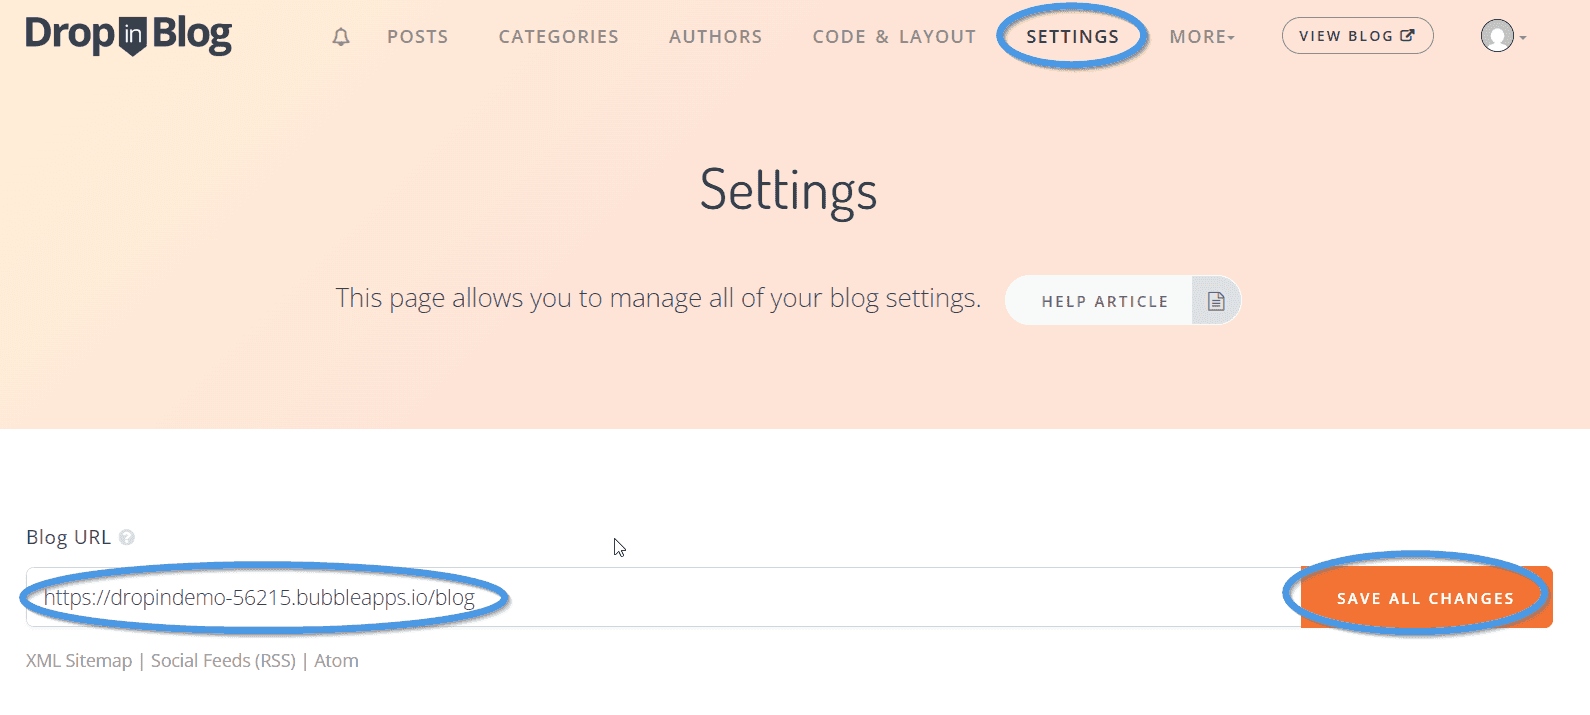
After you publish your blog page, open it in a new tab and copy its link address.

If the link takes you to your homepage, just add “/blog” at the end of the link and copy the URL with the appended part.
Then, go to your DropInBlog account and open the Settings page from the top navigation menu. Paste the link you previously copied into the text field under Blog URL and save the changes.
You have now successfully published your blog on Bubble!
Adding a Blog Link to Your Bubble App’s Navigation Menu
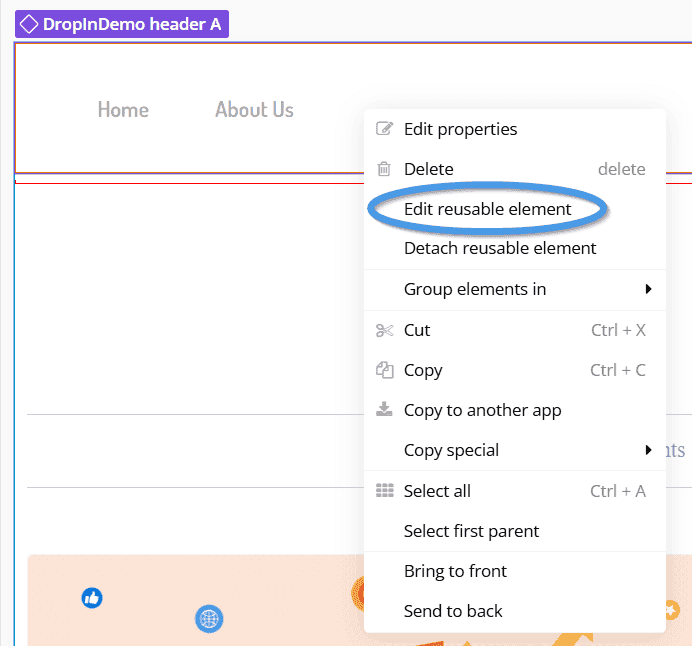
For this tutorial, we created a reusable header, and we’ll show you how to add a link to it.
To edit a reusable header, right-click on it, then select Edit reusable element.
Next, click on one of the header buttons to copy it and paste it using the keyboard shortcuts CTRL+C/CTRL+V (on Windows) or Command+C/Command+V (on Mac).

Click on the item you pasted, and in the settings window, under the Appearance tab, type in “Blog” under Show an icon instead of text. Make sure the link destination is set to an internal page, and select Blog from the dropdown next to Destination page.
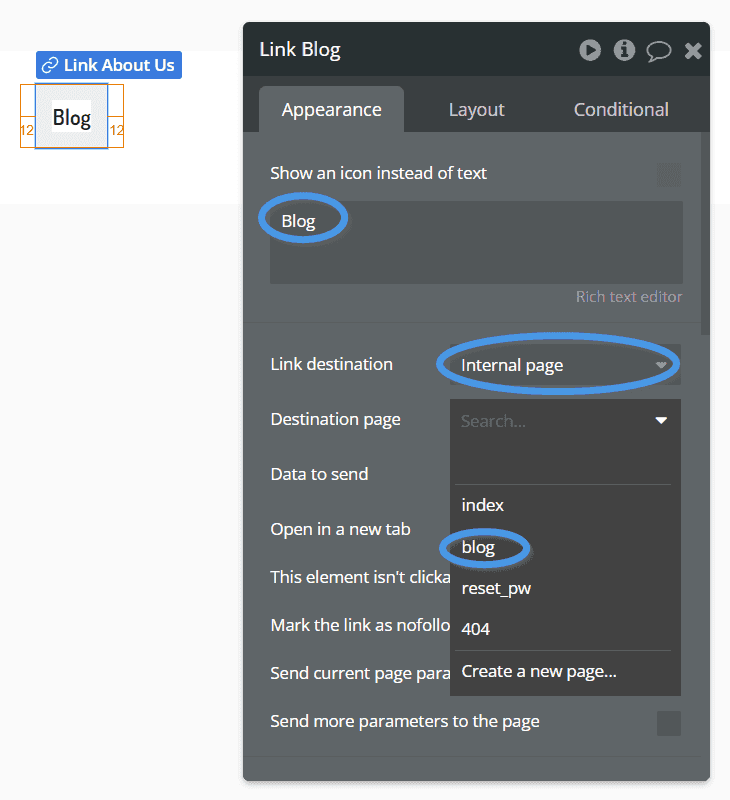
After that, select Main in the upper-right corner of the page, then Deploy to Live, and write down the changes you made to make these changes live.
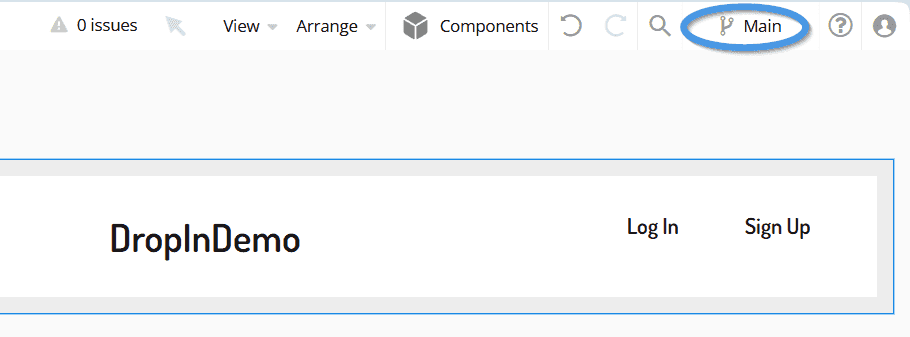
When you open your site in a new tab, the new menu item should appear in your header navigation.

Now your visitors can easily find your new blog.
Managing Your DropInBlog Posts
Once you have everything set up, you can start working on your blog content. To do that, you’ll need to go to your DropInBlog account.
Log in to your account, click on the Posts tab to access your blog posts, then select Add Post to create a new post and launch the DropInBlog editor.
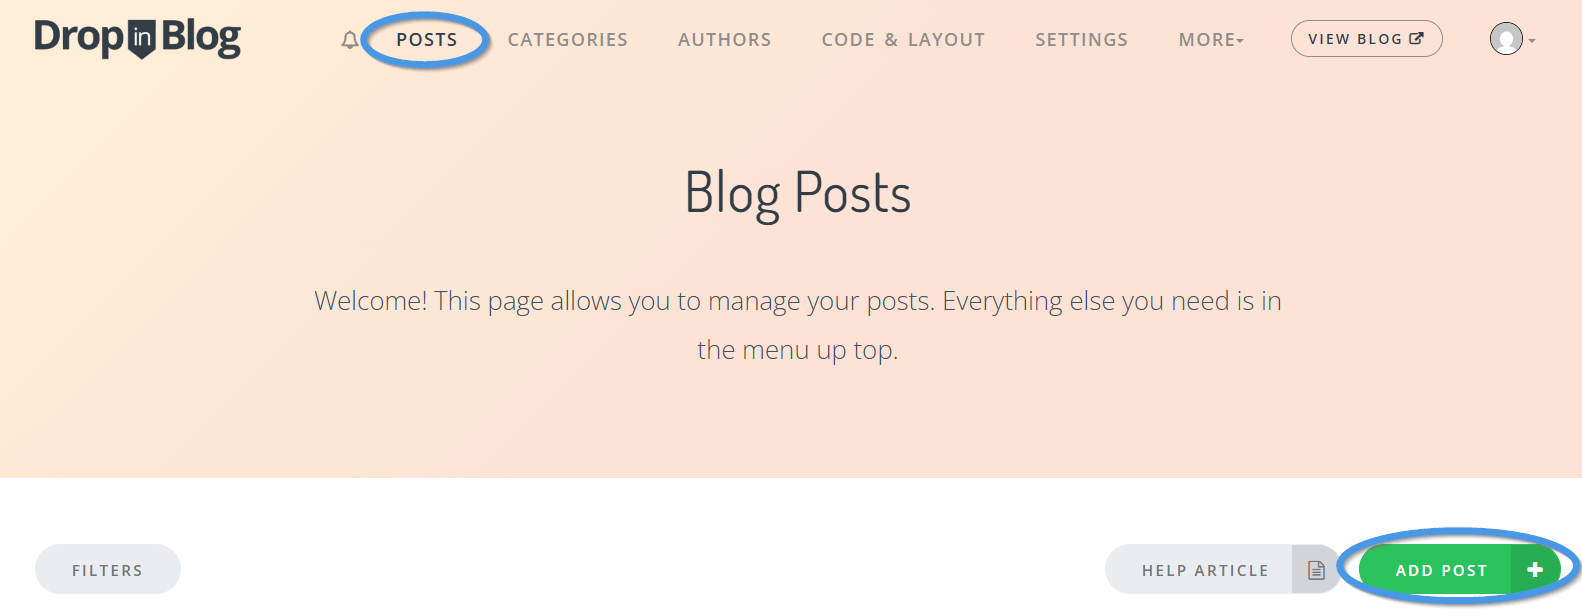
You can use the editor to format your content using headings, table of contents, and FAQs, among other platform features.
DropInBlog also allows you to add images, videos, and call-to-action buttons, as well as create reusable blocks of content called Smart Snippets™, so you’ll have plenty of options to tailor your content to your liking. Additionally, the blogging platform has a built-in SEO analysis tool designed to increase your content’s visibility in search engines. Using this tool, you can focus on creating content without worrying about how you’ll optimize it for search engines like Google.
When you publish a new post in your DropInBlog account, it will automatically show up in your Bubble app. You don’t need to do anything in Bubble to sync the content between these two apps. Like we said at the beginning, adding a blog to your Bubble app really is that simple!
Using a Subdomain or Headless CMS
The third option is to host your blog on a platform such as Ghost, WordPress, or a headless CMS, then connect it through a subdomain such as blog.yoursite.com.
This gives you a dedicated publishing system but separates the blog technically from your Bubble app. A subdomain can rank successfully, although a subdirectory such as yoursite.com/blog may provide a more unified experience and simpler site management when the setup supports it.
FAQs
Does Bubble have a built-in blog?
No. Bubble doesn't include a blog feature. You can build one using Bubble's database and dynamic pages, embed a third-party blogging platform through an HTML element, or host your blog separately on a subdomain.
Is Bubble good for SEO?
Bubble handles page-level basics well, as you can set titles, meta descriptions, and clean URL slugs. Where it gets harder is that Bubble renders pages dynamically with JavaScript, which slows indexing and page speed compared to static HTML. For app pages this rarely matters, but for blog content that depends on organic search, it does.
How do I set up a blog on Bubble?
To set up a blog on Bubble without going through a complex set-up process, you will need to use a native blogging app like DropInBlog. To add a blog with DropInBlog, all you have to do is add an HTML element to a page on Bubble and paste your DropInBlog code there.
Alternatively, you can use Bubble to create a blog, as well. To do that, you’ll need to create multiple pages in your Bubble app, one of which will contain the list of all your blog posts and the others for the blog content itself. This option is doable, but it’s far more complex than just adding two lines of code to an HTML element.
What is Bubble used for?
Bubble is a no-code app development platform used for creating web apps. The platform offers some powerful features that allow you to build an app without writing code.
Can I use Bubble for free?
Yes, you can use Bubble for free to explore the platform’s capabilities. However, if you want to publish your web app, you’ll need to subscribe to one of Bubble’s paid plans.
Over and Out
As you can see, creating a blog on Bubble doesn’t have to be complicated if you use a dedicated blogging app.
We hope that this tutorial will help you embed your blog into your Bubble app.
However, if you need help setting up your blog or you have any questions about DropInBlog, don’t hesitate to drop us a line.
Happy blogging!