
Quick look
In this HighLevel tutorial, you’ll learn how to:
Set up a phone system and email in your HighLevel account.
Add a professional blog to your HighLevel site.
Automate tasks and track sales and leads.
We’ll guide you through HighLevel’s fundamental features, show you how to set up and configure them, and discuss how these features can help agencies and businesses.
If you’re interested in our opinion of the platform, including features and pricing, you can check out our GoHighLevel review.
Table of Contents
How to Use GoHighLevel: Tutorial for Beginners
Before diving into the core features below, make sure you’ve completed HighLevel’s Launchpad checklist:
Connect your account to social media.
Connect payment accounts.
Connect a custom domain.
Set up your calendar.
Then we’ll show you how to set up, configure, and use the following features:
Twilio vs. LeadConnector for setting up a phone system
Mailgun vs. LeadConnector Mail for configuring your emails
DropInBlog for managing your blog content
Workflows for automating tasks
Pipelines for tracking sales and leads

Step 1: Set Up a Phone System in GoHighLevel: Twilio vs. LeadConnector
GoHighLevel gives you two ways to send text messages, make calls, and drop voicemails: you can either connect your own Twilio account, or you can use LeadConnector, which is GoHighLevel’s built-in phone system.
Twilio
Twilio is a third-party communication platform. If you connect your own Twilio account to your GHL dashboard, you’ll have more control.
You’ll be able to log into Twilio separately, buy numbers, see your detailed billing and logs, and even use more advanced tools like WhatsApp messaging. This is a great option for agencies that want full visibility and control over their phone setup, or already have a Twilio account they’re paying for.
To use Twilio in GoHighLevel, you’ll first need to create an account. They’ll give you something called an Account SID and Auth Token – your unique login credentials for connecting Twilio to GHL.
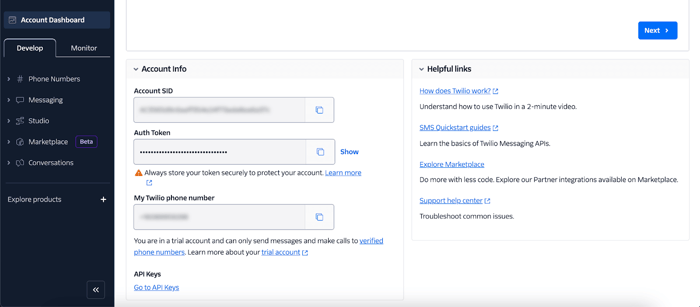
Once you have those, contact HighLevel’s support and ask them to enable Twilio for your account. You’ll need to provide them with your Account SID and Auth Token numbers, then wait for them to set it all up.
LeadConnector
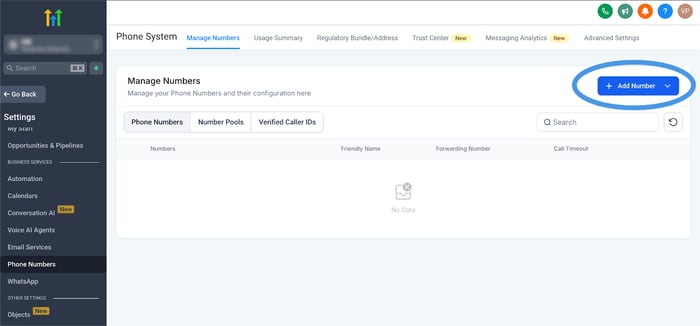
LeadConnector is the default phone system for all new GoHighLevel accounts that works out of the box.
When you go to Settings → Phone Numbers inside a sub-account, you’ll be able to instantly add a number. Once you’ve added a number, you can start sending texts, making calls, and using it in workflows.
Twilio vs. LeadConnector: What’s the real difference?
Twilio gives you more control, but LeadConnector is way easier to get started with.
With Twilio, you pay Twilio directly. You can manage multiple clients using sub-accounts, handle custom phone setups, and dive deeper into delivery logs and API tools. But you’ll also need to manage your own billing and compliance. As mentioned, you’ll even need to request GoHighLevel support to enable the Twilio option.
With LeadConnector, GoHighLevel takes care of everything for you. You still pay for the messages and calls you send, but the billing happens right inside your GHL account. You can also pass those costs onto your clients automatically using the rebilling feature.
One thing to keep in mind: if you're using a trial Twilio account, you won’t be able to send messages to real customers unless you upgrade. You’ll also be limited to messaging only verified numbers. That’s not the case with LeadConnector, which works without those restrictions right away.
Twilio vs. LeadConnector: Which one should you choose?
If you already have a Twilio account, need more advanced tools, or want control over your clients’ phone systems, Twilio is a strong option. But if you’re just getting started and want to move quickly, LeadConnector is usually the better choice.
Step 2: Set Up Email in GoHighLevel: Mailgun vs. LeadConnector Mail
When it comes to sending emails through GoHighLevel, you can either connect your own Mailgun account or use GoHighLevel’s built-in solution called LeadConnector Mail. Both options allow you to send marketing emails, automation emails, and appointment reminders, but the setup and level of control are very different.
Mailgun
When you connect your own Mailgun account to GoHighLevel, you’re choosing to manage your email system directly. That means you’ll handle deliverability, set up your domain authentication, and be able to view email logs and analytics inside Mailgun’s own dashboard.
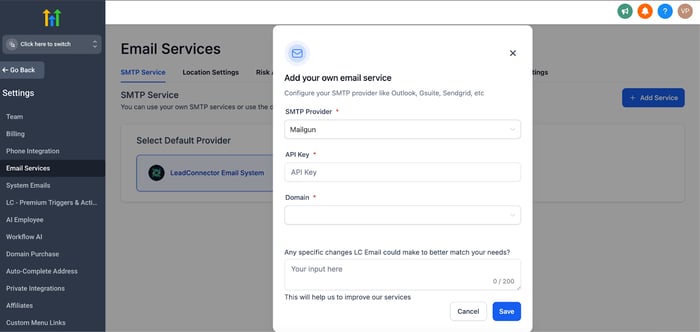
To use Mailgun, you first need to sign up, select a plan, and connect a subdomain. You’ll need to create a sending subdomain (e.g., email.yourdomain.com) and add DNS records to verify it. Once those records are added and verified, you can head back into your GoHighLevel dashboard, go to Settings → Email Services, and click on Add Service.
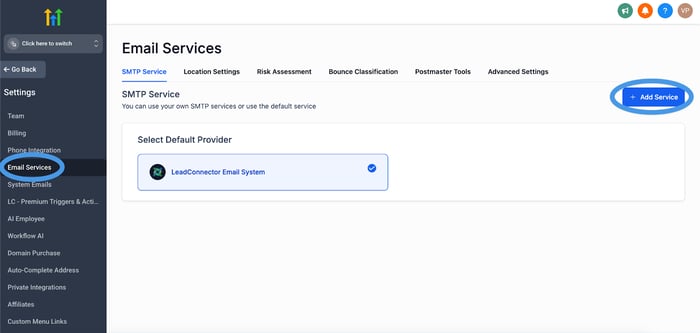
Then paste in your Mailgun API key and the subdomain you created. That’s it – your Mailgun setup is complete.
LeadConnector Mail
LeadConnector Mail is GoHighLevel’s built-in email system. As soon as you create a sub-account, you can start sending emails using LeadConnector Mail.
The main benefit of LeadConnector Mail is that it’s incredibly easy. You don’t have to worry about verifying a domain, setting up a subdomain, or copying over DNS records. You can send automated emails from workflows, drip campaigns, and more.
Mailgun vs. LeadConnector Mail: What’s the Difference?
Control. If you use Mailgun, you manage your own sender reputation and email delivery. You can monitor logs, fine-tune deliverability, and make sure your emails are reaching inboxes. With LeadConnector Mail, you give up some of that control in exchange for convenience.
Also, if you’re an agency, Mailgun lets you create sub-accounts for each client, which is useful if you want to bill them separately for email usage or monitor delivery per account. That’s something you can’t do with LeadConnector Mail right now.
On the other hand, if you’re just getting started or don’t want to worry about all the techy stuff, LeadConnector Mail is the easier path.
One thing to remember: if you decide to use Mailgun’s free plan, there are limitations. You can send emails, but you can’t receive them unless you upgrade. That’s not an issue for most marketing emails, but it’s good to know.
Mailgun vs. LeadConnector Mail: Which One Should You Choose?
If you want to just start sending emails without any setup, you should use LeadConnector Mail. However, if you need more control, better deliverability, or you plan to scale email campaigns across multiple clients, you should use Mailgun.
Step 3: Add a Blog to GoHighLevel with DropInBlog
HighLevel allows you to add third-party software for functionalities that are either completely missing from its out-of-the-box toolset or are quite rudimentary, such as a blog. Content marketing is a no-brainer for any contemporary business, and you’d be hard-pressed to find a business that can’t benefit from a well-thought-out blog.
When it comes to blogging from your GHL account, DropInBlog gives you access to the world of SEO and content marketing. Just like Twilio and Mailgun, blogging with DropInBlog requires a DropInBlog account, which you can test for free.
The DropInBlog setup process consists of several easy-to-do steps:
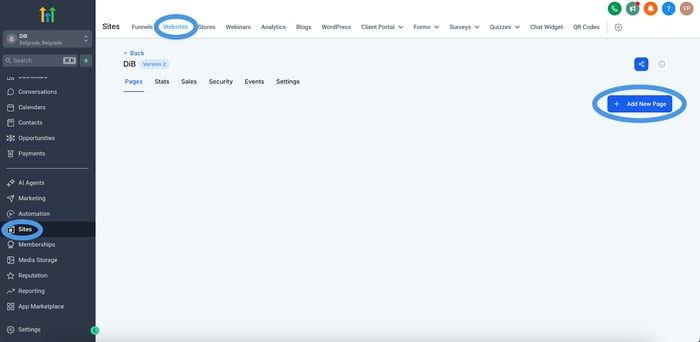
- From within your GoHighLevel account, navigate to Sites → Websites, click on your website, then click on Add New Page. Name it appropriately (“Blog” or something along those lines).
Add a custom code element.
Copy a few lines of code from your DropInBlog account and paste them into your blog page’s custom code section.
Save the page and copy its URL.
Paste the URL into your DropInBlog account, and you’re done!
For an easy-to-follow visual guide, check out How to Create a Blog on GoHighLevel.
Step 4: Automate GoHighLevel With Workflows
In the past, GoHighLevel used a feature called Campaigns to automate marketing messages like SMS, emails, and voicemails. While Campaigns are still available in some accounts, most users today build automations using the newer and much more flexible Workflows tool.
Workflows are essentially automations. With this feature, GoHighLevel allows you to automate things like sending messages, emails, assigning tasks, and triggering actions when something happens. A workflow lets you decide what happens and when it happens by setting up a sequence of events based on time, triggers, or conditions.
Let’s see what this looks like in practice.
In GoHighLevel, workflows are found under the Automation section. When creating a new workflow, you can start from scratch or use one of the “Recipes” that GoHighLevel has set up. First, you need to choose a trigger – this is what starts the workflow. It could be a form submission, an appointment being booked, a tag being added to a contact, or something else entirely.
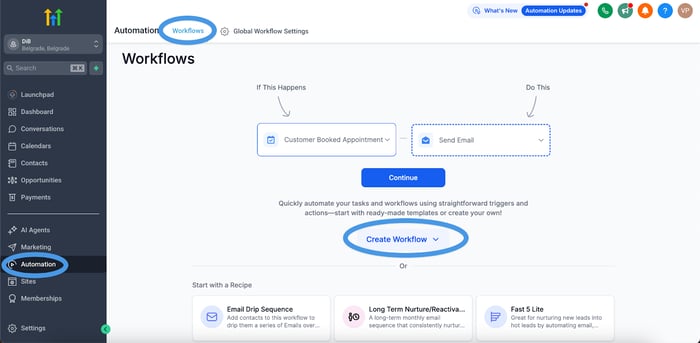
Once your trigger is set, the rest of the process is about building out what happens next. This includes adding actions like sending an automated SMS, email, voicemail, or creating a task for your team to follow up. You can also add time delays (for example, wait two days before sending a reminder) or use filters and conditions to decide who should receive what.
HighLevel lets you choose from various actions, including:
Send SMS
Send email
Voicemail
Phone call
Messenger
Wait (delays between steps)
Webhook (sends data from GoHighLevel to other apps)
Add task
Assign to user
If/else logic (different paths depending on contact behavior)
Remove contact
Internal notification (send alerts to your team)
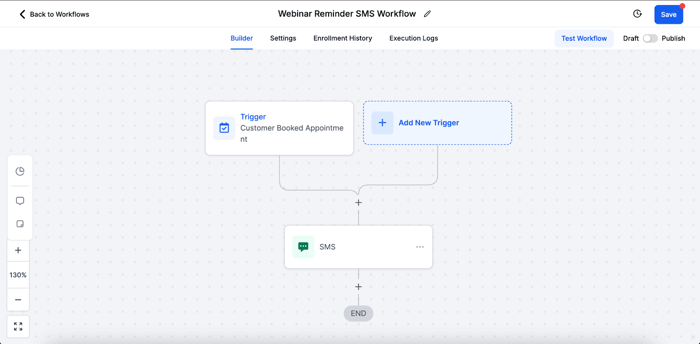
In addition to just adding events and actions, you also need to configure when those things happen. Like in the old Campaigns system, you can space out each step over time. For example, you can send a welcome email as soon as someone books a call, then wait one day and send a follow-up SMS, then wait two more days and drop a voicemail.
Here’s an example of a Workflow where a confirmation SMS goes out to the customer once they book an appointment.
Step 5: Tracking Sales and Leads in HighLevel with Pipelines
A pipeline is basically a visual sales board. It shows you all the steps someone goes through as they move from being a potential lead to becoming a customer.
Let’s take a look at what this looks like in action.
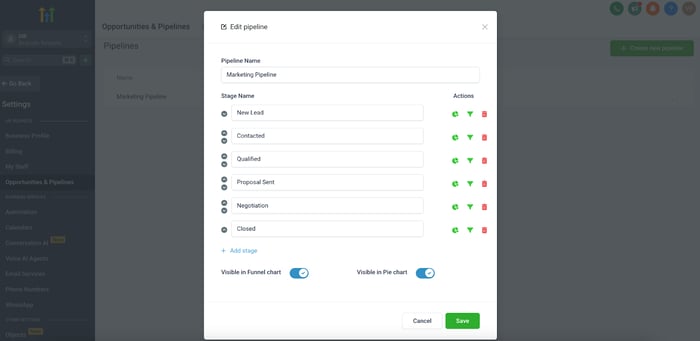
In the screenshot, you can see an example of a pipeline called “Marketing Pipeline.” It’s made up of six stages:
New Lead
Contacted
Qualified
Proposal Sent
Negotiation
Closed
Each one of these stages represents a different phase in the sales process. As your leads progress, you move them from one stage to the next by simply dragging and dropping their contact card. For example, when someone first comes in, they’re placed in the “New Lead” stage. After you’ve reached out to them, you’d move them to “Contacted,” and so on.
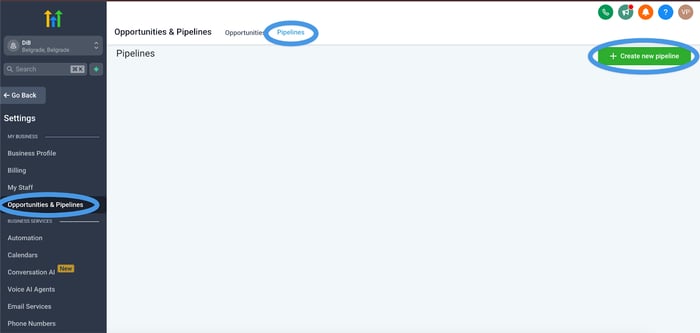
To create a new pipeline in GoHighLevel, go to Settings → Opportunities & Pipelines → Pipelines, and click on “Create New Pipeline.” The first step is to name your pipeline something clear and specific. Don’t just call it “Pipeline 1” – give it a name that reflects its purpose so you’ll still recognize it months later.
The next step is to build and name the stages of your pipeline. Think of each stage as answering the question: “What’s happening at this point in the process?” A good stage name tells you what the lead status is and helps your team understand what needs to happen next.
There’s no rule for how many stages you should create. Some pipelines have three or four stages, others have eight or more. It depends entirely on your business and how your sales process works. Just make sure the stages make sense to you and your team.
You’ll also notice a few icons next to each stage in the screenshot:
The green pie chart icon means this stage will show up in your conversion reports, so you can see how many leads are in each phase.
The green funnel icon includes the stage in your funnel chart view, which is helpful for visualizing how leads move through your pipeline.
The red trash can lets you delete a stage.
The up/down arrows let you reorder the stages if you need to change the flow.
At the bottom of the pipeline, you’ll also see toggles that let you decide whether this pipeline is visible in your funnel chart and pie chart. These are usually turned on by default, but it’s good to know what they do – these settings control whether your pipeline data shows up in the reporting section.
Finally, keep in mind that you’re not limited to just one pipeline. You can create as many as you need. For example, you might create one for sales, another for onboarding, and another for upsells. And if your process changes later, you can go back in and edit any of your pipelines at any time.
GHL: A One-Stop Sales and Marketing Solution
As a one-stop sales and marketing platform, GoHighLevel covers multiple aspects of today’s businesses. The following is a list of what it offers, along with some of the platforms it replaces:
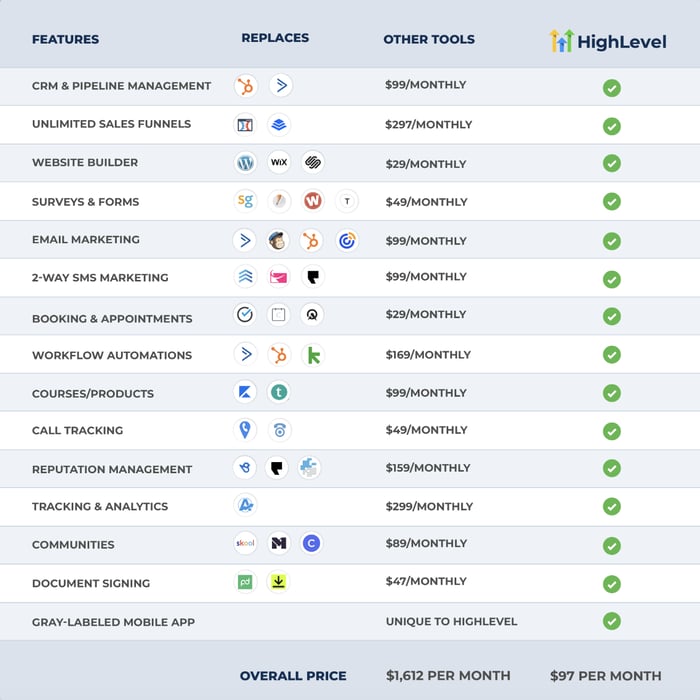
Beginner Mistakes
Getting started with HighLevel is overwhelming, and the image above explains why. You get all these tools at once and you want to start quickly, which leads to these mistakes:
Not having a clearly defined product or service before getting started: The platform is powerful and can do a lot for your business, provided you have a clear picture of your business and your audience.
Learning without doing: Many users focus on learning everything about the platform without putting that knowledge into practice. When you go through this HighLevel tutorial, actually set up your domain, add a site and a blog – don’t just move on to the next step.
Overbuilding workflows early: Using Workflows, you can put many tasks on autopilot. However, if you add too many unnecessary steps at the beginning, you’ll end up spending a lot of time fixing them.
Ignoring content/SEO: Ignoring these two leaves your business growth and visibility to ads. A simple path to organic traffic is to start a blog, and with DropInBlog, this is one of the easiest tasks you’ll do for your HighLevel site and funnels.
Add a blog to your HighLevel site in under 3 minutes.
How Much Does HighLevel Cost?
HighLevel has a three-tiered pricing model, with each service tier being suitable for (slightly) different customers:
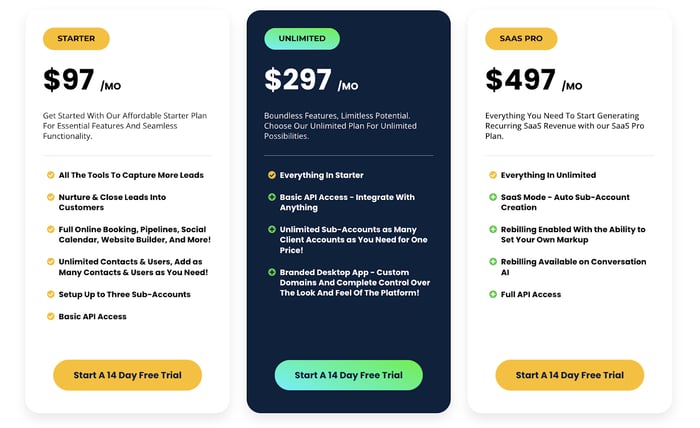
GHL doesn’t have a free offering like HubSpot or some other platforms, but it offers a 14-day free trial that allows you to kick the tires of the Starter, Unlimited, or SaaS Pro plan.
Who Is GoHighLevel For?
Even though GHL mostly leans toward agencies, various other businesses have used it and benefited from it.
The Starter plan can help small businesses of any type with small budgets to capture more leads, track their audience, automate marketing and communication with customers, manage their reputation, and a lot more for a very fair price.
The Unlimited plan can work perfectly for growing agencies, while the SaaS Pro plan is well-suited for agencies looking to offer white-labeled SaaS solutions.
It all depends on what exactly a business needs. Not every plan will work for everybody, but on the other hand, there’s a plan for virtually everybody.
FAQs
Is GoHighLevel suitable for small businesses?
Yes! GoHighLevel is absolutely suitable for small businesses. While it’s often marketed toward agencies, the platform includes all the tools a small business might need to grow, like automated follow-ups, appointment booking, CRM, and reputation management.
What is the difference between HighLevel and GoHighLevel?
This is a common question, but there’s no difference between HighLevel and GoHighLevel – they’re just two names for the same platform.
“GoHighLevel” is the domain name (gohighlevel.com) because when founder Shaun Clark went to register the name “HighLevel,” the domain wasn’t available. So he went with “GoHighLevel” instead.
Today, the company is officially called HighLevel, but many users still use the terms interchangeably, especially when referring to the website or searching online.
Can you build a website with GoHighLevel?
Yes, GoHighLevel includes a drag-and-drop website builder that allows you to build full websites, landing pages, and funnels without writing any code. You can also add a blog to your site using GHL's built-in blog tool or third-party tools like DropInBlog.
Is GoHighLevel a CRM?
GoHighLevel includes a powerful built-in CRM that helps you track leads, manage customer relationships, and automate your entire sales pipeline. While it’s not just a CRM, it fully replaces tools like HubSpot or Pipedrive for most users.
Does GoHighLevel replace ClickFunnels?
Yes, GoHighLevel can fully replace ClickFunnels. It includes funnel builders, sales tracking, email marketing, and automation – all within the same platform. Many agencies and marketers use GHL to consolidate what they previously handled in ClickFunnels, ActiveCampaign, and other tools.
Over and Out
There are so many noteworthy GHL features that we didn’t touch upon here: website builders, email builders, landing pages, etc. Our modest objective here was to show you that, when it comes to sales and marketing, GoHighLevel is just like a Swiss army knife.
In addition to this, we wanted to help you gain at least some idea of how this up-to-the-minute and increasingly popular platform works at the most basic level.
If you’re using GoHighLevel (or thinking about it) and want to include a blog in your marketing strategy, use DropInBlog. If you need help setting it up, feel free to reach out. We’re always happy to help.