
Key Takeaways
- The best way to add a blog to your HighLevel site is with DropInBlog!
- The free trial and quick setup let you test it in a few minutes.
- DropInBlog has different pricing plans for individuals and teams.
There are two ways to add a blog to your GoHighLevel website: the platform's built-in blog feature, or embedding a dedicated blogging app like DropInBlog. In this guide, we'll show you both: how to set up GHL's native blog, where it falls short, and how to add a fully SEO-optimized blog with DropInBlog in a few minutes.
HighLevel's native blog has improved: it now supports meta titles and descriptions, custom URL slugs, categories, authors, and XML sitemaps. For a basic company blog, it can be enough.
But HighLevel is a sales and marketing platform first, and its blog still has no SEO analysis tool, no FAQ or video schema, no AI-search optimization, and no reusable content blocks. If organic traffic is the goal, those gaps become a bigger problem with every post you publish.
The fastest, most straightforward way to add a high-performing blog to your GoHighLevel site in 2026 is with DropInBlog.TL;DR: Blogging on HighLevel – HighLevel vs. DropInBlog
- GoHighLevel has a native blog feature, which is fine for basic posts, but it lacks an SEO analyzer, FAQ/video schema, and AI-search optimization.
If you want to create content that’s optimized for traditional and AI search engines and scale it without hiccups, you’ll need DropInBlog.
DropInBlog integrates seamlessly with HighLevel, inheriting your site’s design and taking only a few minutes to set up.
Table of Contents
- Key Takeaways
- TL;DR: Blogging on HighLevel – HighLevel vs. DropInBlog
- Option 1: GoHighLevel's Native Blog (Quick Setup)
- Why DropInBlog Is the Best Blogging Option for HighLevel
- Option 2: Add a Blog to GHL with DropInBlog (Recommended)
- GHL Blog Setup Checklist:
- Step 1: Create a Blog Page in HighLevel
- Step 2: Add a Custom Code Element to Your HighLevel Blog Page
- Step 3: Get Your DropInBlog Code for Your HighLevel Website
- Step 4: Add Your Blog Link to Your DropInBlog Account
- Step 5: Publish Your New GHL Blog
- Step 6: Add Your Blog Page to Your HighLevel Website’s Menu
- How to Style Your New Blog to Match Your HighLevel Site
- Blogging for Agency Clients at Scale
- Best Practices for Blogging on HighLevel in 2026
- Manage Your Blog with DropInBlog
- FAQs
- Over and Out
Option 1: GoHighLevel's Native Blog (Quick Setup)
If you just need a simple blog and aren't chasing search rankings, GHL's built-in feature will do the job. Here's the short version:
In your GHL dashboard, go to Sites → Blogs and click Create Blog.
Enter your blog title, select your connected domain, and set a slug (e.g., /blog).
Click New Post to open the editor, add your title, cover image, and content.
Fill out the SEO details section: meta title, description, keywords, and URL slug, and publish or schedule the post.
To display posts on your site, go to Sites → Websites, open your page, and add the Blog Posts element.
Generate an XML sitemap from Domains → Manage → XML Sitemap, select the pages you want included, click Generate & Save, then submit the sitemap URL to Google Search Console.
You can also import existing posts via CSV, organize posts with categories, and add authors.
That's genuinely useful for a basic setup. The problems start when you want your blog to rank, which is what the next section covers.
HighLevel’s Built-In Blog Limitations
| HighLevel native blog | DropInBlog | |
|---|---|---|
| Meta titles, descriptions & custom slugs | ✓ Yes | ✓ Yes |
| XML sitemap | ✓ Yes | ✓ Yes |
| Categories & authors | ✓ Yes (basic) | ✓ Yes (advanced author profiles) |
| Blog schema | ✗ No | ✓ Yes |
| Built-in SEO analyzer & content scoring | ✗ No | ✓ Yes |
| AI search optimization (Mention Boost™) | ✗ No | ✓ Yes |
| Reusable content blocks (Smart Snippets™) | ✗ No | ✓ Yes |
| Text-to-speech (Blog Voice AI™) | ✗ No | ✓ Yes |
| Works across client sub-accounts at scale | Limited | ✓ Yes |
Why DropInBlog Is the Best Blogging Option for HighLevel
In contrast, DropInBlog offers a wealth of features that make it the preferred blog integration method for HighLevel sites:
Quick and simple setup: DropInBlog integrates into HighLevel with just two lines of code. You only need a few minutes to launch your blog.
Fully SEO-optimized: With DropInBlog, you can create SEO-friendly content with the help of the built-in SEO analysis tool. Furthermore, all blogs are optimized for speed, and BlogPosting, VideoObject, and FAQPage schema data is automatically added. Plus, you have full control over your content’s metadata.
MentionBoost™: You can structure your content to increase its chances of appearing in AI searches. Simply follow the suggestions from Mention Boost™.
Blog Voice AI™: The blogging platform also has a text-to-speech engine, contributing to your blog’s accessibility and increasing user engagement.
Smart Snippets™: With this feature, you can create an image, text block, or signup form in a single place and reuse it across your blog.
No coding required: Creating a blog on HighLevel with DropInBlog is an intuitive process that doesn’t require any coding skills. Neither does managing your GHL blog.
Designed for performance: Lazy loading and image compression are only some of the many ways DropInBlog blogs achieve fast loading times. And, as you know, search engines love fast sites (and blogs).

Option 2: Add a Blog to GHL with DropInBlog (Recommended)
GHL Blog Setup Checklist:
Create a new page.
Add a custom code element.
Paste in your DropInBlog blog snippets.
Add your HighLevel blog URL to DropInBlog.
Create a menu item for your new blog page.
Step 1: Create a Blog Page in HighLevel
Log in to your HighLevel account, select the Sites tab from the sidebar, and then click on Websites in the menu at the top.
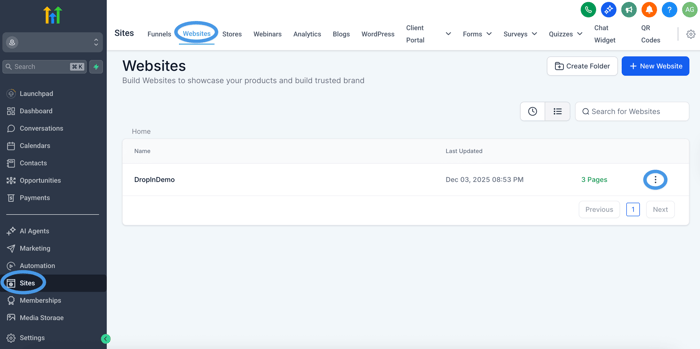 HighLevel dashboard: Websites tab within the Sites menu
From there, you’ll be able to select the website you wish to edit by clicking on the three-dot menu on the right.
Within your website editing view, click on Add New Page in the top right.
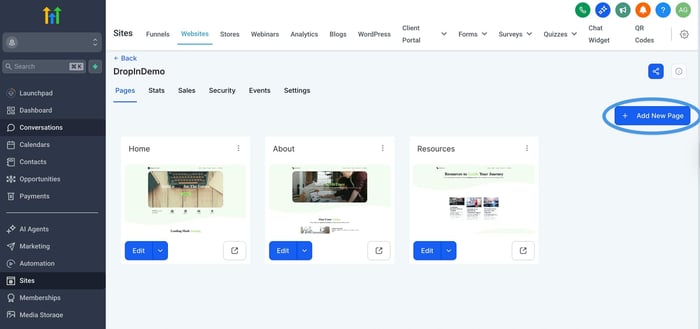 Adding a new page in HighLevel’s Websites tab
On the following screen, enter the page name and path. We’ll use “Blog” for the page title and set the path, i.e., the URL slug, to “blog.”
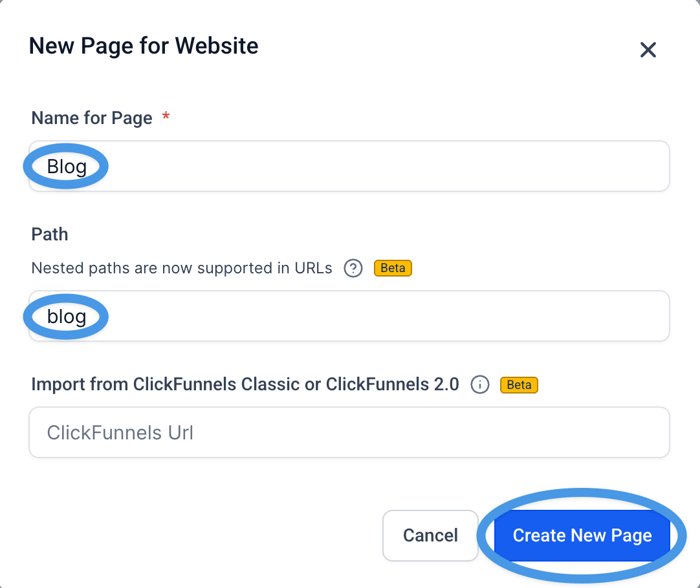 Page settings for a new blog page in HighLevel
Upon clicking on the Create New Page button, you can choose whether you want to create a blank page or clone an existing one.
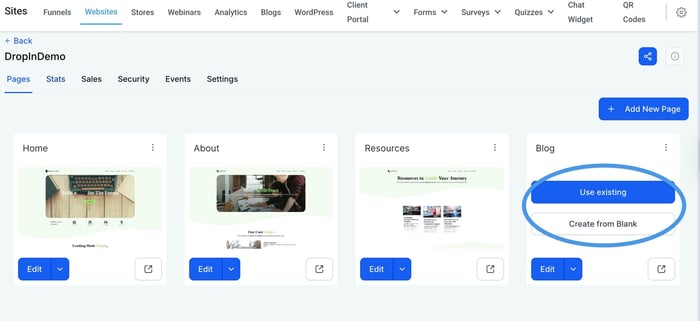 Creating a new blog page in HighLevel: Choose an existing page or create from blank.
For this HighLevel blog tutorial, we selected the Use existing option, which allows us to select the page we want to copy and import all of its elements into our new page.
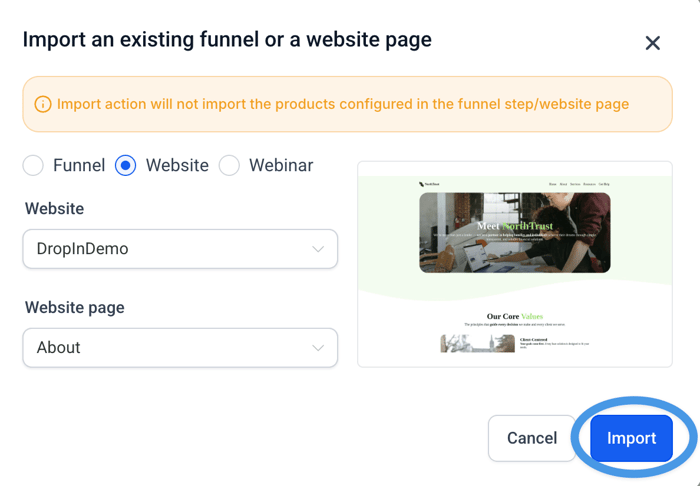 Importing an existing webpage in HighLevel
If you decide to use an existing page for your blog, delete all the unnecessary elements before proceeding to Step 2.
Step 2: Add a Custom Code Element to Your HighLevel Blog Page
Before you can add an element to your new page, you’ll first need to add a Section, and within that section, a Row.
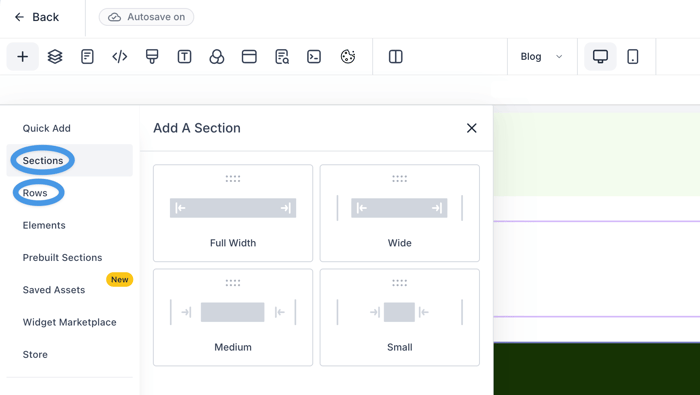 Adding sections and rows to a new blog page in HighLevel
Then, within the row on the page, click on the plus sign icon on the upper left to select the Elements tab and find Code in the Custom section.
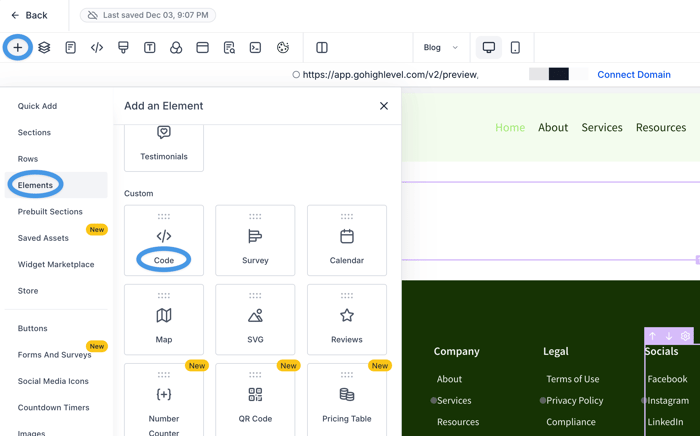 Adding sections and rows to a new blog page in HighLevel
To edit the code within this new element, click on it, then select Open Code Editor in the right-hand sidebar.
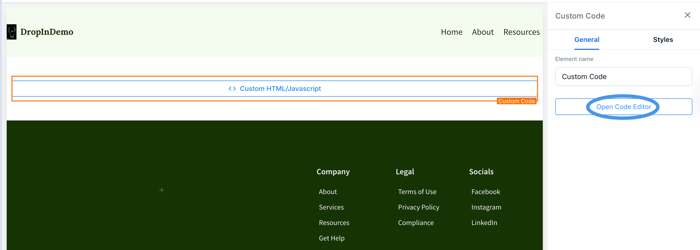 Accessing HighLevel’s code editor from within the page builder
Step 3: Get Your DropInBlog Code for Your HighLevel Website
Next, log in to your DropInBlog account and select Code & Layout from the main navigation. In the Blog Code section, find and copy the code shown in Step 1 and Step 2, which looks something like this:
Step 1 code:
<script src="https://io.dropinblog.com/embedjs/XXXXXXXXXXXXXXXXX.js"></script>
Step 2 code:
<div id="dib-posts"></div>
Switch back to your GoHighLevel website and paste the code into the code editing area. Once you’ve added the code, hit the Save button just underneath the code editing area.
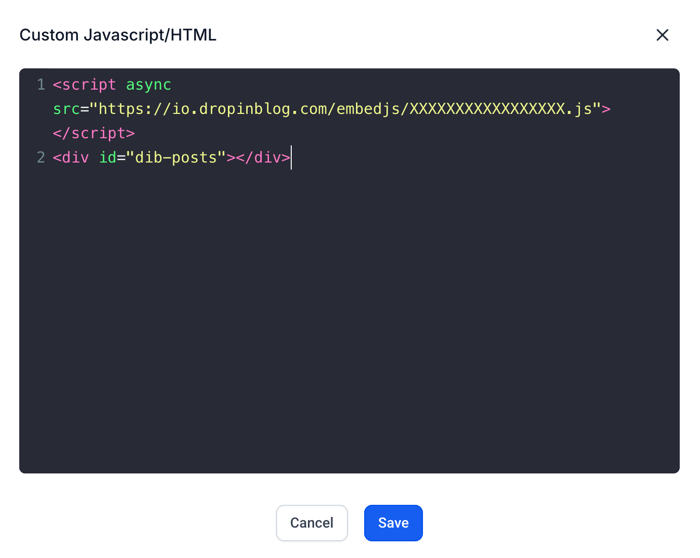 Adding DropInBlog code inside HighLevel’s code editor
To check that everything works correctly, click the two icons in the top-right corner next to Publish: first Save, then Preview.
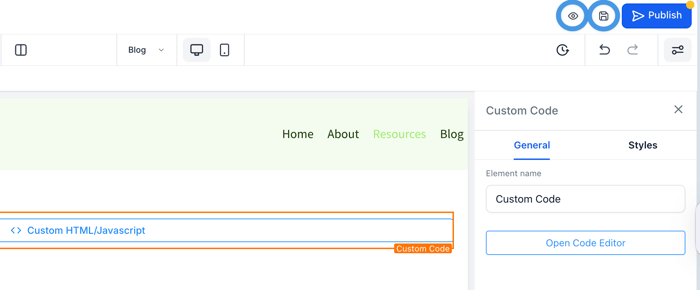 Preview your new GHL blog page
If your blog is displayed as it should, move on to the next step.
Step 4: Add Your Blog Link to Your DropInBlog Account
Go back to DropInBlog and select Settings from the main navigation. Locate the Blog URL field and add your GoHighLevel blog URL, which you created earlier. This will be your website domain, followed by the page path. For example, my blog URL is https://website.com/blog/.
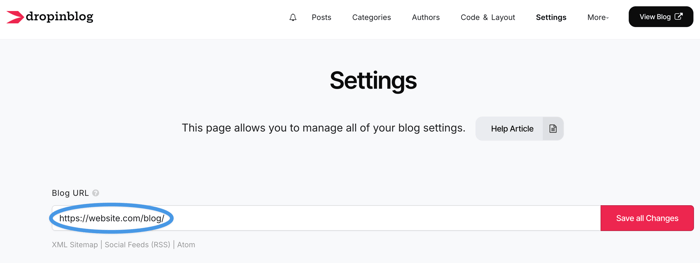 Connecting HighLevel with DropInBlog: Paste the blog URL on the DropInBlog settings page
Hit Save all changes in the DropInBlog settings and return to your HighLevel website.
Step 5: Publish Your New GHL Blog
Finally, hit Publish in the top right corner of the HighLevel website editor, select the domain where you want to publish your blog, and click on the Save button to confirm your choice.
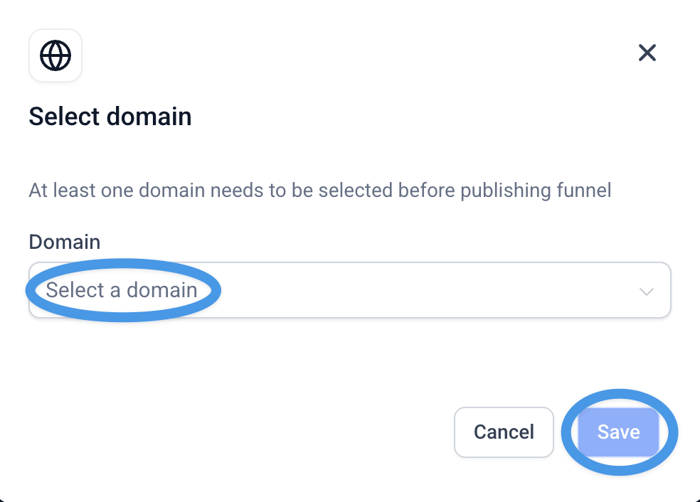 Publishing the new blog page on Highlevel
Then, click on the eye icon in the top-right to navigate to your new blog page to test out your new and fully functioning blog. ✨
 HighLevel blog created with DropInBlog: Blog preview
Step 6: Add Your Blog Page to Your HighLevel Website’s Menu
To add a link to your blog, access your site from the Sites tab in your GoHighLevel dashboard. Then, select the Edit option from the ellipses menu on the right.
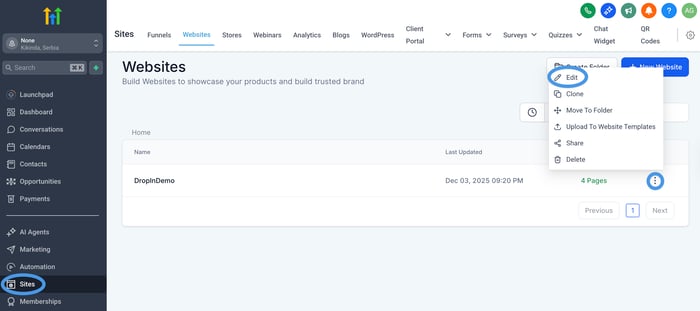 Editing a HighLevel website
Doing so will open a new page where you’ll find all your site’s pages. Choose one and click on the Edit option to open the page editor.
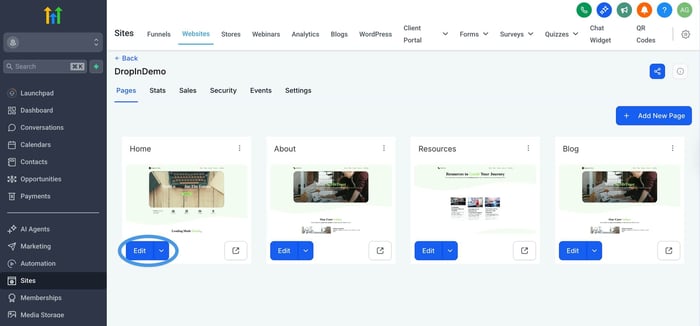 Accessing the HighLevel page editor
Make sure that the menu where you want the blog link to appear is saved as a Global section. Making changes to global sections will apply across all your site’s pages. Then, from the menu on the right, select Add Item.
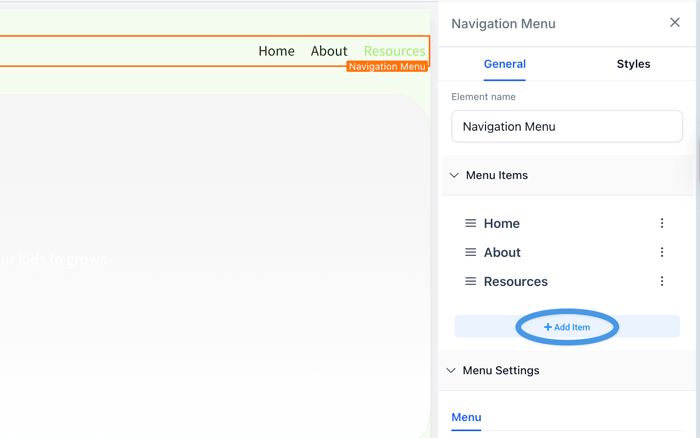 Adding a new menu item to the navigation menu in HighLevel’s page editor
In the pop-up window, adjust the settings for your new menu item. Set the item title to “Blog,” select Go to Page from the Go To dropdown, and choose your new blog page from the Page dropdown.
 New menu item settings: Connecting the blog link to the new HighLevel blog page
Click on the Submit button to save the changes and close the pop-up window. Then, from within the site editor, click on the Publish button to make your blog page link visible on your live site.
How to Style Your New Blog to Match Your HighLevel Site
While DropInBlog-powered blogs inherit styling from your website, you can also make some custom tweaks to your blog’s layout.
To do that, open the Code & Layout page in your DropInBlog account. For making smaller changes, go to Design Customizations in the Advanced section.
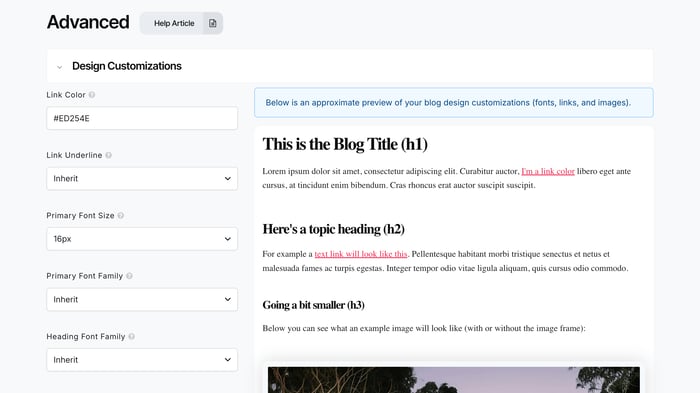 DropInBlog's Design Customizer
From here, you can change the link color and underline style, customize the background and text color of your call-to-action buttons, and change your blog’s font family and size.
To change the link color, click on the field under Link Color and select one of the offered colors or paste the hex code of the color you want to use.
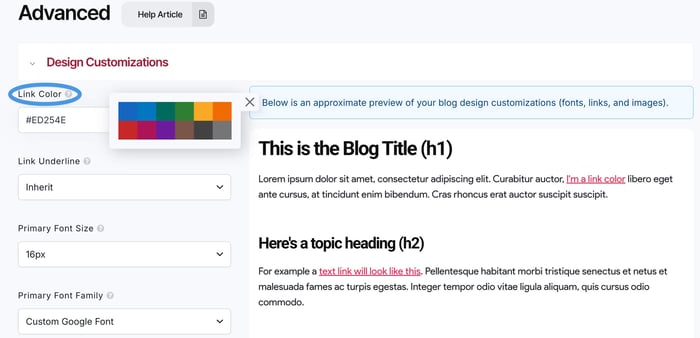 Changing link color in the DropInBlog Design Customizer
If you want to change your blog’s font family, click on the dropdown next to Primary Font Family and select one.
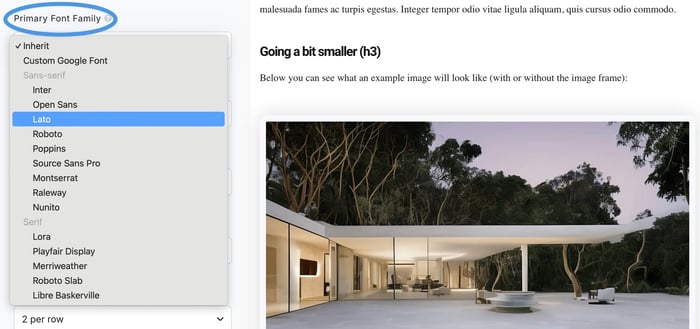 Change primary font family from within the Design Customizer
Under the Design Customizations and Custom Code sections, you’ll find an expandable Blog Layout section. Here you can see your blog’s current layout and switch it if you want.
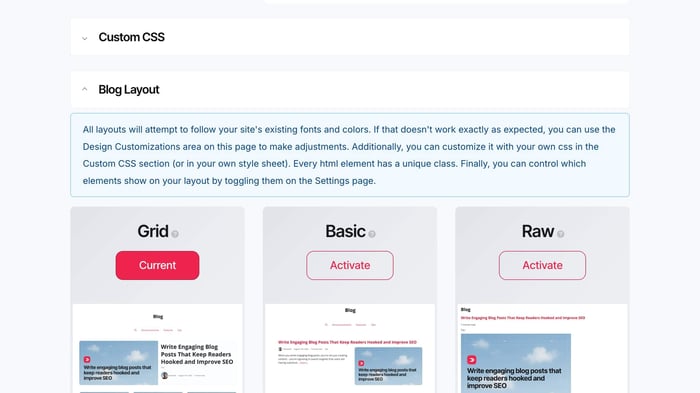 DropInBlog blog layouts
And if you want to make some more advanced changes to your blog and are familiar with CSS, find the Custom CSS section on the same page and add your code.
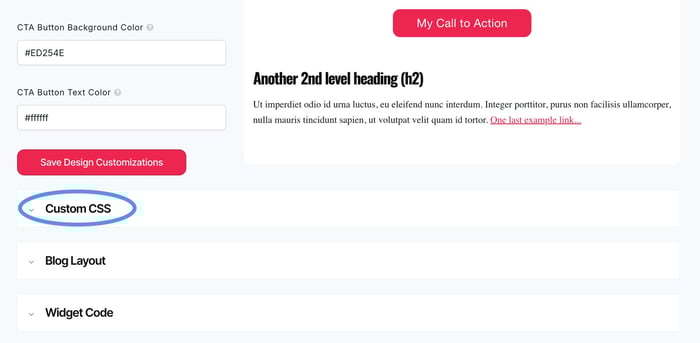 Custom CSS section within DropInBlog admin
Don’t worry – your blog will work even without adding custom CSS. It’s just one of the more technical ways to customize the look and feel of your blog.
Once you complete this step, you can add and manage your blog content from your DropInBlog account.
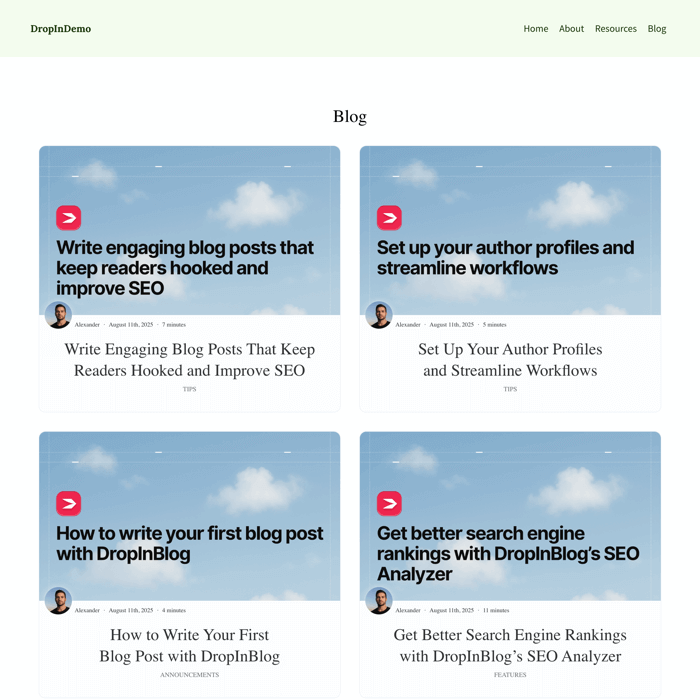
Below is a screenshot of one of the HighLevel sites that uses DropInBlog.

Here, you’ll notice that the blog page blends seamlessly with the rest of the pages, using the same fonts and styling for the above-the-fold content.
That means that when you add a blog to your HighLevel site, it will look as if it has always been there.
Blogging for Agency Clients at Scale
If you're running GHL as an agency, blogging isn't one blog; it's a blog per client. That's where the native feature gets painful: every sub-account needs its posts written, optimized, and maintained inside GHL's basic editor, with no content scoring and no way to reuse blocks across posts.
With DropInBlog, each client site gets its own blog that takes minutes to install and inherits that site's design automatically. A few things agencies specifically care about:
White-label friendly: your clients see a blog that looks native to their site, with no third-party branding on the front end. (See our agencies page for white-label options.)
User roles: give writers, editors, and clients exactly the access they need – nobody touches the funnel builder by accident.
Repeatable setup: the install is the same two snippets on every GHL site, so onboarding a new client blog is a checklist item, not a project.
Zapier automations: connect pre-built DropInBlog + Zapier templates to auto-share new posts or sync content workflows.
The result: you can sell content/SEO retainers on top of every GHL site you manage, without the per-client maintenance tax.
Best Practices for Blogging on HighLevel in 2026
After embedding a blog into GHL, you should implement these SEO best practices to improve your blog’s visibility in SERPs:
Structure posts for SEO: Use the answer-first approach, offering clear, concise information right away. Make sure to use a proper heading structure, and add schema markup, FAQs, lists, images, videos – all of which DropInBlog supports out of the box.
Optimize metadata using DropInBlog’s SEO Analyzer: The SEO analysis tool analyzes your target keyword and offers guidance on how to create good SEO titles, meta descriptions, and URLs.
Add related posts for internal linking: By default, DropInBlog blogs have a related posts section, which improves your linking structure. Select related blog posts manually or leave automatic selection on.
Enable author boxes: DropInBlog supports comprehensive author profiles. Assign authors to your posts to improve your blog’s credibility (and internal linking), and increase readers’ trust.
Add a CTA block at the end of each post: You can easily create a CTA with DropInBlog. Add a link and text, and set the link rel attribute. Don’t forget to make your CTA click-worthy.
Ensure mobile readability: Since HighLevel users primarily use mobile devices, use appropriate font sizes, large buttons, and short paragraphs. To make other mobile-friendly adjustments, use Custom CSS in your DropInBlog account.
Promote Your HighLevel Blog
Once you complete the GHL blog setup, you should let others know about your new blog. Here are a few ways to do so:
Add a blog to your site’s menu: As shown in Step 6 of the HighLevel blog integration tutorial, create a menu for your HighLevel blog so that your visitors can easily reach it.
Add blog links in funnels: A common practice is to link your blog from your funnels, which is easy to do with HighLevel’s global sections. Add the blog link to your funnel in one place, and it will appear on all other funnel pages.
Display your posts on any page: Using DropInBlog’s widget code, you can select the posts you want to display and add the code anywhere on your site, funnel, or store.
Add posts to email sequences: You can add your posts to your marketing emails using HighLevel’s elements, like link preview or text and image to link to your blog.
Index with Google Search Console: With DropInBlog, you can easily create a sitemap for your blog (the DropInBlog Settings page). Then, just go to your GSC account and add your sitemap to help Google find and index your blog content.
Use social previews (OpenGraph): With DropInBlog, you don’t need to create them; they're automatically generated from your post’s title, description, and featured image.
Manage Your Blog with DropInBlog
To create a new blog post for your HighLevel blog, visit the Posts tab from your DropInBlog admin panel and click on the Add Post button to launch the DropInBlog post editor.
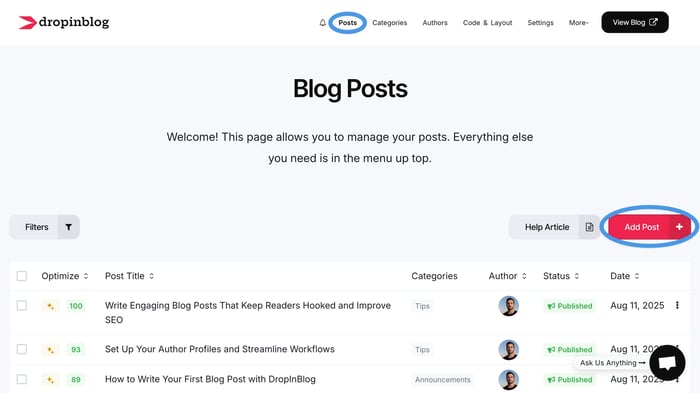 DropInBlog admin: Posts page
Once in the editor, you can add various elements to your content and optimize it for search engines, including images, tables, videos, CTAs, and FAQs.
Additionally, the blogging platform supports reusable content blocks, Smart Snippets™, which you can use for displaying newsletter signup forms, products, and promotional banners across all your blog pages.
We already mentioned the SEO Analyzer, which is designed to boost your posts’ on-page SEO and improve their visibility in Google and other search engines. Additionally, the tool is easy to use – just follow the suggestions in the Content Score section.
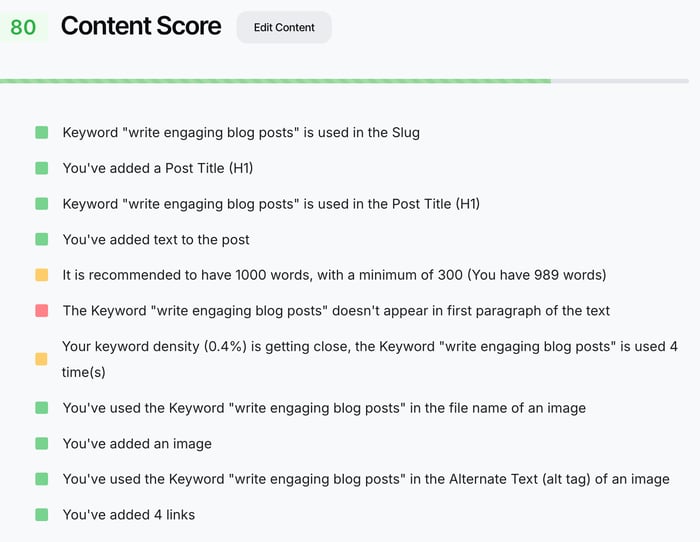 The DropInBlog SEO Analyzer: Content score
Right under the DropInBlog editor, you’ll find Mention Boost™, the platform’s native tool in charge of your content’s visibility in AI search engines. It will suggest adding specific elements and formatting options to make your content easier for AI tools to find and interpret.
Apart from these features, DropInBlog also includes a text-to-speech feature that turns your written content into audio. You can customize this feature from the Settings page of your DropInBlog account, where you’ll be able to adjust the language, locale, and tone of your blog’s AI voice:
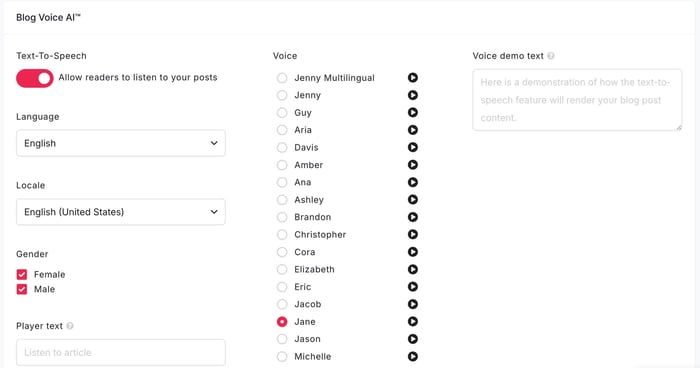 Blog Voice AI™ settings
Additional options that DropInBlog offers can help you manage and run your blog more easily, including:
Post scheduling: Set the publish date for your post if you don’t want it to go live right away. When updating your content, use the Modified at field to inform users and search engines when the latest changes were made.
User roles: Ensure that every member of your team has access to the parts of your DropInBlog account that you choose. Enterprise users also have access to audit logs, which provide valuable insights into account activity.
Authors and categories: Easily create and assign authors and categories to your blog posts to help your readers navigate your content more easily.
Zapier automations: If you want to streamline some of the tasks on your blog, you can use pre-built DropInBlog+Zapier recipes.
Google Analytics in your DropInBlog account: Once you connect Google Analytics to DropInBlog, you can view your GA4 metrics without leaving your DropInBlog account.
FAQs
Is it possible to add a blog on HighLevel?
Yes, in two ways. GHL's native blog feature (Sites → Blogs) handles basic publishing, or you can embed DropInBlog for advanced SEO features, schema markup, and AI-search optimization. The latter gives you access to advanced blogging features – all while helping you increase your blog’s visibility in search engines. Setting it up shouldn’t take more than a few minutes, and it’s just as easy to use!
How to create a blog in HighLevel?
Open the Sites section in your HighLevel account, select Blogs, then click on Create a Blog to add a title and description to your blog and connect it to your domain. On the following page, you’ll see the New Post button in the top right, which will take you to the post editor and let you create your first blog post.
If you need a more advanced blogging tool, you can create a blog on HighLevel even more easily with DropInBlog. Simply create a new site page in GHL with a custom code element, then add your blog snippets to it. That’s it! You can create your content, optimize it for searches, and fine-tune your blog’s design right away.
Is HighLevel good for SEO?
HighLevel covers the basics: metadata control, URL customization, redirects, and XML sitemaps. What it lacks is everything that helps content actually compete: an SEO analysis tool, automatic FAQ/video schema, and AI-search optimization. For a site where the blog is a real acquisition channel, pair GHL with a dedicated blogging tool like DropInBlog.
Can I customize the layout of my HighLevel blog?
You can customize your blog’s layout in HighLevel from the Blogs tab under Sites. Here, you can select one of the two blog layouts, i.e., standard and compact, and change its design using the Styles tab.
Does DropInBlog slow down HighLevel?
No, DropInBlog uses various technologies to offer fast-loading blogs, including static rendering, lazy loading, and image compression.
How much does DropInBlog cost for HighLevel users?
The DropInBlog pricing starts at $49/month (or $39 when paid yearly). For more information, visit DropInBlog’s pricing page.
Over and Out
That's both ways to add a blog to GoHighLevel — the native feature for basic publishing, and DropInBlog for a blog that's built to rank in Google and AI search.
Are you ready to attract more traffic to your HighLevel site? Start your free DropInBlog trial today! Remember: The HighLevel + DropInBlog integration is as simple as creating a new page and adding two blog snippets inside a custom code element. After that, you can focus on your content marketing strategy and create content that both looks and ranks well.
If you still need some assistance with getting set up, please do get in touch, and we’ll be more than happy to help out.
Happy blogging!


