
You’re probably here because of Shopify’s confusing blog URL structure. And it’s probably giving you headaches because it’s… well, confusing. The link to your blog has the word “blogs” in it, and it’s most commonly followed by the word “blog,” which is a bit redundant, isn’t it?
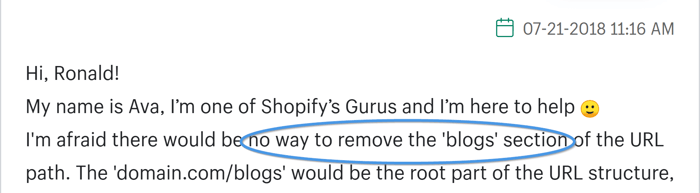
We looked at some of the many discussions about the “blogs/blog” URL topics in Shopify’s community. The one that caught our attention started in 2018 and has to do with changing the default URL structure of Shopify blogs. After many years and even more requests from Shopify users, the answer remains the same: you can’t change the default URL path of your Shopify blog, i.e., yourdomainname.com/blogs.
However, you can change the “/blogs/” part of the URL structure on your Shopify blog. You only need the right tool to do that.
Before we jump to the whys and hows of changing the default URL of Shopify blogs, let us tell you more about the e-commerce platform’s URL structure.
Table of Contents
Shopify Blog URL Structure Explained
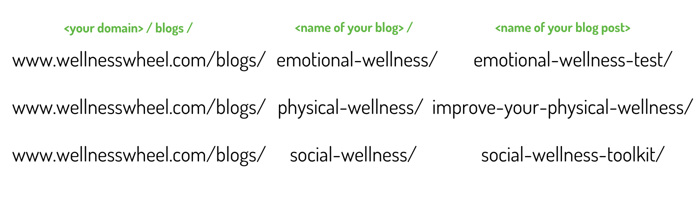
Why did Shopify create such an odd blog URL structure? It might surprise you, but the logic behind it is sound. The e-commerce platform starts with the assumption that you’ll have more than one blog on your site. For example, you might have a blog for news, another for product updates, and a third containing how-to guides. The “blogs” part of the URL acts as a subdirectory (or folder) in which each of these individual blogs would be located.
When the assumption of having multiple blogs is correct, the URL structure is fitting. Each blog kind of serves as its own "category" and the URL structure represents a clear file path to the posts within it.
However, most websites only have one blog (which they want to name “blog”!) and thus the default Shopify blog URL structure ends up as "blogs/blog" which just feels redundant and clunky.
Why Should You Change the URL of Your Shopify Blog?
The problem with the “blogs/blog” part of the URL is that if you have a single blog, the “blogs” part of the URL just isn’t true. That, and your URL doesn’t look nice, and while it might not seem that important, the “not looking nice” part could potentially affect your rankings. The word “blogs” in Shopify blog URLs can confuse your visitors and negatively impact their user experience. And since user experience heavily affects SEO, it’s important to address this issue.
That is not to say that leaving your blog URL as it is would crush your rankings. It just means that changing it could improve your blog visitors' experience and, consequently, improve your visibility on search engines.
Which Part of Your Blog URL Can You Change in Shopify?
The good news is that you can change the default “news” part of your blog handle to whatever you want.
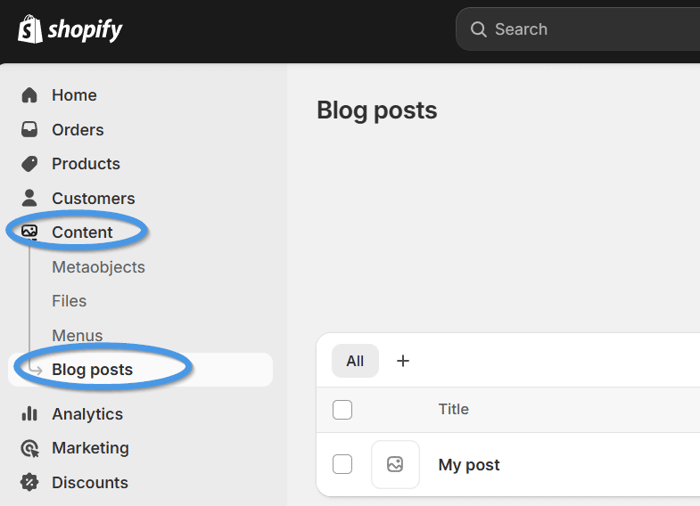
To do that, go to your Shopify admin panel, and from the menu on the left, select Content, then Blog posts.
On the page that opens, find the Manage blogs button and click on it.

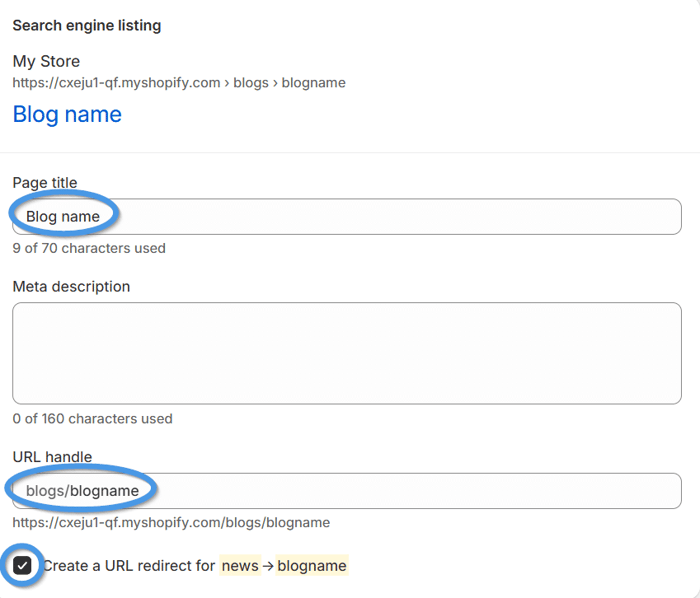
Next, click on the name of your blog to open the settings page and edit the Search engine listing section.

Replace “news” with how you want to name your blog, and enter the selected name in the field under Page title and URL handle. Also, check the box next to “create a URL redirect.”
Besides the default name of your blog, you can also modify the URL of your blog posts from the “Search engine listing” section of an individual post. However, customizing blog post URLs has never been part of the problem.
So how do you alter the default Shopify URL structure and get rid of the “blogs” part? Unfortunately, you can’t do this from within Shopify, but you can solve this problem with the SEO-friendly blogging app for Shopify stores, DropInBlog.
What about DropInBlog alternatives that could potentially solve this problem? Other apps have been built on top of Shopify’s native blogging functionality, whereas DropInBlog was built from the ground up – independently of Shopify’s blogging feature.
This means that other blogging apps may help you change Shopify’s URL structure, but you might run into other issues that Shopify’s native blog has if you decide to go with one of them.
The Solution: DropInBlog Blogging App
DropInBlog is a cloud-based blogging app that fills the gaps in Shopify’s native blogging functionality. One such gap is customizing your blog’s URL. Another is the option to create author pages, which Shopify doesn’t provide out of the box.
And not just that – DropInBlog is packed with features that make creating and managing your blog easy. These include a flexible post editor, FAQ builder, dynamic product embeds, and design customizations.
To start your blog on Shopify, simply install the DropInBlog app from Shopify’s app store. Once you complete this step, you can move on to the next step, i.e., changing your blog URL structure.
How to Change Your Shopify Blog URL with DropInBlog
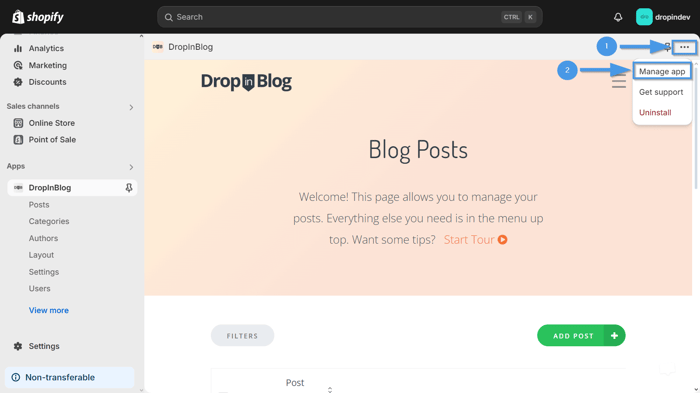
To change your blog URL, open the DropInBlog app from your Shopify admin dashboard.
Then, from the app’s settings menu in the top-right part of the page, select the Manage app option.
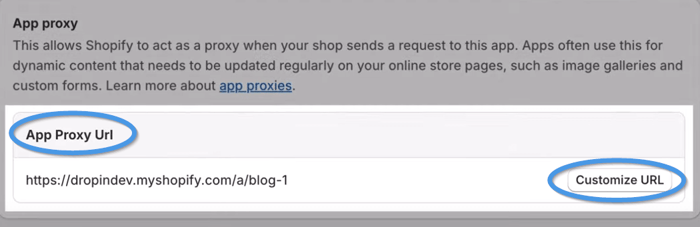
On the new page that opens, find the App Proxy URL section and click on Customize URL.
When you click on the dropdown menu, you’ll see four options that replace the default “blogs” part, along with the option to name your blog however you like.
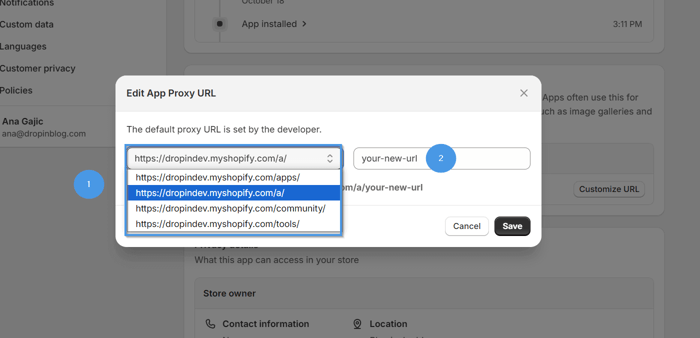
With DropInBlog, you can change Shopify’s default URL to something like: mysite.com/a/blog-name.
Current options include /a, /apps, /community, and /tools.
Once you’re happy with your blog’s URL slug, copy and paste it into your browser’s address bar. Hit enter to visit the selected URL, and your new blog URL will be activated.
It will also look cleaner and make more sense if you only have one blog.
If you’re looking for a more detailed guide, read our step-by-step support doc on how to customize your Shopify blog URL using DropInBlog.
FAQs
What is the URL structure of Shopify blogs?
Shopify blogs have a URL structure that includes the word “blogs” after your site's domain name, followed by “blog” or “news,” and the title of your blog post. For example, a default Shopify blog URL looks something like this: myshopifystore.com/blogs/news/how-to-cook-for-ten-people.
How do I edit my Shopify blog URL?
To edit your Shopify URL, click on the Content tab from your Shopify’s admin panel, then Blog posts. On the page that opens, select the Manage Blogs option, then click on the name of your blog. Next, open Search engine listing by clicking on the pencil icon, and enter the name of your blog under Page Title and URL handle fields.
How do I change the URL that says “blogs/blog”?
In Shopify, there’s no way to get rid of the blogs/blog part of the URL. To do this, you’ll need to install a third-party app like DropInBlog from Shopify’s app store.
Can I customize my Shopify URL?
Yes, you can customize your Shopify URL by changing the default blog name, i.e., “News.” To do that, go to Contents→ Blog posts → Manage blogs and click on the name of your Shopify blog. Then, from the Search engine listing section, change “news” to whatever you want.
If you want to customize the “blogs” part of Shopify’s blog URL, you can use DropInBlog and change this part of the URL path to /a, /apps, /community, or /tools.
Over and Out
We showed you how to change your Shopify blog URL, and now you can test this solution by signing up for DropInBlog’s free trial.
If you have any questions about Shopify’s URLs or just want to say hi, drop us a line.
Happy blogging!


