Key Takeaways
- The best way to add a blog to your Shopify site is with DropInBlog!
- The free trial and quick setup let you test it in a few minutes.
- DropInBlog has different pricing plans for individuals and teams.
To add a blog to Shopify, go to Content → Blog posts → Manage Blogs → Add Blog. Shopify's native blog is good for basic content with simple SEO.
For schema markup, AI-assisted SEO writing, author profiles without staff accounts, multiple categories per blog, and a customizable blog URL structure, install a dedicated app like DropInBlog (available in the Shopify App Store).
The native blog is enough for occasional posts, but choose DropInBlog if blogging drives your SEO.
TL;DR: How to Create a Blog on Shopify
Shopify has a built-in blogging tool that lets you add a blog to your store.
To create a blog on Shopify, you’ll just need to navigate to Content → Blog Posts → Manage Blogs. From here, you can add one or more blogs to your store.
If this blog integration method doesn’t provide you with the SEO features you need to make your blog more visible in search engine results, you should consider a specialized blogging app.
The steps outlined below will show how to create a blog on Shopify with both Shopify’s native tools and a specialized blogging app for Shopify, DropInBlog.
Table of Contents
- Key Takeaways
- TL;DR: How to Create a Blog on Shopify
- What's New in Shopify Blogging in 2026
- Which Blog Integration Method Should You Choose?
- The Best Way to Add a Blog to Shopify (Recommended)
- Does Shopify Have a Blog Feature?
- Enhance Your Shopify Blog
- Customize Your Shopify Blog Design
- SEO Tips for Shopify Blogs
- Shopify Blog Examples
- FAQs
- Leverage an SEO-Friendly Blogging App to Create a Blog on Shopify
What's New in Shopify Blogging in 2026
Shopify didn’t launch a major new blogging platform in 2026, but it continued expanding Shopify Magic, its built-in AI writing assistant.
Merchants can use Shopify Magic inside the native blog editor to generate blog titles, outlines, and draft content faster. While useful for brainstorming and first drafts, the content still requires human editing for SEO quality, originality, and brand voice.
What changed most in 2026 is that AI-assisted content creation became a much bigger part of the overall Shopify experience. For blog apps, this means basic AI writing is no longer enough to stand out. Advanced SEO tools, schema automation, E-E-A-T features, and publishing flexibility are becoming the real differentiators.
Which Blog Integration Method Should You Choose?
The first step towards creating a blog on Shopify is to choose which of the two blog integration methods is better for your store – Shopify’s native blog or DropInBlog. The easiest way to decide is to consider your blog size, publishing frequency, and features you need from a blogging platform.
| Feature | Shopify's native blog | DropInBlog |
|---|---|---|
Blog size / publishing frequency | Small / infrequent | All blog sizes / frequent |
SEO | Metadata control | Metadata control SEO analysis tool Customizable URL structure |
Categories | Basic | Built-in |
Authors | Yes (requires a staff account) | Yes |
Product embeds | Code embeds via Buy Button / third-party apps | One-click dynamic product embeds |
Schema | Manual | Automatic |
Design control | Limited | Advanced |
The Best Way to Add a Blog to Shopify (Recommended)
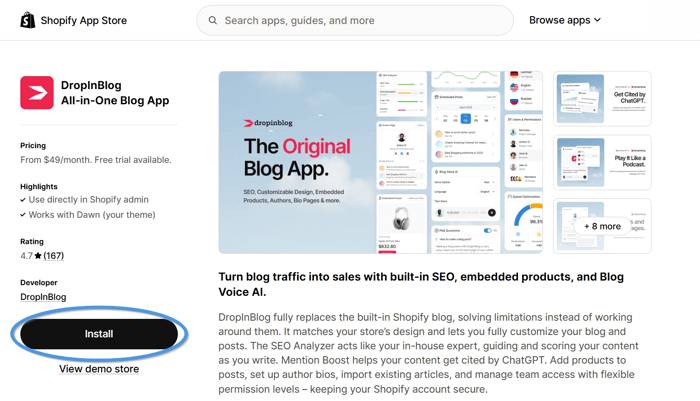
Step 1: Install the DropInBlog App and Grant It the Necessary Permissions
Find DropInBlog on Shopify’s App Marketplace, and once you’re on the app’s installation page, find and click the big Install button.
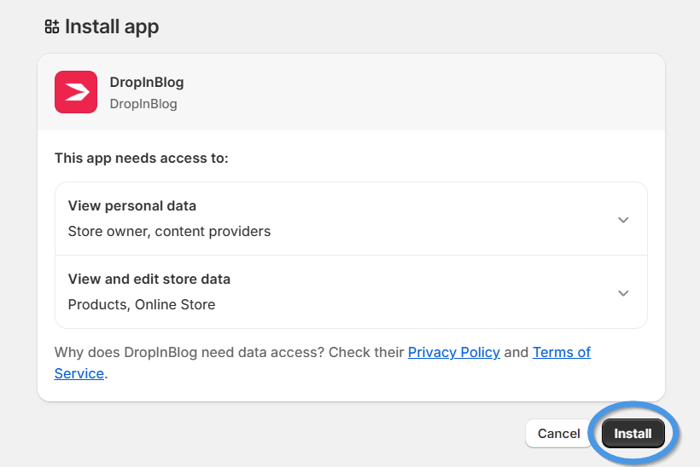
Next, a new tab will open, prompting you to grant DropInBlog access to your store’s data. Select Install to continue.
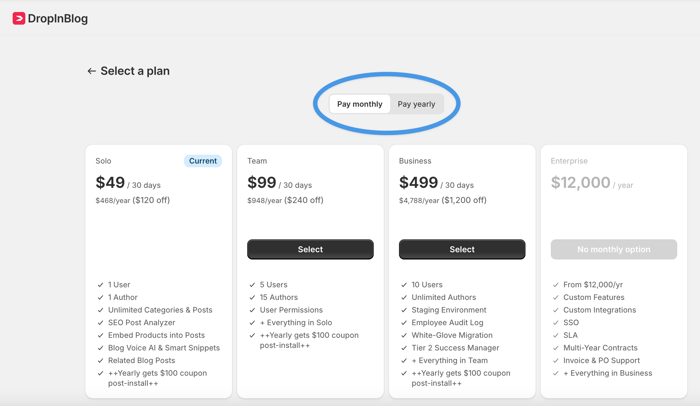
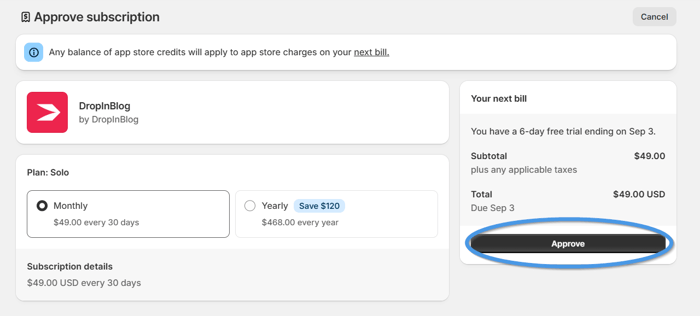
Step 2: Select Your Pricing Plan
After that, you’ll be presented with DropInBlog’s pricing page. Select the desired plan and billing frequency.
Note that you won’t be charged anything during your free trial. You can explore the DropInBlog app for free during the trial period and cancel your subscription at any time.
Upon selecting a plan, you’ll be asked to confirm your choice by clicking the Approve button on the following page.
After you’ve selected the plan, you’ll be taken to your DropInBlog admin panel because the app will automatically create an account for you using the same email address you used to set up your Shopify account.
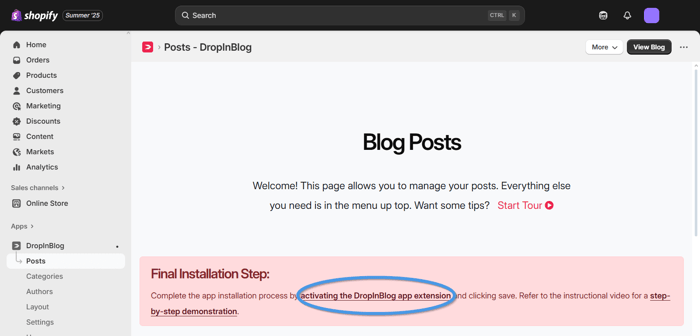
Step 3: Activate the DropInBlog App Extension
To continue the integration process, click the Posts tab from the left-hand side menu.

You may see a dialog box offering to take you on a short tour explaining the key features of your newly created blog, along with some tips on using it with Shopify. You can follow the tour or close it to proceed with the next integration step.
In the middle of your screen, you'll see a prompt informing you that you need to complete the DropInBlog installation. Click the "activating the DropInBlog app extension" link from the dialog box.
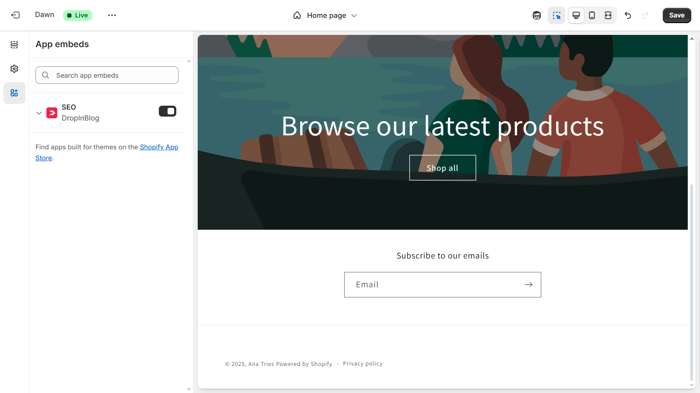
On the following page, toggle the switch on the left to turn it on, then click Save.
To see what your blog looks like, head back to your DropInBlog account. Click Settings in the navigation bar and copy your blog URL.
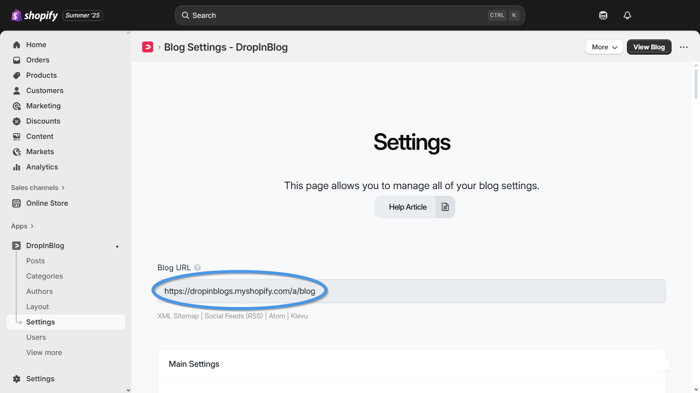
Paste the URL in a new tab, and you’ll see your new Shopify blog, along with four demo posts!
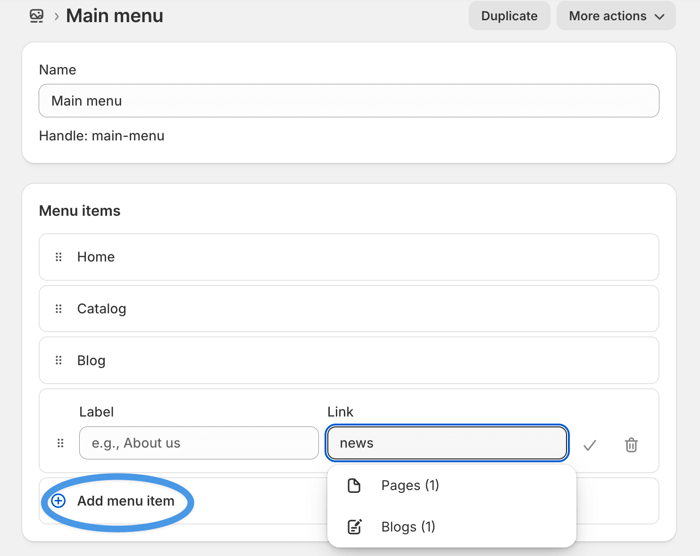
Step 4: Add Your Blog URL to Your Store’s Menu
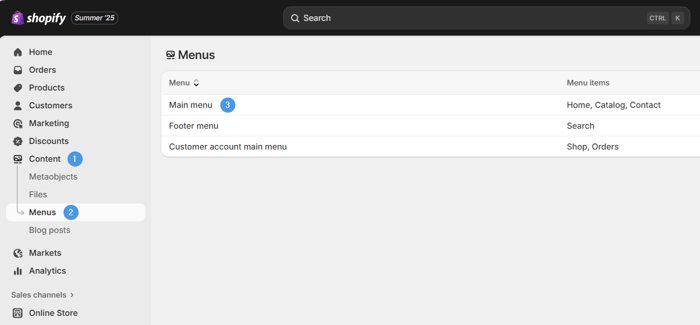
Now, head back to your Shopify dashboard. Click Content → Menus in the left sidebar, then select Main menu.
Then, click Add menu item. Under Label, write something suitable for your blog, such as "Blog." In the Link field, paste the blog URL you used in the previous step.
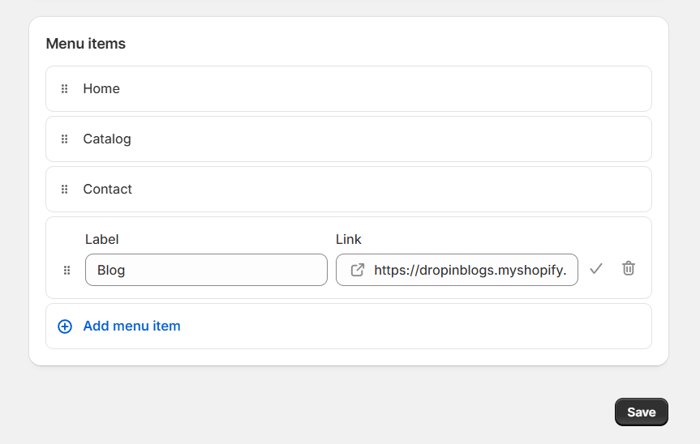
After you paste the blog URL:
Click on it to ensure it's selected.
Click the ✅ button to confirm; you'll see Blog among the Menu items.
Click the Save button to save the changes you've made.
To view your online store after the most recent changes, click the eye icon next to Online Store under Sales channels.
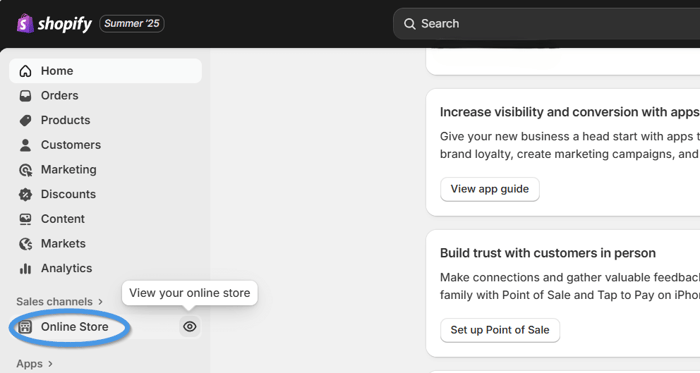
On the following page, you’ll see the new Blog button in the navigation bar of your Shopify Store.
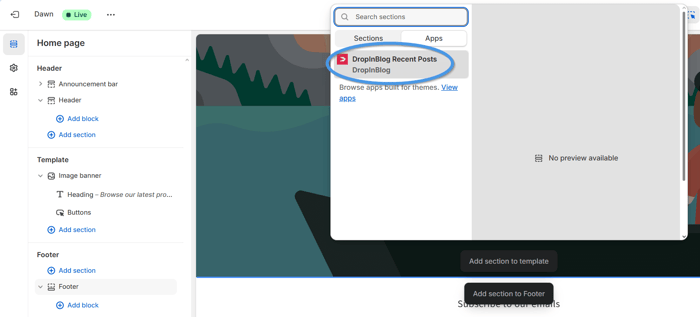
Step 5 (Optional): Add Recent Posts to Your Home (Or Any Other) Page
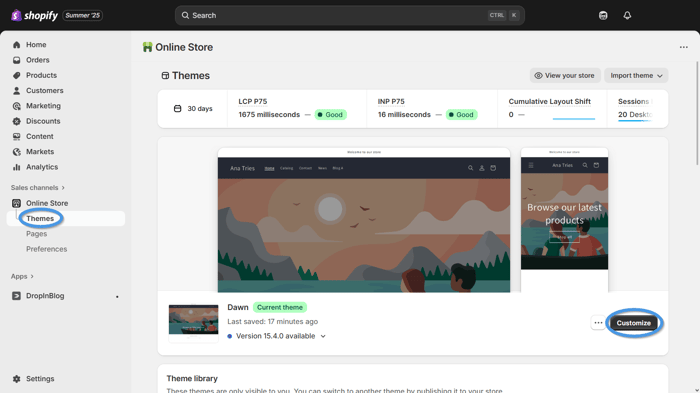
From within your Shopify admin dashboard, find and click the Customize button (Sales Channels → Online Store → Themes → Customize).
This option takes you to your homepage and lets you edit your online store pages and style them however you want. Scroll down and up the page to choose the best place to add your “Recent Posts” widget.
You'll notice a plus icon when you hover over parts of the page. If you move your mouse cursor close enough to this icon, you'll see an Add section button. Click this button where you want to add your recent posts.
Next, click Apps and DropInBlog Recent Posts.
Your recent posts should appear in the page section you chose. You'll also notice some customization options on the left. You can change the title (if you don't like the default "Recent Posts"), choose the number of posts your visitors see when they land on the page, edit the display layout, and select which category of posts shows in the widget.
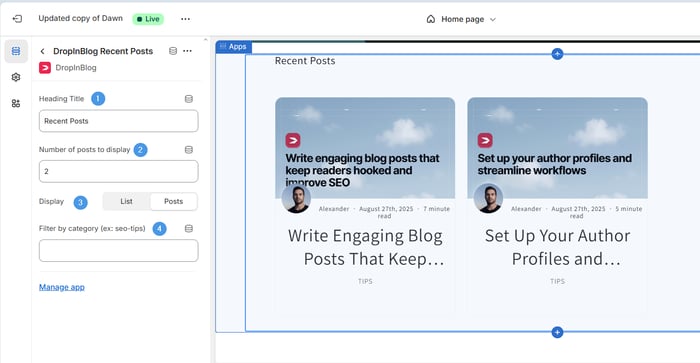
Whether you keep the default values or make changes, remember to click the Save button in the top right corner.
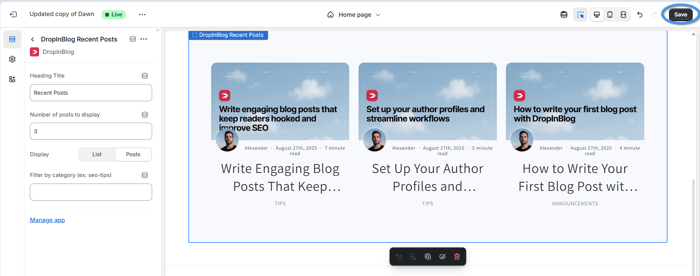
After saving the changes, return to your Shopify dashboard and view your online store to see the recent posts displayed on your Homepage or the page you chose.
Does Shopify Have a Blog Feature?
Yes, Shopify has a built-in blogging feature, which you can find in your dashboard under the Content tab. With Shopify’s native blog, you can add one or more blogs to your store, set custom meta tags for better search engine visibility, and add your blog to your store’s navigation so your store visitors can easily access it.
The steps below demonstrate how to add a blog to your store with Shopify.
How to Add a Blog Using Shopify’s Built-in Feature
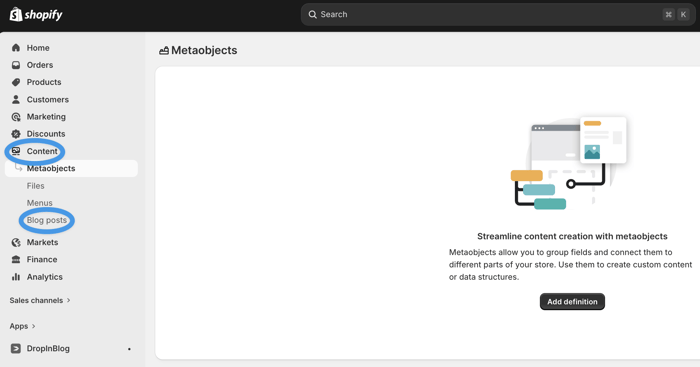
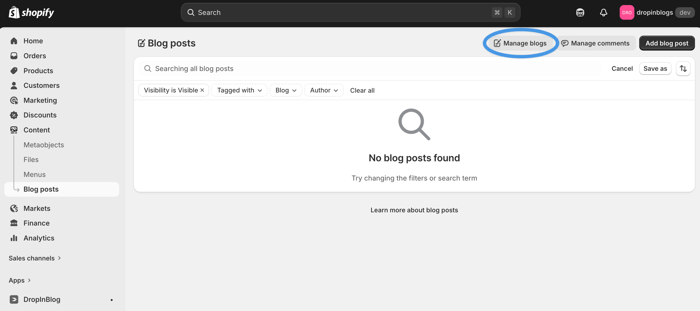
Step 1: Go to Content → Blog posts
From your Shopify’s left-hand side menu, click the Content tab, then in the dropdown that appears, select Blog posts.
Step 2: Click Manage Blogs
In the top-right corner of the Blog posts page, you’ll see the Manage Blogs button. Click it to proceed.
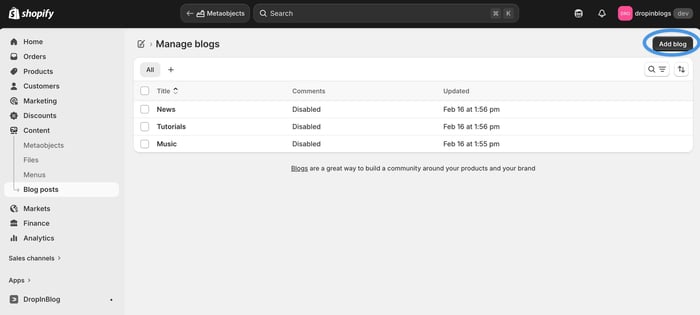
Step 3: Click Add Blog
On the following page, you’ll see the option to create a new blog. To do so, just click the Add Blog button.
Selecting this option will open a new page where you can name your blog, modify comment settings, add an SEO page title and meta description, and partially customize the URL.
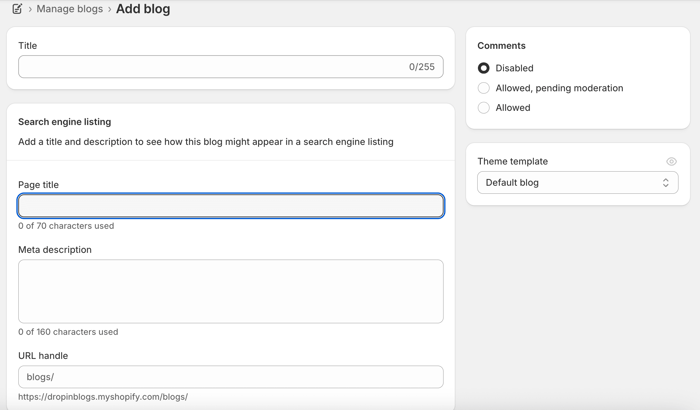
Once you fine-tune your blog’s settings, don’t forget to save your changes.
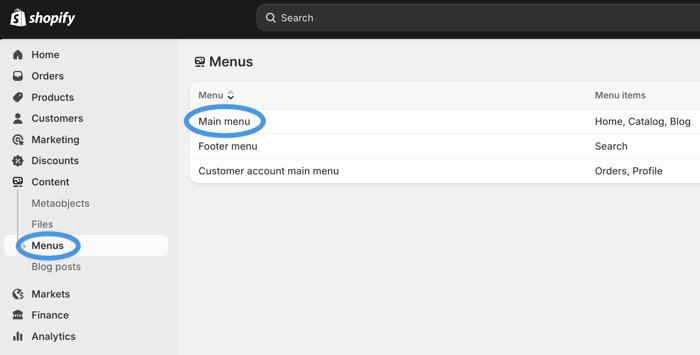
Step 4: Add Blog to Navigation
Now that your Shopify blog is live, select the Content tab again, then click Menus and select the menu you want to edit.
On the following page, select the Add menu item option. Then, add the name of your blog under Label, and start typing the name of your blog into the box under Link to retrieve your blog link.
Lastly, save your changes.
When Shopify’s Built-in Blog Is Enough (And When It’s Not)
The Shopify native blog offers a non-technical setup for users who want to start writing right away. The built-in blog comes with everything you need to start a simple blog, including some basic formatting options, categories, authors, and some modest SEO features.
So, if you need basic blogging features, you can indeed manage your blog through Shopify. If, on the other hand, blogging is at the heart of your SEO strategy, you may find Shopify restrictive.
The supported SEO features cover the basics of search optimization, whereas more advanced features or setting up a less awkward blog URL are outside Shopify’s scope.
The post editor doesn’t support product embeds.
For each category, you have to create a new blog, which only simulates categories but doesn’t truly replace them.
For each author profile, you need to create a staff account, which isn’t ideal for multi-author blogs with lots of guest posts.
Shopify’s design customizations aren’t extensive and often require working with code.
So, before you decide to create a blog on Shopify using its native blogging functionality, consider all the limitations discussed above. If none of them conflict with your blogging needs, starting a blog with Shopify’s built-in tool may be a good idea.
If, on the other hand, you need a more SEO-focused, scalable blogging solution for your Shopify store, consider setting up a blog using DropInBlog.
Enhance Your Shopify Blog
At this point, your Shopify blog is live, but there are still a few things you can do to turn it into an asset.
1. Add Authors to Your Shopify Blog (Without Staff Accounts)
If you use Shopify’s author profiles, you’ll have to create a staff account for every writer on your team. DropInBlog lets you create a comprehensive author profile with a photo, bio, title, slug, expertise, featured links, social profiles, and assign an author-specific voice using the Blog Voice AI™ feature. Here’s how you can easily add authors to your Shopify blog:
Open the DropInBlog app from your Shopify dashboard.
From the sidebar menu, select Authors.
Click the Add Author button to create a new profile.
On the following page, fill in the data about your new blog author.
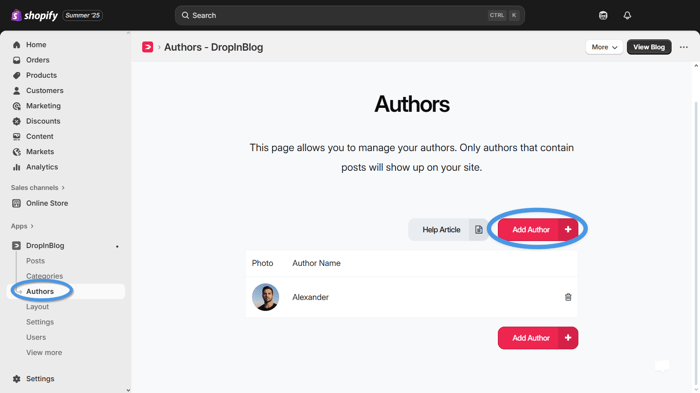
After you enter all the information you deem helpful, click Save Author, and you're done.
2. Add Blog Categories on Shopify
Blog categories help you organize your posts in meaningful content blocks, making it easier for your visitors to find what they need. DropInBlog allows you to create multiple categories for your Shopify store blog posts. And you don’t need to create a new blog for each – your blog can have as many categories as you’d like.
The three default blog categories you can see after integrating DropInBlog with Shopify are Announcements, Features, and Tips.
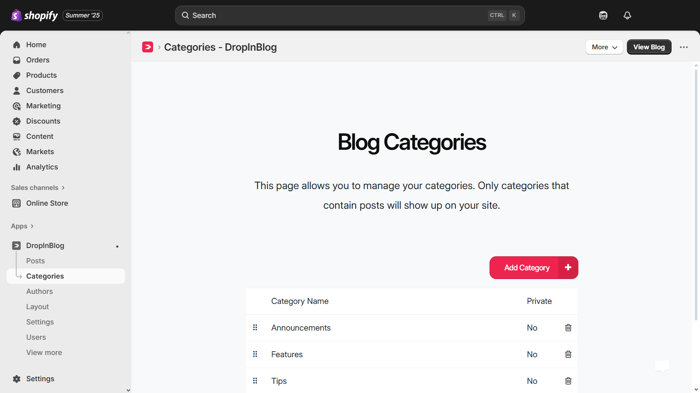
To manage them, head over to your DropInBlog account and click Categories in the sidebar menu. You can edit or delete any category you want. You can:
Change its title, slug, SEO title, SEO description, background image, and heading description.
Hide it from crawlers and the category menu.
Remove it from the main blog page.
Mark it as private.
On the other hand, if you want to keep the default categories and add a new one, it's as easy as clicking the big Add Category button and adding the same type of information from above. Just remember to click Save Category at the end of the process.
3. Find Topics for Your Blog
Before you can focus on creating engaging content for your blog, you should know what you’ll write about. Researching blog topics often takes hours, but it doesn’t have to. If you use DropInBlog to create a blog on Shopify, you can generate new content ideas in minutes and move those ideas straight into the content editor.
Simply start Blog Pilot™ from your DropInBlog admin panel, wait for the tool to recommend blog post title ideas, and choose an outline. After that, you’ll be able to move the generated output into the DropInBlog editor and start writing a new blog post.
4. Create Engaging Blog Content
When you write your first blog post, follow these best practices to not only make your blog posts read well, but also look good:
Break up big chunks of text with formatting and media: Add images, videos, bulleted lists, block quotes, and tables to add visual breaks.
When possible, use infographics: Most users are visual learners, so offering this type of content may increase engagement rates.
Use headings in your content: A proper heading structure contributes to your post’s readability, so include key talking points in H2s and H3s.
Insert a table of contents: Add a ToC at the beginning of your posts to give your readers a quick overview of your content and let them skip to the content they’re interested in.
Add products to your blog: Embed your store’s products in your content to boost conversion rates.
Make related content easily accessible: Show related posts below individual posts and add links to other relevant posts on your blog.
Distribute your content on social media: Share your blog posts on sites like X and LinkedIn to increase their reach.
Once your blog starts gaining traction, track your content’s performance through an analytics tool such as GA4. This will help you identify the content that needs improvement and discover your top-performing posts. And don’t forget to update your content regularly so it's always current and accurate.
Customize Your Shopify Blog Design
With DropInBlog, your blog will automatically match your store’s design, so you don’t have to worry about theme integration issues or inconsistent design. You’ll also have the freedom to style your blog further.
Some of the styling changes you can make in DropInBlog include adjusting the link color and underline options for better visibility, selecting the primary font and heading font family for a cohesive look, adjusting the image frame settings, and setting the number of posts per row for a neat layout.
DropInBlog offers a preview feature, allowing you to see and fine-tune these customizations in real time.
To access Design Customizations in DropInBlog, go to the Layout section and scroll down. Here, you can personalize various design elements of your blog.
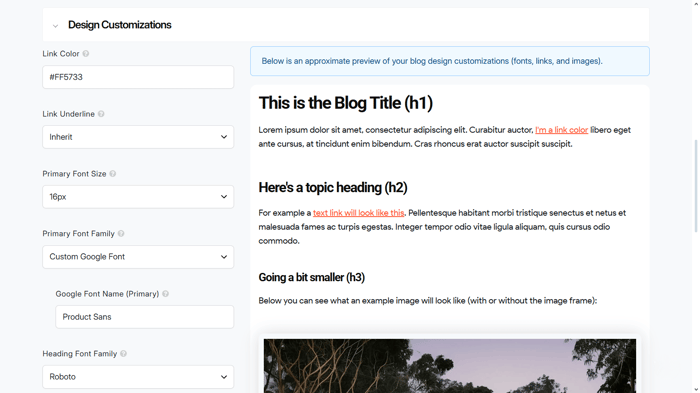
On the same page, you can also add custom CSS and change the layout of your page.
SEO Tips for Shopify Blogs
DropInBlog provides an SEO analysis tool to support your efforts in achieving better search engine rankings.
The SEO Analyzer evaluates your content as you write. It shows you how well it fares in SEO terms – you can check the overall SEO score of your post, where 100 is the maximum – and it gives you guidelines on how to improve it if necessary.
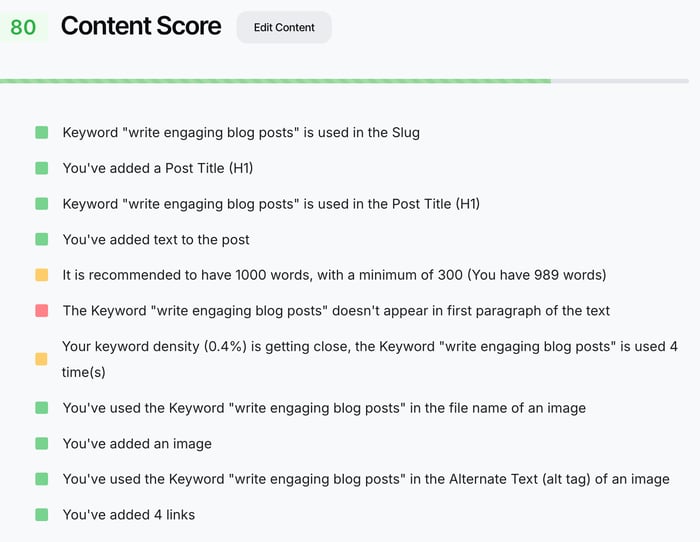
When we say content, we don't mean just the body of your blog post. Your title, meta description, keywords, and images all affect your post's SEO, so the SEO Analyzer evaluates and gives you tips on them as well.
Read also: How to Add Multiple Blogs to a Shopify Store
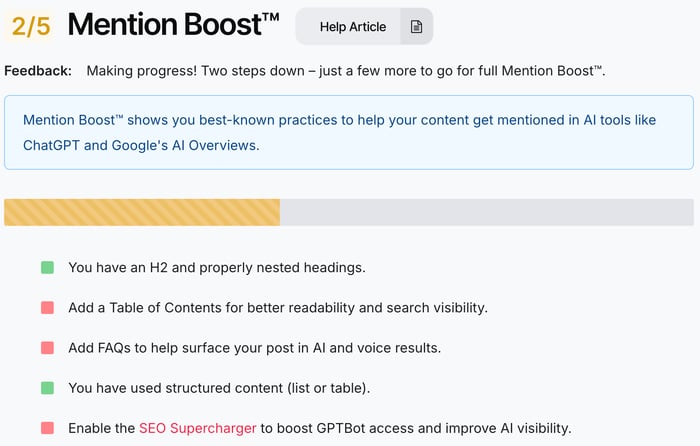
Apart from helping you make your blog posts more visible in traditional search results, DropInBlog also helps you increase your content’s visibility in AI searches like Google’s AI Overviews. The Mention Boost™ tool offers real-time suggestions for structuring your content so AI-based search tools can more easily find and understand it. It will tell you how to format your blog posts and which elements to include, which may earn you some AI mentions and a more prominent position in AI searches.
Another way to prepare your Shopify blog posts for search engines is with structured data, which, with Shopify blogs powered by DropInBlog, is automatically added.
Shopify Blog Examples
Take a look at some Shopify blogs below and discover the capabilities of DropInBlog for yourself.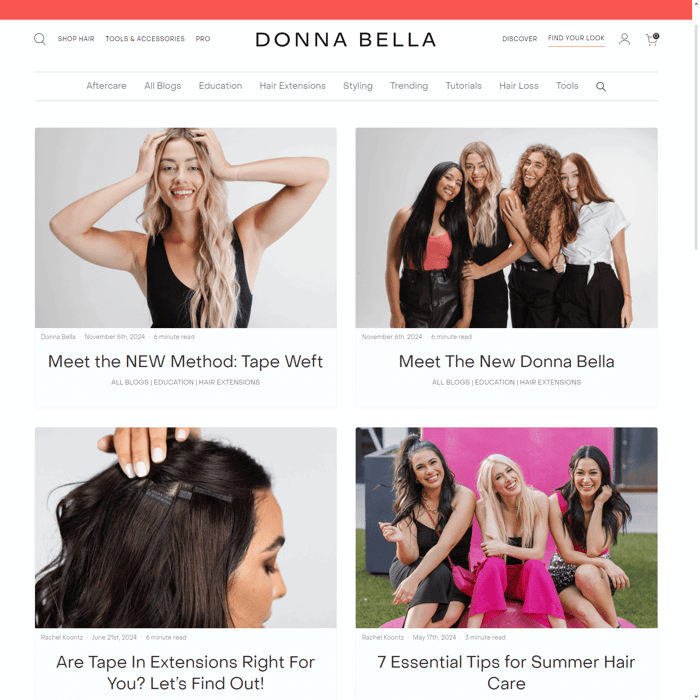
Donna Bella Hair 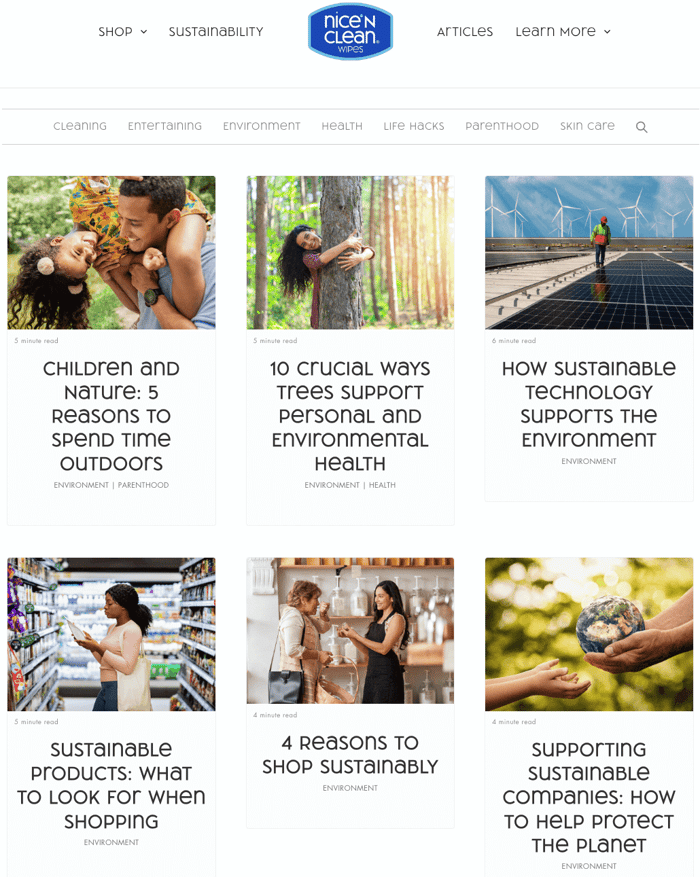 Nice 'n Clean Wipes
FAQs
Can you build a blog on Shopify?
Yes, you can build a blog on Shopify using the platform’s built-in blog or one of the specialized blogging solutions from the marketplace, like DropInBlog.
Does Shopify have a built-in blog?
Yes, Shopify has a built-in blog that lets you easily add a blog to your store without third-party apps.
Is Shopify good for blogging?
If you have a small blog, you publish occasionally, and aren’t looking to build organic SEO and attract traffic through your blog, Shopify’s native blog engine will serve its purpose well.
Does Shopify have good SEO for blogs?
Shopify has decent SEO features for blogging. It lets you add and edit your posts’ metadata and customize URLs. However, for more advanced blogging features, you’ll have to use another blogging solution or install an SEO app like DropInBlog.
How do I add a blog to Shopify?
Open the Content tab from your Shopify admin account, select Blog Posts, then Add Blog. Fill in the basic information about your blog, like your blog’s name, and save the changes you made.
Can you customize Shopify blog URLs?
Partially. Shopify lets you customize the last part of your blog post URL, which defaults to a post’s title. However, the “blogs” part can’t be changed or removed, unless your Shopify blog is built with DropInBlog.
Should I use an app for Shopify blogging?
If you want to create SEO-friendly blog posts, you should definitely use a blogging app like DropInBlog.
Leverage an SEO-Friendly Blogging App to Create a Blog on Shopify
Shopify is a powerful e-commerce platform, but its native blogging engine is intentionally basic. DropInBlog is designed to fill its blogging limitations for stores that want blogging to drive SEO.
This guide showed you how to add a blog to your store using Shopify’s native blog. It also showed you how easy it is to add DropInBlog to Shopify, adjust everything you need, and optimize your brand-new blog for SEO. But if you need any help, do not hesitate to reach out to us – we'll be delighted to help. In the meantime, you can learn more about Shopify and DropInBlog in our help center.