
Key Takeaways
- The best way to add a blog to your Squarespace site is with DropInBlog!
- The free trial and quick setup let you test it in a few minutes.
- DropInBlog has different pricing plans for individuals and teams.
If you want to create a blog on Squarespace, you can do so in a few simple steps and a couple of ways. You can use the platform’s native blogging functionality or, if you need more advanced blogging features, create a blog with a dedicated blogging app.
So, in this guide, we’ll include step-by-step instructions on how start blogging on Squarespace with:
Squarespace’s built-in blog
DropInBlog
Let’s begin!
Table of Contents
- Key Takeaways
- TL;DR Squarespace Blogging Options
- Option 1: Create a Blog Using Squarespace’s Native Blog Feature
- Option 2: How to Add a Blog to Squarespace Using DropInBlog
- Customizing Your Blog with DropInBlog
- Squarespace Blog vs. DropInBlog – Which Should You Use?
- FAQs
- Start Blogging on Squarespace with DropInBlog Today
TL;DR Squarespace Blogging Options
You can use Squarespace to create a blog website or just add a blog to an existing Squarespace website.
To use the platform’s native blog, you’ll only need to create a new blog page and select one of the four blog templates.
An alternative way to create a blog on Squarespace is with DropInBlog, a blogging platform that scales with your site. It offers more blogging features, built-in SEO tools, and makes running a blog easy.
Option 1: Create a Blog Using Squarespace’s Native Blog Feature
Step 1: Add a Blog Page to Your Squarespace Site
Using the left-hand side menu of your Squarespace dashboard, open Pages from under the Website menu tab. Right after that, click on the plus sign next to Main Navigation, and in the pop-up that opens, select the Blog tab.

Select one of the four templates and, using the menu on the left, name your blog.
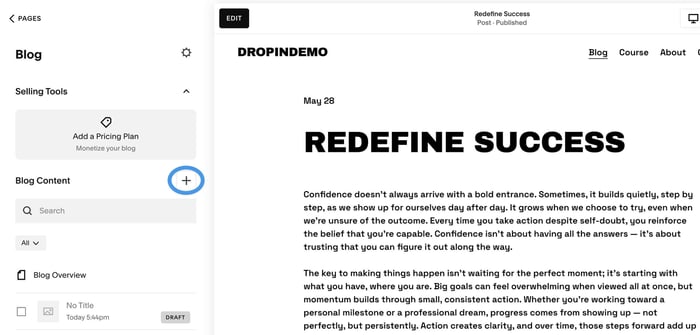
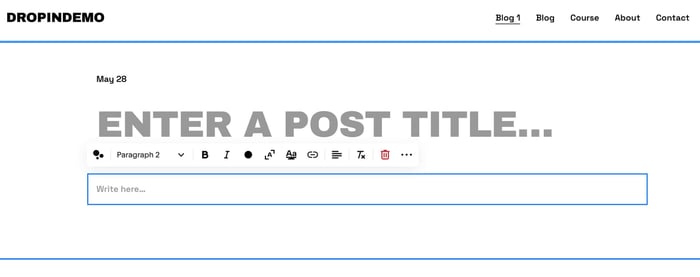
Step 2: Create Your First Blog Post
To start a new post, click on the plus icon next to Blog Content.
Doing so will open the post editor, where you can add your content.
At the top of the page, you’ll see the title section, and just below it, a blank section for the article body.
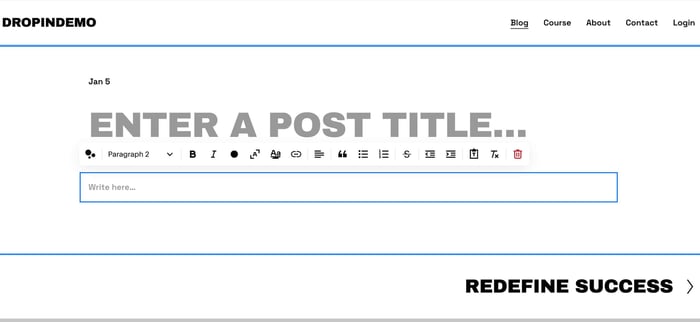
Above and under each section, you’ll see a plus sign, which allows you to add other non-text elements to your blog, such as audio, video, and code.
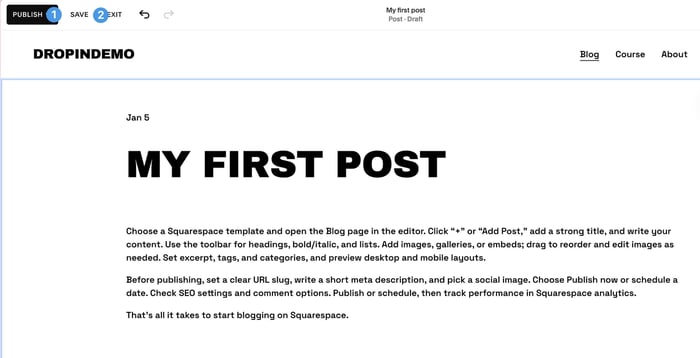
Once you’re happy with your post, make sure to save it if you don’t plan on publishing it right away. You’ll find these two options in the top-left corner of the editor.
To start a new blog post, simply open your blog page and click on the plus sign next to Blog Content. All the posts you create will appear under the Blog Overview section.
Step 3: Configure Core Blog Settings
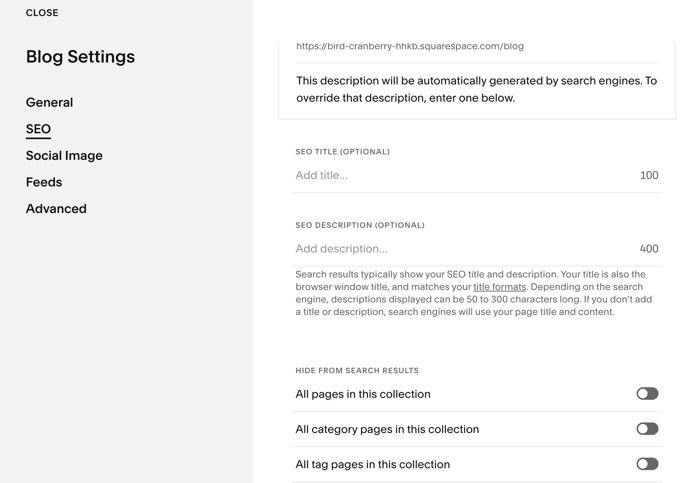
Now that your Squarespace blog is live, you should optimize it for search engines. Consider customizing the following aspects of your blog:
SEO title and meta description: This data explains what your blog is about.
URL slug: Your blog should have an easy-to-read and logical slug, i.e., “/blog” to signal the type of page and content that lives on that URL.
Social image: Adding a social image creates a uniform look for all of your shared content. It also makes your content more visually appealing, so be sure to include one.
Categories and tags: Categories and tags help organize your content, making it easier for users to navigate your blog posts. In Squarespace, you must first add them to a single post, then apply them to the entire blog.
Blog comments: Comments have a positive impact on user engagement, and in Squarespace, you can enable them on a per-post basis or for the entire site.
Posts per page: Limiting the number of posts that appear on a page improves your site’s performance and prevents infinite-scrolling fatigue. In your blog settings, set the number of posts to anywhere between 1 and 20.
To access these settings, open the blog page and click on the gear icon on the left, near the top. Doing so will open a new window where you’ll find all the settings mentioned above.

Step 4: Add the Blog to the Navigation
The final step in creating a blog on Squarespace using the platform’s native functionality is to ensure your visitors can access your blog from your site’s navigation.
By default, Squarespace adds a blog link to your main navigation, but you should also link your blog from your site’s footer to improve the user experience. How you’ll do that depends on the template your site uses, but in most cases, you should be able to duplicate an existing menu item and link it to your new blog page.
Don’t forget about internal linking, though. Adding links to other posts on your blog improves your site’s structure, makes the content easier to discover, and can speed up indexing. Don’t overdo it – add links to relevant blog posts only.
Limitations of Blogging on Squarespace
Squarespace has done a lot of things right with its native blogging tool, starting with how easy it is to add a blog to your Squarespace site. The post editor is also much more flexible than what you get from a typical website builder. It supports various formatting options, media types, and elements, including charts, calendars, and custom code.
On the other hand, working with the post editor is somewhat clunky. When creating text-only posts, this isn’t something you’ll notice. However, when moving and resizing post elements, you’ll notice it takes some time to line up everything nicely. Still, this shouldn’t be a problem if you’ve used similar blogging solutions like Weebly’s native blog.
Another common complaint about creating a blog on Squarespace with its built-in blogging features is that it lacks a built-in SEO tool, and the SEO features it offers out of the box are quite limited.
You can add meta titles and descriptions to your content, but if you want more than that, you’ll need a third-party app. On the other hand, if your blog doesn’t rely on search engines for gaining traffic, Squarespace’s native SEO features may be sufficient for your needs.
Besides that, some features don’t work as expected. Table of contents (ToC) is one such example, and if you want to add it to a post, you’ll need to use jump links and, depending on the site version you use, maybe even add some code to get it all to work.
And if you were looking to just copy and paste long posts from Google Docs and other word processors into the post editor, Squarespace will only meet you halfway. It will keep the original formatting and text of your document. However, if your content contains images, you’ll have to manually upload them one by one.
Another detail that’s been bothering some Squarespace users is that you can’t show more than 20 posts per page. This is a minor thing, but still big enough to spark a discussion. That, and the lack of autosave functionality, which many users find frustrating.
So, while Squarespace does allow you to create and manage a simple blog, DropInBlog is a dedicated blogging app that might better fit your needs. The app’s features, such as the SEO analysis tool, Blog Voice AI™, and automatic ToCs, perfectly complement Squarespace sites and make running a blog of any size a breeze.
Now, let’s take a look at how you can create a blog on Squarespace using DropInBlog. This blog integration method, just like the first one, has a few simple steps.
Option 2: How to Add a Blog to Squarespace Using DropInBlog
Before you add a blog to your Squarespace site, make sure you’ve done the following:
You’ve created a DropInBlog account (free trial available).
You’ve purchased one of the site builder’s paid subscriptions, as without this, you won’t be able to publish your site.
Once you set up both accounts, proceed to Step 1.
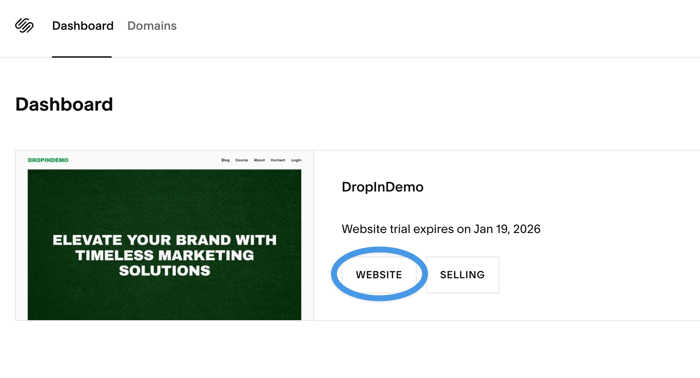
Step 1: Add a New Page to Your Squarespace Website
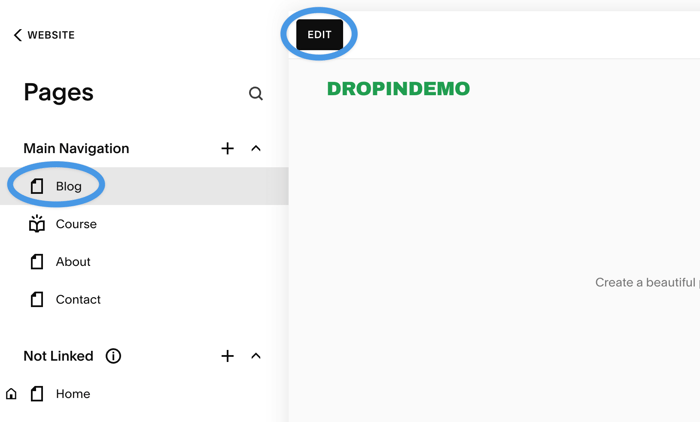
Log in to your Squarespace account and select the website to which you want to add a blog. Click on the Website button to edit your website.
From the left-hand sidebar, select Website, then Pages to view your site’s pages.
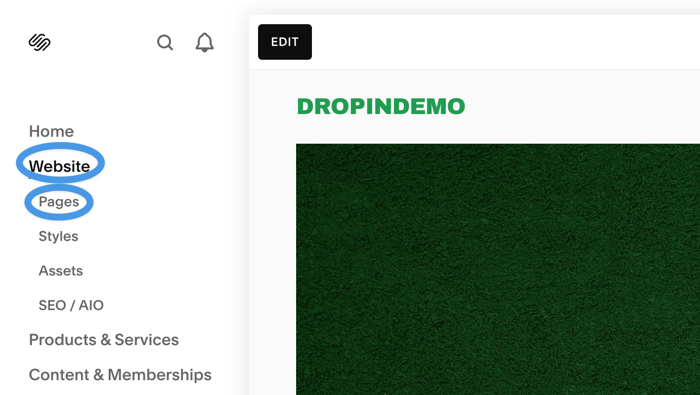
Next, click on the plus sign next to Main Navigation and select Blank Page. This will add a new page to your site, which will be your blog page.
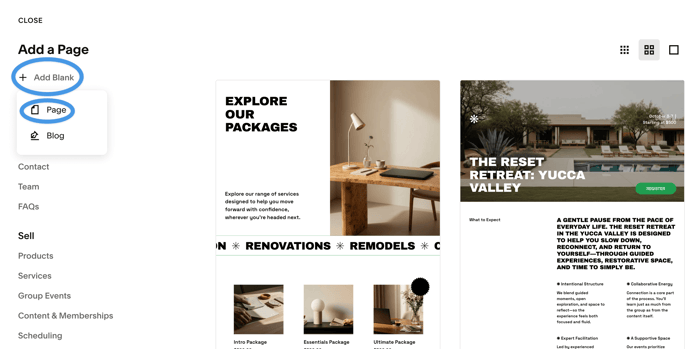
Name your new page (we simply named ours “Blog”), then click on the Edit button on the top left of the page preview to launch the page editor.
Step 2: Add the Embed Block to Your New Blog Page
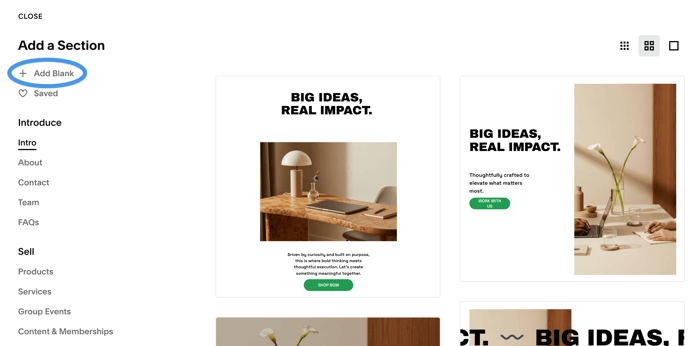
Once in the page editor, click on the Add Section button, and in the pop-up window that appears next, select Add Blank.
After adding a section to your page, you need to add a block inside it. To do that, click on the Add Block button.
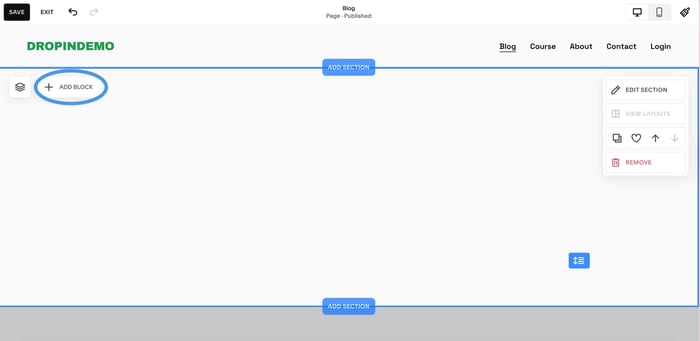
When you click on it, you’ll get a dropdown where you can select a block to add to your new page.
In the Basic section, find Embed and click on it to add it to your new blog page.
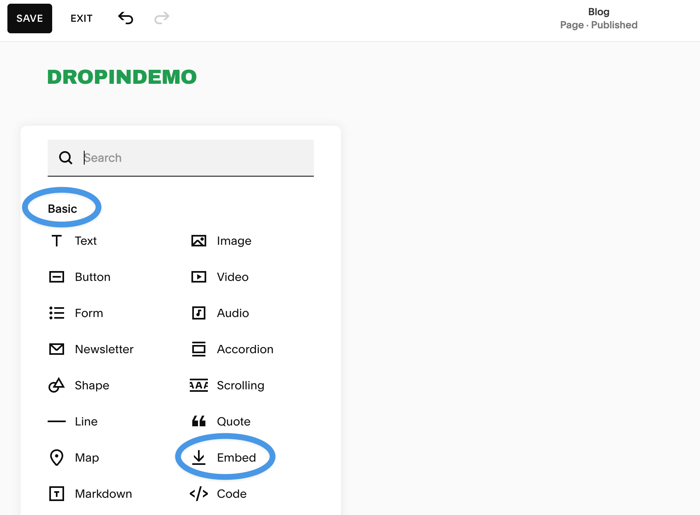
Before making any changes to this element, click on its resize handle and drag it all the way to the right to make it full-width.
Click on the Embed element to open its settings menu, then select the pencil icon to edit it.
Next, you’ll see a pop-up window, where you’ll add the code from your DropInBlog account. Under Embed As, select Code Snippet, then click on Embed data under it.
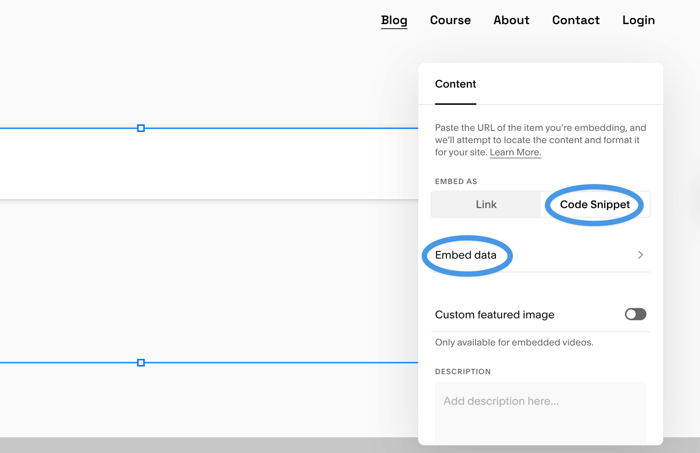
A new pop-up will appear, which is where you’ll add the code from your DropInBlog account.
Step 3: Add Your DropInBlog Blog Code
Go to your DropInBlog admin dashboard, open the Code & Layout page, and under Blog Code, find and copy the code under Step 1.
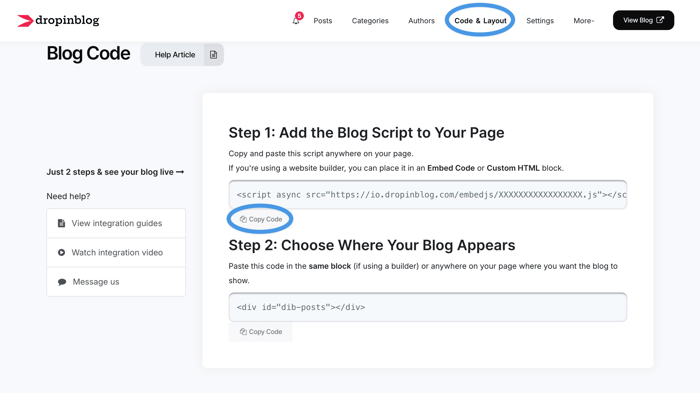
Return to Squarespace and paste the first line of code into the box.

Go back to your DropInBlog Code & Layout page and copy the code under Step 2. Then, switch back to the Squarespace editor and paste that code right after the code you previously added.
To apply these changes, click on the Save button on the top left and exit the page editor.
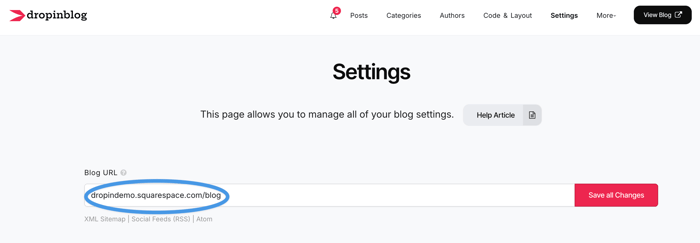
Step 4: Connect Your Blog URL in DropInBlog
The next step is to find and copy the link to your new blog page. To do that, click on the arrow on the top right of the Squarespace editor.
Then, copy the page link.
Return to your DropInBlog account and open the Settings page from the top navigation. Paste the link in the text box under Blog URL, then click on Save All Changes on the right.
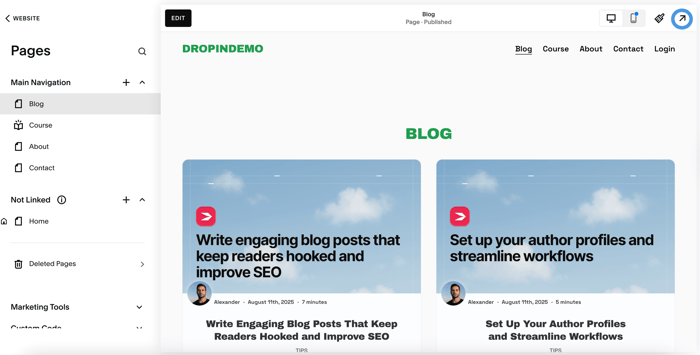
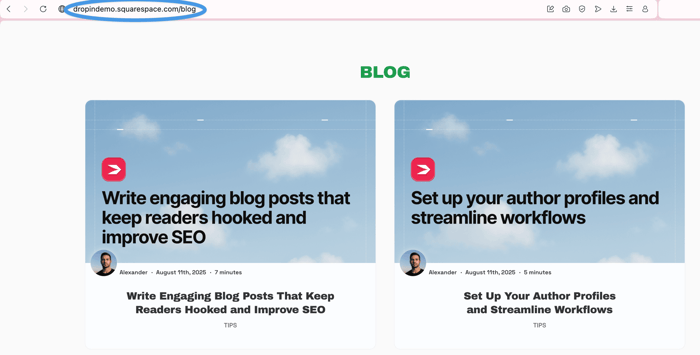
If you want to view your blog, copy and paste your blog link into your address bar. Open a post to check if everything’s working as expected. If it is, you can start blogging on Squarespace.
If Squarespace takes you back to your configuration page when you open a blog post, turn your password manager off or log out of your Squarespace account to resolve this issue.
Common mistakes:
If your blog page isn’t loading, check whether the URL has a trailing slash (/). Remove it, then reload the page to see if that resolves the issue.
Double-check if the URL you pasted on the Settings page of your DropInBlog account matches the URL of the blog page you created in Squarespace.
Make sure that your Squarespace blog page is published.
Step 5: Test and Verify Your Blog
To be sure that your new Squarespace blog works and displays correctly, follow these simple steps:
Open your blog page in a private window.
Scroll through the blog homepage to see if all blog posts have loaded.
Open one or two blog posts to find out if the URLs are working.
Open any blog post and check that the formatting, media, and other post elements are displaying correctly.
Once your blog is live, all you have to do is add your first blog post from your DropInBlog account. Open the Posts tab, and click on the Add Post button.

After you publish your post, it will automatically show up on your Squarespace website. 🎉
What are your next steps? Develop a content strategy, do some keyword research, and spread the word about your blog.

Customizing Your Blog with DropInBlog
When you embed a blog into your Squarespace site, it will inherit the look and feel of the site.
Still, if you want to tweak your blog’s appearance, you can use DropInBlog’s Design Customizer.
You’ll find it on the Code & Layout page of your DropInBlog dashboard under Design Customizations. From here, you can change your blog’s typeface and link colors, and set the default colors for call-to-action buttons.
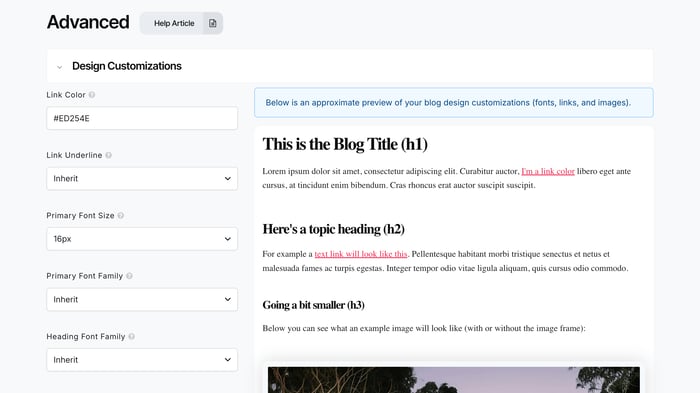
Additionally, if you want to make bigger styling changes, you can use the Custom CSS section to apply custom styles to your blog.
Squarespace Blog vs. DropInBlog – Which Should You Use?
Quick Comparison Table
| Squarespace blog | DropInBlog | |
|---|---|---|
| Best for | Small blogs | Blogs of all sizes |
| SEO flexibility | Low | High |
| Content organization | Categories, tags | Categories, advanced content filtering options |
| Scaling content | Difficult as the blog grows | Easy |
| Blogging UI | Page-builder-like interface | Traditional blogging UI |
Decision Guidance
Use Squarespace’s blog if you want a quick setup, and you run a small blog.
Use DropInBlog if you need a scalable, SEO-friendly blog and content is your primary driver of organic traffic.
FAQs
Can I use Squarespace as a blog?
Yes, you can create a blog website with Squarespace. The site builder has a native blogging functionality, and it’s a great fit for visually oriented blogs. If, on the other hand, you want to start a content-heavy blog, it may be better to choose a CMS or a specialized blogging tool.
Is Squarespace good for blogging?
Yes, Squarespace is good for blogging if you want to run a small, simple blog. The main limitation of the site builder’s blogging tool is that it offers some very basic SEO features. So, if you want to optimize your blog content for search engines, you’ll need an SEO plugin or a different blogging tool.
How do I add a blog to Squarespace?
From your Squarespace dashboard, go to Website → Pages, then click on the plus icon next to Main Navigation, and select Blog from the Showcase section. Choose the layout for your Squarespace blog, name your blog page, and click on it to start managing your blog content.
Are blogs free on Squarespace?
No, you can’t create a blog on Squarespace for free. Although the platform offers a blogging tool, you need to purchase a subscription to publish and maintain your blog.
How do I add a blog to my homepage in Squarespace?
Click on the Edit button next to your homepage to open the editor, then select Add Section where you want your blog posts to appear. Choose Add Blank, click on Add Block, and find and click on Summary to add it to your homepage.
How much does it cost to start a blog on Squarespace?
To add a blog to your Squarespace site, you need to subscribe to the Personal plan ($25/month) or higher. You can also use the platform’s free trial to explore the platform’s blogging tool, but without a subscription, you won’t be able to make your blog public.
Start Blogging on Squarespace with DropInBlog Today
Now you know how to create a blog on your Squarespace site using both the platform’s built-in blogging engine and DropInBlog.
In most cases, the Squarespace native blog will suffice for blogs that don’t post too often. As your blog grows, you’ll find it challenging to organize and manage your content, in which case, it may be better to try a platform built for blogging, like DropInBlog.
Next steps? Create a blog on Squarespace with DropInBlog’s free trial.
We also invite you to explore everything that’s possible with this SEO-friendly blogging app.
As always, feel free to reach out to us if you have any questions.
Happy blogging!


