Key Takeaways
- The best way to add a blog to your Wix site is with DropInBlog!
- The free trial and quick setup lets you to test it in a few minutes.
- DropInBlog has different pricing plans for individuals and teams.
Having an established online presence is key to generating traffic, and even though there are many different SEO practices today, blogging has remained a classic. It’s an invaluable tool not only for increasing conversion rates but also for establishing a rapport with your audience. By doing that, you’ll secure their trust for the long term. The result? It’s simple – success. That’s exactly what DropInBlog sets you up for on a multitude of platforms. So in this integration tutorial, we’ll show you how to create a blog on Wix the easy and fun way – using DropInBlog. Let’s go!
Table of Contents
What Is Wix and What’s It Used for?
Wix is one of the most popular website-building platforms known for its constant evolution. It’s a well-rounded platform that has excellent e-commerce and website-building functionalities that are perfect for small and medium businesses. It has been in the business software game for well over a decade and is still going strong with its large user base.
So, what makes Wix tick, and why is it so popular? Well, it’s hard to pin it down to just one thing – it’s a combination of being user-friendly, being adaptable, and offering a good set of useful tools and features. You can build a general website with it, but you can also run a successful business. Simply put, it has a little something for everyone.
The only major downside is that, compared to all the other terrific features Wix has, its blogging functionality could be better. It’s perfectly fine for occasional blogging, but you can achieve so much more with a superb tool that was designed specifically for blogging, which makes the DropInBlog-Wix combo a dream team!
Wix’s Two Website Builders
One of Wix’s highlights is its agile website builder, the Wix Editor. It’s a traditional drag-and-drop editor that has many customization options, though it can be a little clunky. Still, it sports advanced design features that enable you to create a beautiful website by editing the template of your choice without using code.
Wix has another editor that they launched in 2016 called ADI, which is short for “artificial design intelligence.” It was created to simplify the design process by doing the heavy lifting for you. However, this also means that you are very limited in customization and other design features.
The ADI editor is used by a minority of Wix users. The majority use the original Wix Editor for obvious reasons – better customization options and total design control. Therefore, this tutorial will focus on installing DropInBlog via the original Wix Editor. But don’t fret, if you are using the ADI editor, you can still connect DropInBlog by following the instructions here.
What You Need to Create a Blog on Wix
Okay, so before we begin, here’s what you need to create a blog on Wix: a Wix account. It’s as simple as that! The free plan counts, so you don’t need to worry about that.
Accessing the DropInBlog App
The process of installing DropInBlog on your Wix website is simple and intuitive. Just follow these few easy steps!
The first thing is to go to the DropInBlog listing on the Wix App Market.
Next, click the Add to Site button to begin the integration process (you may be prompted to log in to your Wix account if you aren't already).

On the following screen, click Agree & Add to allow DropInBlog and Wix to connect to one another.

At this point, you may be presented with the following pop-up. If so, just click Go to Editor and then on Open:

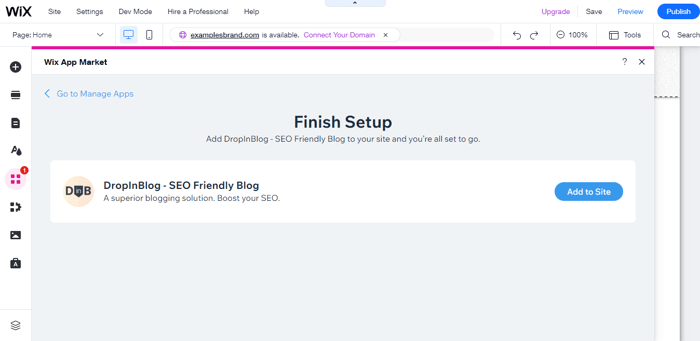
Lastly, you’ll be redirected to the Wix Editor, where you’ll see one last pop-up confirmation for finalizing the setup of DropInBlog. All you need to do here is click Add to Site one more time, and you’re done! Once all the steps are completed, your new DropInBlog account will be automatically created and you’ll be all set for blogging.
Publishing Your New Blog
After you complete the last step in the setup process, a new Blog page will automatically be created and added to the site menu. Once the new page loads, four demo posts from DropInBlog will show up.
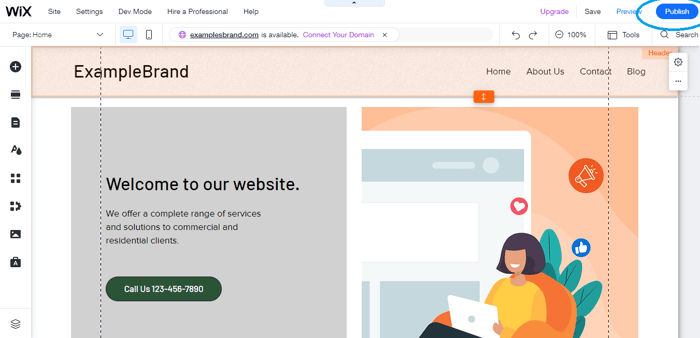
And now, for the exciting part – your page is ready to be published! You can view how cool it will look right away by clicking Publish in the upper right corner and then View Site once the pop-up window appears.
This is what our blog looks like after it’s been published:

And now that you’ve published yours, you can admire it briefly before creating your own blog posts!
Adding New Posts
Creating new posts with DropInBlog is very easy. Here’s how.
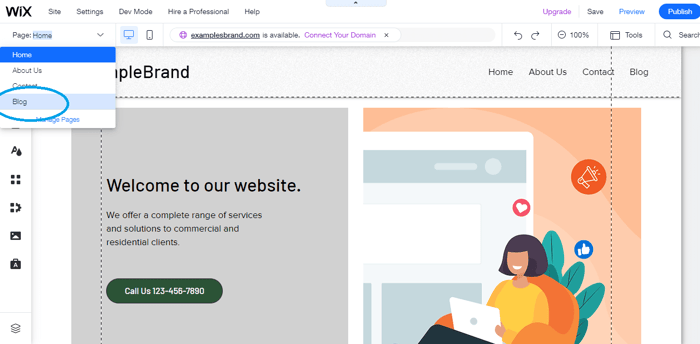
First, go back to the Wix Editor and navigate to the Blog page that was just created by using the drop-down site menu in the top left.
Once the blog page loads, double-click anywhere within the new DropInBlog section to open the Settings popup, then click Manage Blog to access your DropInBlog account.
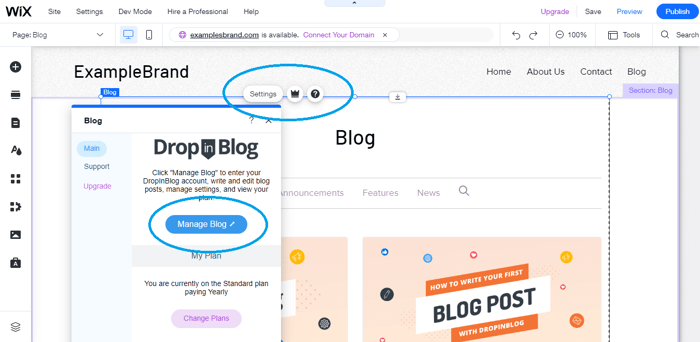
Your DropInBlog account will load within the Wix dashboard. It will look like this:

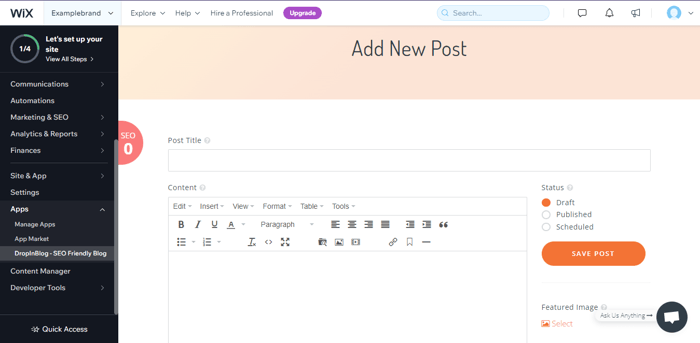
As you can see, your Wix Control Panel is still on the left side, but your DropInBlog Blog Posts page is shown on the right. On the page, you’ll see four demo blog posts with helpful instructions to get you started. You can delete those once you start blogging.
To create a new post, just click the Add Post button, and you’re ready to start writing!
Your Blog Settings
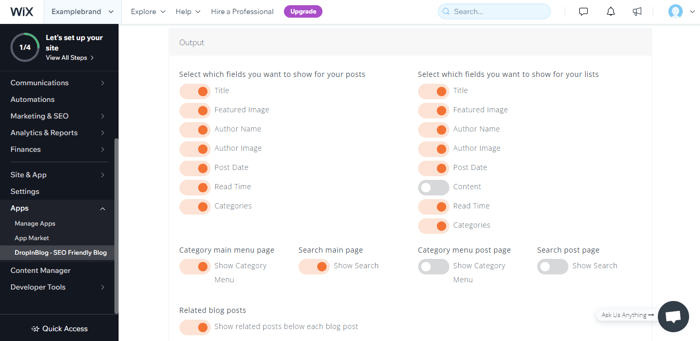
You can access the DropInBlog Settings page from the navigation menu on the top of your DropInBlog account. The Settings page allows you to control all of your blog settings, including the main settings, home page output, social settings, and more.
You’ll notice that there’s a little question mark next to each main setting. When you hover over it, you’ll see a tooltip, which is a brief and informative message that will help you understand what the setting does in case you’re lost.
Each setting category was made to be easily modified, and Output Settings are the best example of this. You can easily toggle them off and on to customize the previews.
Optimizing Your Posts
It goes without saying that optimizing your blog posts is integral, and DropInBlog has the SEO Analyzer to help you with that.
The SEO Analyzer is an intelligent tool that assists you while you’re creating your posts. It gives you immediate feedback as you type and grades your content from 0 to 100 based on a few criteria. The higher the score, the more optimized your content is.

The feedback you get is in the form of a descriptive checklist, where the SEO Analyzer lets you know which parts need improving.
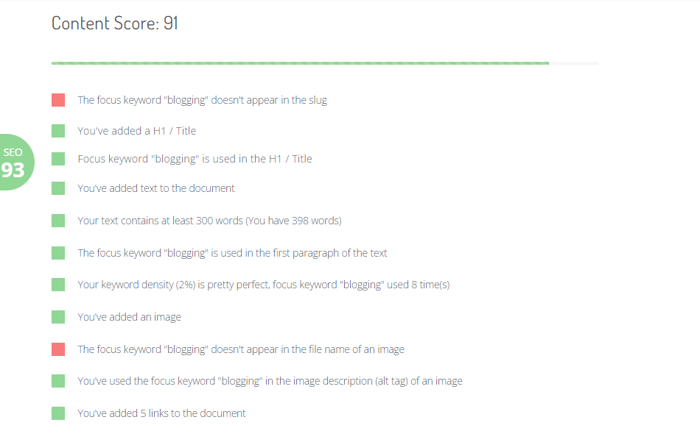
All you need to do is make the suggested changes and watch the SEO score go up. Generally, anything between 90 and 100 is perfect for SEO.
If you want to learn more about how the SEO Analyzer works, you can check out this article from the Help Center. For even more information, read our article on how to get better at SEO.
Until Next Time!
This concludes our tutorial on how to install DropInBlog on your Wix account. The process is relatively simple, and it shouldn’t take long before you’re creating your first blog posts.
If you have any questions, we’d be happy to help! Give us a shout through our online chat or email at any time, and we’ll do our best to resolve your issue. Thank you for choosing DropInBlog, and have fun blogging!


