
Most Laravel blog tutorials show you how to create a blog for your app, but more often than not, they suggest building it from scratch. If you already have a working app and your blog isn’t your core product, there’s no need to build the entire blog system yourself.
In this tutorial, you’ll learn about the common approaches to adding a blog to Laravel and the trade-offs for each one. We’ll also introduce an alternative blog integration method that’s built for existing Laravel sites.
Table of Contents
- The Problem with Building a Blog from Scratch in Laravel
- Common Approaches to Adding a Blog to Laravel
- A Simpler Approach: Use a Laravel Package With Rendered Blog Output
- Step-by-Step: Adding a Blog to a Laravel App with DropInBlog’s Rendered Laravel Package
- How Rendering Works in DropInBlog’s Laravel Package
- Why DropInBlog’s Rendered Laravel Package Works Well in Laravel
- Comparing the Approaches for Adding a Blog to Laravel
- When the DropInBlog Rendered Laravel Package Makes Sense
- SEO and Performance Considerations for DropInBlog-Powered Laravel Blogs
- Choosing the Best Method for Your Laravel Blog
The Problem with Building a Blog from Scratch in Laravel
Laravel is a powerful framework, and without a doubt, you can use it to create a highly flexible blog. The problem is that in most cases, you don’t need a custom blog system. Building one in Laravel means taking on all the engineering work involved in building and maintaining a blog system:
Setting up the content structure (database tables, migrations, post models)
Building the public blog pages (routes, controllers, Blade views, slug handling)
Creating the blog admin workflow (admin UI, draft tools, publishing controls)
Handling media uploads (uploading, storing, and displaying media)
Managing SEO structure (titles, descriptions, canonicals, slugs)
That's, at minimum, a sprint of work before you've published a single post. So, while it’s far from impossible to build a Laravel blog from scratch, it probably isn’t necessary. You can spend that engineering time on features for your actual product.
Common Approaches to Adding a Blog to Laravel
The most common approaches to creating a Laravel blog are:
A fully custom Laravel blog: Building a custom Laravel blog means your blog is built in the app and gives you maximum control over your data, design, SEO, publishing workflow, and features. It takes a lot of engineering work, though.
A headless CMS feeding a Laravel frontend: A Laravel blog built this way has an editorial interface, which is great for content teams. This blogging method also gives you complete design control, but it requires a lengthy setup and many moving parts that must work together. For a simple blog, the added infrastructure and maintenance may not be worth it.
A rendered blog package for Laravel: A rendered Laravel package is an easy way to add a blog to an existing Laravel app without building a blog system yourself. It’s somewhat less flexible than a fully custom Laravel blog, but it comes with an admin interface and is easy to set up and maintain.
A Simpler Approach: Use a Laravel Package With Rendered Blog Output
With a Laravel blog package, you don’t have to build a CMS. Instead, you can easily create a blog that crosses off most of the tasks you’d have with a custom blog system. For this approach, you need DropInBlog’s Rendered Laravel package. This is DropInBlog’s official Laravel package, and since DropInBlog itself is built on this framework, the package integrates naturally into Laravel applications.
Here’s how this blog setup works:
DropInBlog’s Laravel package reduces developer workload. Instead of returning raw JSON data for rendering, the package retrieves pre-rendered HTML from DropInBlog’s Rendered API.
The package retrieves that HTML and inserts it into your Laravel views.
Laravel controls the page header, footer, and styling, whereas the blog content is already converted into display-ready HTML.
This way, you are integrating a publishing layer into your app rather than building and maintaining a blog engine, which saves you a lot of engineering work.
Step-by-Step: Adding a Blog to a Laravel App with DropInBlog’s Rendered Laravel Package
Before you start the setup process, make sure you meet the following requirements:
You have an existing Laravel app built with Laravel 11 or newer.
Your server is running on PHP 8.2 or higher.
You have an active DropInBlog account (you can create one with a free trial).
You have a blog ID and an API key, available in your DropInBlog admin.
Step 1: Install the package via Composer
Run this in your terminal inside your Laravel project:
composer require dropinblog/laravel-rendered
Step 2: Publish the configuration file
Run the following publish command:
php artisan vendor:publish --provider="DropInBlog\Laravel\Providers\DropInBlogServiceProvider" --tag="config"
Doing so will create a config/dropinblog.php file inside your project. This file controls the fields the package can request from the API, sets the blog URL path and feed format, and specifies the layout in which the blog content will be rendered.
The default settings work well for most apps, but if you want to change anything, you can do so from within the config file. The two settings most likely to need editing are layout (must match your app's layout file name) and sections.content (must match the section name where content is rendered in that layout).
Step 3: Add credentials to the .env file
Open the .env file in the project root and add these two lines:
DROPINBLOG_ID=your-dropinblog-id
DROPINBLOG_API_KEY=your-dropinblog-api-key
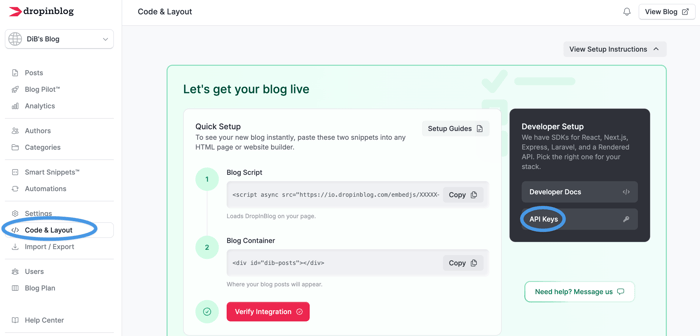
You’ll find your blog ID and API key in the DropInBlog admin panel on the Code & Layout page under API Keys.
Replace your-blog-id and your-dropinblog-api-key with the actual values from your DropInBlog account, and proceed to the next step.
Step 4: Add @dropInBlogHead to the layout
Open your main layout file (typically resources/views/layouts/app.blade.php) and add the following directive inside the <head> tag:
@dropInBlogHead
This step is important because this directive adds blog-specific head content to your site, including title tags, meta descriptions, and Open Graph tags. Always use this directive in your layout’s <head> section so that DropInBlog can show the right head content on your blog pages.
However, since your app’s layout probably has its own <title> tag, you should wrap your default title in the @notDropInBlog directive so that it only appears on non-blog pages.
Here’s an example pattern:
<head>
    {{-- Include DropInBlog head content (title, meta tags, etc.) --}}
    @dropInBlogHead


    {{-- Only include your own title on non-blog pages --}}
    @notDropInBlog
        <title>Your Site Title</title>
    @endnotDropInBlog
</head>
Adding these directives tells your app to use DropInBlog’s post title and SEO data on your blog pages and show the app’s default titles on all the other non-blog pages.
Step 5: Run the app
To launch your Laravel blog, type this command:
php artisan serve
Copy your app’s URL, add /blog to the end, and run it in your browser. If you changed the blog path inconfig/dropinblog.php, use that path instead. At this point, your blog should be live.
You don’t have to set up any routes, because the package automatically registers all blog routes.
How Rendering Works in DropInBlog’s Laravel Package
Here’s what actually happens when someone visits a blog page:
The user types a post URL (
/blog/my-post-title) into their browser. Laravel receives this request via routes registered by the DropInBlog package, and the package requests the rendered blog content from DropInBlog’s Rendered API.The API returns rendered HTML for the blog page. It includes
bodyHtml, which contains the blog content, andheadHtml, which contains page-specific head data, such as title tags, meta descriptions, and Open Graph tags.The package places
bodyHtmlinside your Laravel view, while making the head HTML available through the@dropInBlogHeadBlade directive. Your app still controls the surrounding layout, including header, footer, and navigation.The browser receives a complete server-rendered page with the blog content, SEO metadata, styling, and layout already in place.
The benefit of this method is that you don’t need JavaScript to display the content.
Why this matters:
Simpler to build: You don't write a rendering pipeline or assemble individual page pieces. Instead, you get ready-made HTML that your app only needs to insert into the page.
Easier for search engines to crawl and index: Search engine crawlers read the page and immediately see all the content, whereas with JavaScript and client-rendered pages, they have to wait for JavaScript to load the content.
Less maintenance: You don’t need separate markdown parsers, rendering pipelines, or frontend content rendering logic to display blog content correctly. DropInBlog sends ready-to-display HTML.
Views can be customized: DropInBlog’s Laravel package comes with the default Blade views, but you can publish them into your app if you want to edit them. To do so, run this command:
php artisan vendor:publish --provider="DropInBlog\Laravel\Providers\DropInBlogServiceProvider" --tag="views". This will publish the views toresources/views/vendor/dropinblog/. From here, you can edit the Blade templates and adjust wrapper elements, layout structure, and styling hooks for your blog pages.
Why DropInBlog’s Rendered Laravel Package Works Well in Laravel
Laravel’s templating system is designed to create and display HTML pages, so DropInBlog’s pre-built HTML fits naturally into Laravel.
Laravel's routing and service provider systems allow packages to add routes and set up code automatically, so developers don’t have to connect everything manually.
Adding a blog to Laravel with DropInBlog keeps your blog within your app. It uses the same domain, layout, and navigation, and doesn’t require a separate content system.
DropInBlog itself is built on Laravel. The package comes from a team that already uses the same framework and understands Laravel well, which contributes to a smooth blog creation process in existing Laravel projects.
Comparing the Approaches for Adding a Blog to Laravel
Below is a table showing the strengths and weaknesses of the three most common methods for adding a blog to Laravel.
| Custom Laravel build | Headless CMS | DropInBlog Laravel package | |
|---|---|---|---|
Setup time | High | Medium-high | Low |
Admin interface | Yes (you build it) | Yes | Yes |
Rendering | Your responsibility | Varies | Handled by package |
Maintenance | High | Medium | Low |
Flexibility | Full control | High | Moderate |
Compatibility with existing apps | Yes | Yes | Yes |
When the DropInBlog Rendered Laravel Package Makes Sense
Here’s how you can determine if the DropInBlog Laravel package is a good fit for your blog.
Good fit if:
You already have a working Laravel app and want to add a blog without building it from scratch.
Your blog is managed by non-developers who need an editor-friendly publishing interface.
Your blog is an important part of your app, but not its main product.
You need a way to create and manage your Laravel blog quickly.
Less ideal:
Your blog requires a complex, custom content structure.
You want to control how each piece of content is built and displayed.
You don’t want to use an external package.
Need a blog for your Next.js app? Here's how to add one.
SEO and Performance Considerations for DropInBlog-Powered Laravel Blogs
The blog lives inside the Laravel app: Blogs created with DropInBlog are served from the same domain your app uses (e.g., yourapp.com/blog). Because your blog lives in a subdirectory on the same domain, it can benefit from the domain authority your app already has.
Metadata is handled automatically: The
@dropInBlogHeaddirective injects title tags, meta descriptions, canonical URLs, and Open Graph tags into the page head automatically. That means you don't need to build a metadata layer yourself.Clean URLs out of the box: Since clean URLs matter for SEO, the package creates clean, readable routes by default (e.g.,
/blog,/blog/your-post-slug).Sitemaps and RSS feeds: Instead of manually creating them, the package automatically generates them for you.
Crawlable blog content: Because DropInBlog’s Laravel package uses server-side rendering and serves pre-rendered content, search engine crawlers see the full content immediately. The result is content that’s easier for search engines to crawl and understand.
Choosing the Best Method for Your Laravel Blog
To add a blog to Laravel, you can take a few different paths. Building a blog engine from scratch just because your app runs on Laravel is, in most cases, unnecessary and takes a lot of engineering work. Using a headless CMS requires less work, but despite the flexibility it offers, it comes with a lot of moving parts and adds more integration and maintenance work.
So, if you want to skip the complexities of these two blog setup approaches, you should consider DropInBlog’s Laravel package. It will give you a fully functioning blog with a publishing interface, and thanks to server-side rendering, you’ll get an SEO-friendly blog that handles rendering for you.


