
This guide will help you master the details and fine points of DropInBlog’s new feature, the unified account login.
A unified login means using only one login for different blogs, websites, and business scenarios. It’s an incomparably more convenient and simpler way of managing content marketing than constant account switching.
Now that we’ve got the basics down, let’s dive in and see how a unified account login can make things easier!
Table of Contents
DropInBlog’s Unified Account Login
When there are countless DropInBlog users with multiple accounts, it poses a challenge: How can we make their experience even more enjoyable and straightforward? Introducing a unified login seemed like a no-brainer.
DropInBlog’s unified login enables you to access multiple blogs via a single login. This type of setup is sometimes called a “unified account,” and other times “unified login.” Both are good, but here we’ll go with the latter.
What are the use cases for DropInBlog’s unified login?
Here are three examples:
1. One owner, multiple businesses and blogs
Suppose you had three different businesses. Each has a separate website. And each website has its unique blog.
Previously, you would’ve needed three different DropInBlog accounts with different login credentials, one for each blog. With the new unified login feature, you only need a single DropInBlog account and login. It gives you access to all three blogs, which makes managing them incredibly easy.
2. One user, different blogs
Imagine a friend of yours, a business owner, assigns you as a “user” on their blog. Now imagine a second friend, also a business owner, does the same.
With the new DropInBlog feature, you’ll be able to access both blogs with one login instead of having two different accounts requiring different logins. Moreover, DropInBlog’s unified login allows you to add a blog of your own to the same account as the other two.
3. One website, multiple blogs
The unified login feature makes it possible to create more than one blog for your website.
And why would you do that? Who needs two or more blogs on one website?
- Two (or more) blogs can come in handy if you want one space for standard blog posts and another for case studies.
- Two (or more) blogs are a great solution if you plan to use one blog exclusively for informational content and another for company news.
- Two (or more) blogs allow you to target different personas when you have different types of products or offerings.
These three are not the only possible scenarios where multiple blogs make sense. However, they’re sufficient to show that we’re talking about a useful ability. That said, we believe this third use case is not a very common practice.
So now, via one login, you can access multiple blogs you’re associated with as a user or an owner. You can switch between them in no time and manage each blog separately with its own users, categories, design customizations, billing plans, and payment methods, as you’ll see in the following sections.
Create a New Blog Account
As always, everything starts in your admin dashboard.
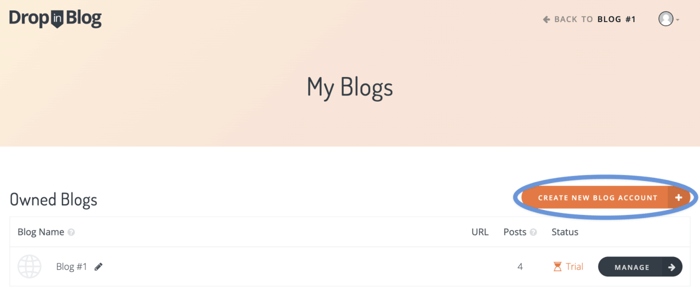
Hover over the user image on the right. You’ll see a dropdown menu. Click My Blogs.

Clicking My Blogs takes you to a page where you can see all your current blog accounts under the same email.
You’ll also see a nice big ol’ Create New Blog Account orange button.
When you click this orange button, it opens a new page where you can name your blog and add the blog URL.
The latter is optional since you can always change the URL later.
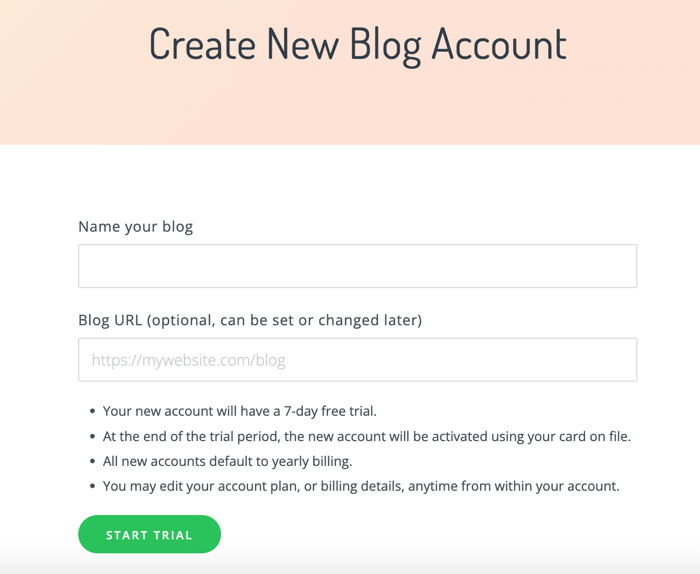
The same page has a green "Start Trial" button which, when you click it, allows you to start your free trial for this particular blog. DropInBlog is highly transparent and immediately informs you about the billing arrangements for your new blog, as the image above shows.
You can create multiple blogs in this way with the same login. Regardless of how many you create, you can always see them by hovering over the user image. They’ll show in the dropdown menu, where you can switch between and manage them.
Manage the Blog’s Plan (or Cancel the Blog Account)
When you create a new blog, there are a few things you need to do to make everything perfect.
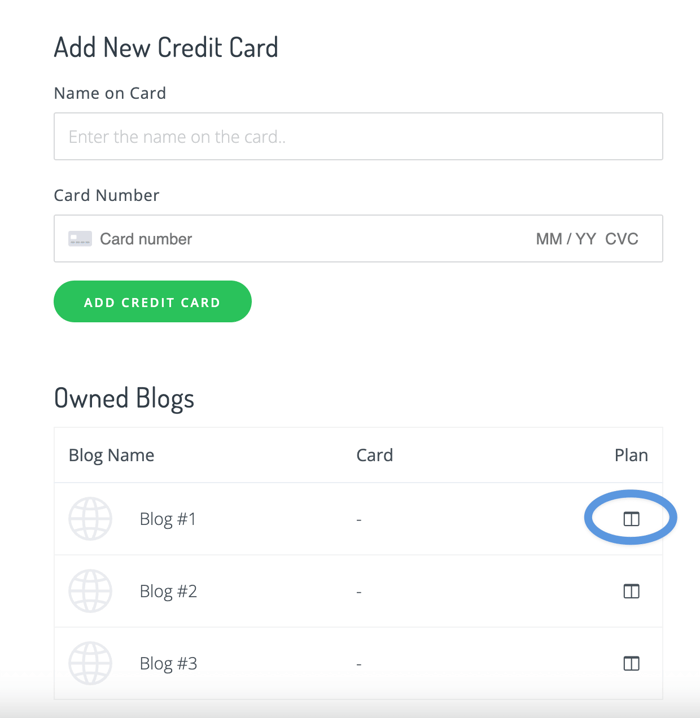
For starters, to keep your blog active after the free trial, you must add your credit card information. So, hover over the user image and choose My Credit Cards from the dropdown menu.

That will open a new page where you can enter your details, such as the credit card name and number.
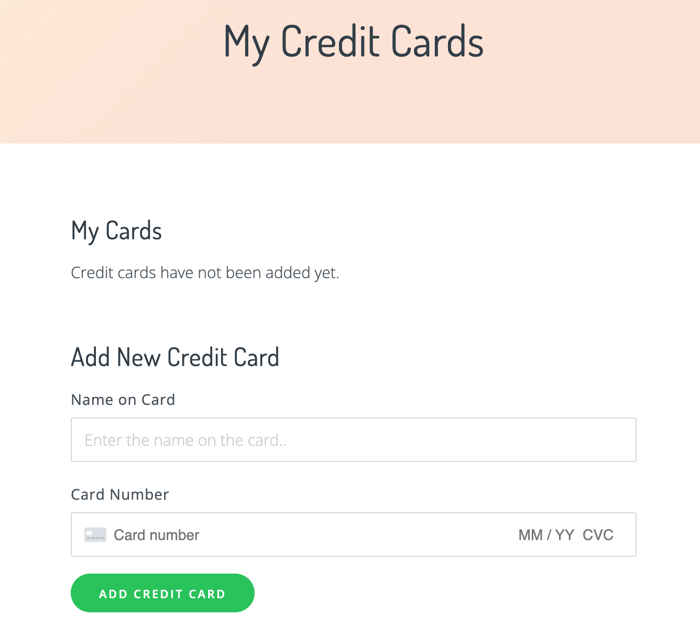
Just make sure you click the green Add Credit Card button after you add your details to save the information.
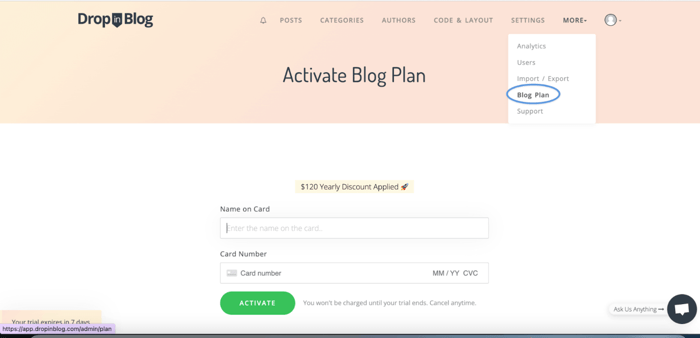
To see more details about your subscription and further manage your account, click the Plan icon under Owned Blogs.
Clicking the Plan icon leads you to a page where you can see your blog’s subscription plan information, such as the pricing plan’s name and billing cycle.
Alternatively, click More and then Blog Plan. You’ll find yourself on the same page with information on the plan your account defaults to when you create a new blog.
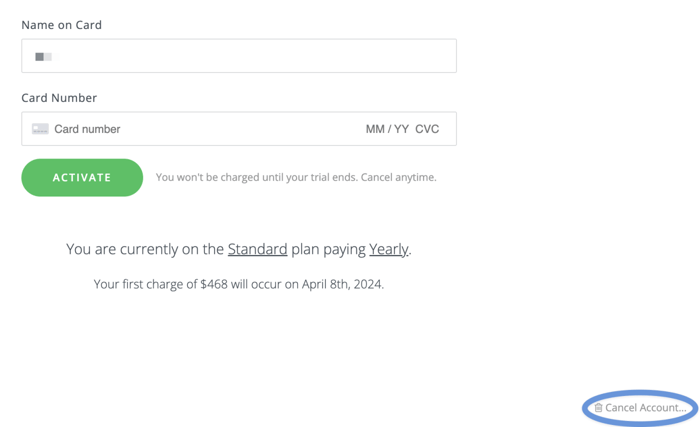
If you want to cancel your subscription after the free trial, click Cancel Account at the bottom right of the page.
Add Users to Your Blog
Setting up multiple user blogs in DropInBlog is a piece of cake.
While you’re on your admin page, click More. Choose Users from the dropdown and click the orange Invite User button.
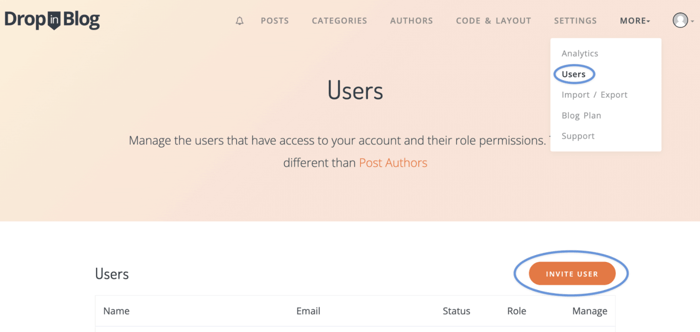
This step leads you to a page where you need to add the new user’s email address and assign them a suitable role, such as Admin, Editor, Writer, or Custom.
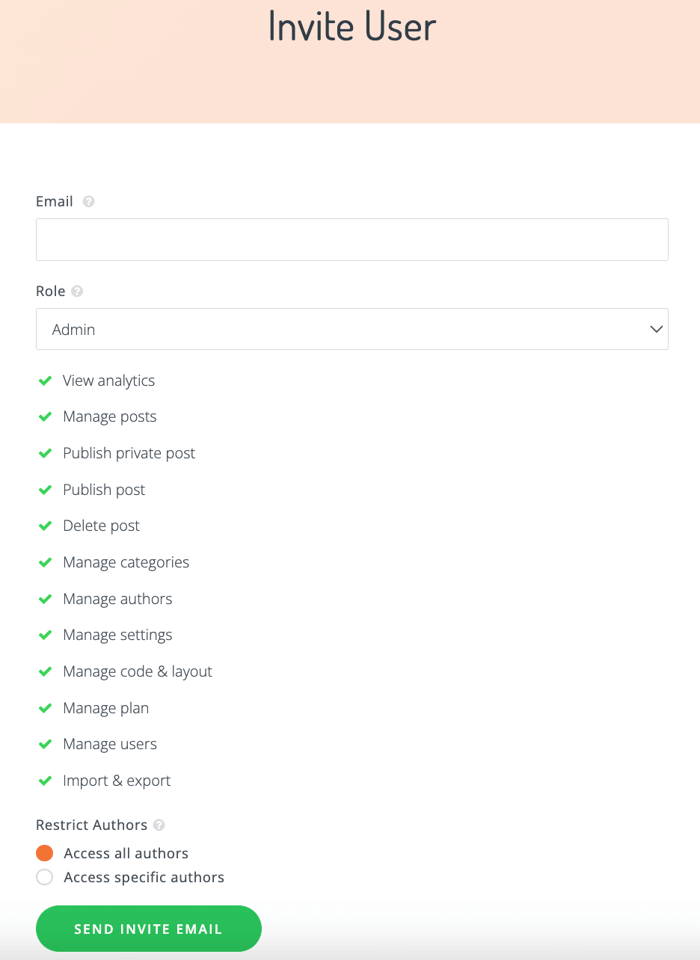
The new user will have different access rights and permissions based on the role you assign them. The list below the Role field shows you those rights, such as View analytics, Manage posts, Publish private post, etc.
Since the newly added user in the image above is Admin, there’s a green tick symbol before all the possible access rights. However, this will be different for the Editor and Writer roles. These roles have fewer rights than the Admin, meaning you’ll see fewer green ticks and more black Xs when you assign someone the role of an Editor or Writer.
Regarding the Custom role, you can grant them as many or as few permissions as you deem necessary.
In addition, you can allow a user to post on behalf of all or some blog authors. The first corresponds to the Access all authors, and the second to the Access specific authors option.
When you decide on the role and permissions, click the green Send Invite Email button, and you’ll see a confirmation that the invitation was sent successfully.
Keep in mind that when you’re adding a new user, you’re adding that user to a specific blog. So, be sure to invite the right user to the right blog.
Also, one user can receive an invitation from different accounts. Thanks to the unified login feature, the added user can manage all the blogs they’re invited to with a single DropInBlog account.
Connect with Your Website
You can connect each blog you set up in DropInBlog with any prominent website, e-commerce site, or course builder, such as Wix, Shopify, or Thinkific. It goes without saying that each of your blogs can be integrated with a different builder, for example one with Wix, another with Shopify, and a third with Thinkific.
Integrating your blogs with a site, online store, or course builder takes only a few simple steps, as described in our how-to integration guides.
To find the integration code, make sure you’re on the blog you want to connect to the builder. Then click Code & Layout in the navigation bar, and you’ll find yourself on a page with the integration code – Step 1 and Step 2 – specific to that particular blog.
It’s worth mentioning that on the same page with the integration code, you’ll also find design customization options, such as the ability to change link color, font size, font family, and more.
FAQs
Can I have multiple blogs on my Wordpress website?
Yes, you definitely can. DropInBlog had made it possible to have multiple blogs on WordPress even before it introduced the unified login. Now, with this new feature, owning more than one blog on a WordPress website is even easier and more convenient.
Is it good to have multiple blogs?
It depends. This answer is probably not what you want to hear – we know we wouldn’t – but that’s how things really are.
In this case, “it depends” means multiple blogs can be good if:
- You manage separate businesses.
- Your single business includes different departments.
- You target various audiences.
- You operate in more than one state, country, or region.
If you think it may help, re-read the third example from the “DropInBlog’s Unified Login” section above and see if your idea of multiple blogs fits that use case description.
Conclusion
Having multiple blogs with one login and playing different roles on other people’s blogs, again with just one login, dramatically simplifies blog access and creates a seamless user experience.
Hopefully, this was a smooth ride, and you’ve become an expert on DropInBlog’s unified login by now. Still, if you have any questions regarding the new feature, don’t hesitate to reach out. We look forward to hearing from you.


