
Key Takeaways
- The best way to add a blog to your WordPress site is with DropInBlog!
- The free trial and quick setup let you test it in a few minutes.
- DropInBlog has different pricing plans for individuals and teams.
If you’ve already created a WordPress blog and want to add a second blog to your WordPress site, here’s what you should know:
You can add a second blog to WordPress.
There’s more than one way to do that.
The method you choose will affect your blog’s SEO, maintenance, permissions, and scalability.
In this guide, we’ll review the different methods for creating multiple blogs on your WordPress site and show you the safest, most sustainable option to do it.
TL;DR
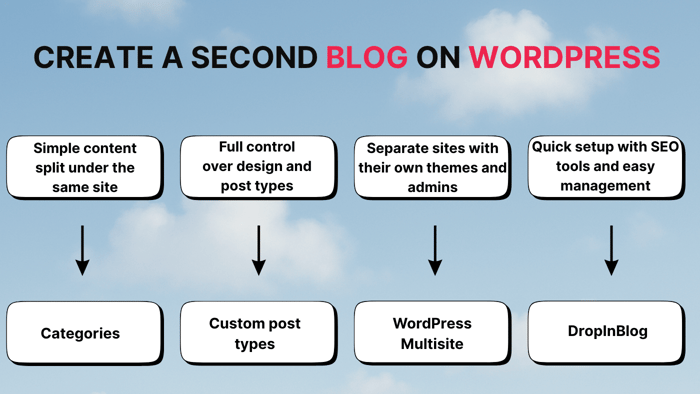
There are four ways to add a second blog to WordPress.
Users with little or no technical knowledge should use categories or DropInBlog to add another blog to their site.
Advanced WordPress users and those with coding knowledge can also use custom post types (CPTs) or the multisite feature.
Table of Contents
- Key Takeaways
- TL;DR
- The Benefits of Adding a Second Blog to WordPress
- Before You Choose a Blog Integration Method
- Method 1: Adding a Second Blog to WordPress With DropInBlog
- Method 2: Add a Second Blog to WordPress With Categories
- Method 3: Adding a Second Blog to WordPress Using Custom Post Types
- Method 4: Adding a Second Blog to WordPress with Multisite
- Benefits of Using DropInBlog to Create Multiple Blogs on One WordPress Website
- WordPress Multisite vs. DropInBlog
- SEO and Maintenance Best Practices for Multiple WordPress Blogs
- Use DropInBlog for Your WordPress Blog
- FAQs
- Creating Multiple Blog Pages in WordPress: Which Method to Use
The Benefits of Adding a Second Blog to WordPress
Having multiple WordPress blogs means you can keep each blog neatly focused on a specific topic. If you already use WordPress, remaining on the same platform is more convenient, cost-efficient, and secure.
If you add a second blog to your existing WordPress site, you’ll still have only one login, which helps to keep your site more secure. And depending on the blog creation method you choose, you could also experience reduced site maintenance in terms of plugins and URLs.
Another benefit of having a second WordPress blog is improving your visibility and marketing performance. You can use both blogs for cross-promotion. Cross-promotion can lead to an increase in visibility and traffic, meaning more customer conversions for you.
The problem is that WordPress doesn’t actually allow multiple blogs within one installation. That’s why you need a workaround to add the second blog.
We’ll show you four different methods of adding multiple WordPress blogs.
Why Some WordPress Users Are Adding Tools Instead of Switching
WordPress is still the dominant CMS, but in 2026 a growing number of WordPress users have shifted from "WordPress for everything" to "WordPress for what it's best at, with focused tools for the rest."
For blogging specifically, that often means keeping WordPress for the main site and adding a dedicated blog tool like DropInBlog for a parallel blog, avoiding the upgrade-and-debug cycle that comes with running multiple plugins for multi-blog setups.
Before You Choose a Blog Integration Method
As mentioned at the beginning of this WordPress guide, the blog integration method of your choice will affect your blog’s SEO, maintenance, permissions, and scalability. Here’s how:
SEO isolation and shared metadata: Depending on the method, your WordPress site and your blog will use either a single SEO system (shared metadata) or separate systems (SEO isolation).
URL structure implications: The selected method also determines the SEO-friendliness and flexibility of your blog URLs, as well as whether your blog and the rest of your site feel like one entity.
User and editorial permission limitations: With some methods, you’ll have shared permissions across blogs, and with some, you’ll be able to separate your editors, roles, and permissions.
Performance and plugin conflict risks: Depending on the method, your blog may experience plugin conflicts and decreased performance. Choose a method with limited or no risks of this kind.
Quick Decision Guide
Use categories to group blogs with similar topics and audiences, and better organize your content.
Use custom post types if you need structured content and have the technical resources to create and maintain it.
Use Multisite if you need truly independent blogs with different topics, audiences, and separate SEO strategies, workflows, and teams.
Use DropInBlog if you need a non-technical setup and low maintenance with numerous SEO benefits for blogs with different topics and audiences.
Categories | Custom Post Types | DropInBlog | Multisite | |
|---|---|---|---|---|
SEO system and control | Shared WordPress SEO system | Shared WordPress SEO system | Centralized SEO (not limited by WordPress plugins) | Separate SEO systems |
Subdirectory-based blog | ✓ Yes | ✓ Yes | ✓ Yes | ✗ No |
Editorial boundaries | ✗ No | ✓ Yes (requires dev work) | ✓ Yes | ✓ Yes |
Free from plugin conflicts / stable performance | ✗ No | ✗ No | ✓ Yes | ✗ No |

Method 1: Adding a Second Blog to WordPress With DropInBlog
The easiest, non-coding solution for adding two or more blogs to your WordPress site is with DropInBlog – a professional blogging app that you can easily embed into any website.
Why Use DropInBlog:
Use DropInBlog if you need an SEO-friendly blog that’s easy to set up and bypasses the limitations of other blog integration methods.
Unlike with CPTs and Multisite, you won’t need additional plugins or development workAlso, you won’t have to worry about your blog’s performance as DropInBlogs runs independently of your WordPress site.
Users typically choose this method to avoid blog separation and performance issues related to categories.
It also skips the complexities of CPTs and Multisite while offering a flexible, SEO-friendly setup in a subdirectory, role and permission controls, and scalable content sections.
Update: DropInBlog now has a Wordpress Plugin! Install that for the quickest and most robust integration.
Step 1: Create a DropInBlog Account
First, create a DropInBlog account. You can test it for free with a trial account.
You'll also need an existing WordPress installation. You have to be logged in to your WordPress site as a super-admin, which is the primary admin of the WordPress installation. This will give you the right permission levels to add the custom code.
Step 2: Create a Second Blog Page in WordPress
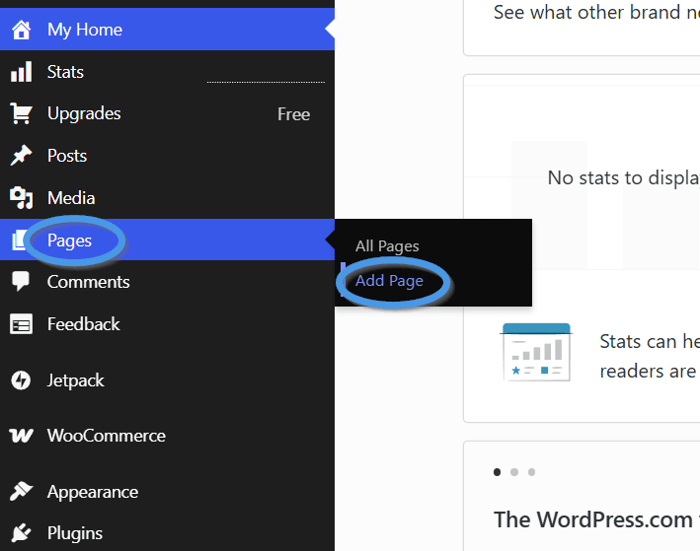
To create a new page, log in to your WordPress website admin and use the Pages item in the sidebar. Hover over the sidebar item and click on Add Page.
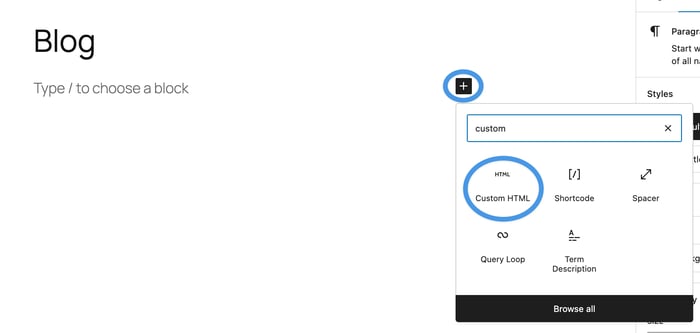
Then, name your newly created page. We’ll use “Blog.”
Step 3: Add Your Blog Code to Your New Page
Depending on the version of WordPress you have, the process of adding the DropInBlog embed code may differ a bit.
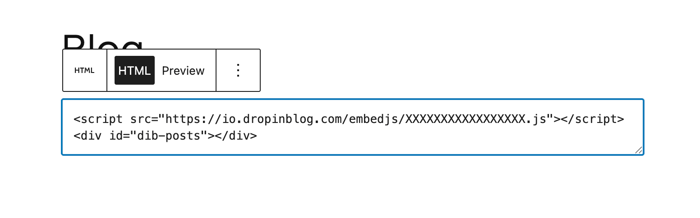
For newer WordPress versions (5.0 and above), you’ll be presented with the block editor. Within the blocks UI, use the plus icon to add a Custom HTML block to the new page. Once added, you’ll then be able to simply add the DropInBlog embed code.
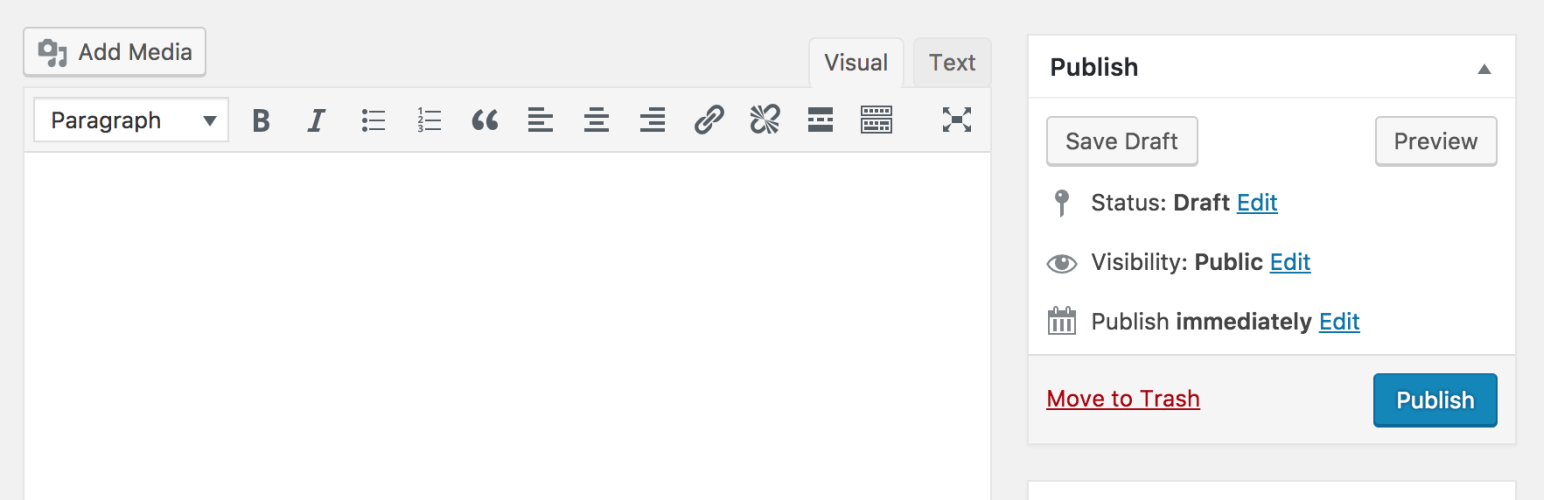
For older versions of WordPress, you’ll be presented with (or will have access to) the classic WYSIWYG editor. Switch to Text mode to add the DropInBlog embed code.
To find the embed code, open a new tab, navigate to your DropInBlog account, and select Code & Layout in the main navigation.
Copy the code that is shown in Step 1 of the DropinBlog guide. It will look something like this:
<script src="https://io.dropinblog.com/embedjs/XXXXXXXXXXXXXXXXX.js"></script>
Paste this code into the HTML editor in WordPress. Then go back to DropInBlog and copy the code shown in Step 2:
<div id="dib-posts"></div>
You can then switch back to WordPress and paste this additional line of code under the code from Step 1.
Note: WordPress comes with an autosave feature that will save the changes you’ve applied to your new page, but you may need to save these changes manually in older versions.
Step 4: Publish Your Second WordPress Blog
Once you add the blog code from your DropInBlog account and paste it inside the Custom HTML block in WordPress, click on the Publish button in the top right.
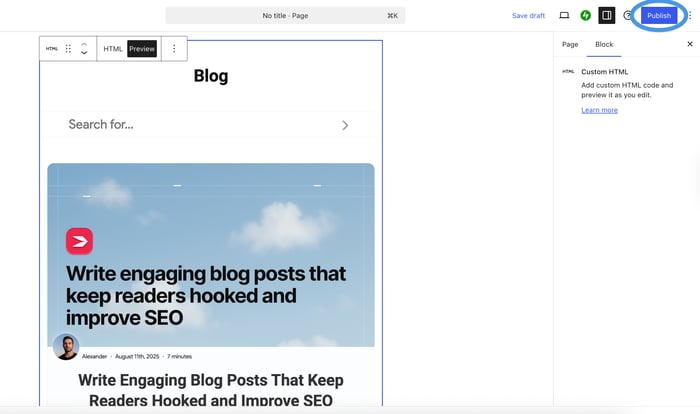
Return to the WordPress page editor, and check out your new blog page by clicking the Preview button in the top right corner of your browser.
Step 5: Add the Blog Link to Your Navigation Menu
To make sure your visitors can access your blog, you need to create a new menu item for your blog page.
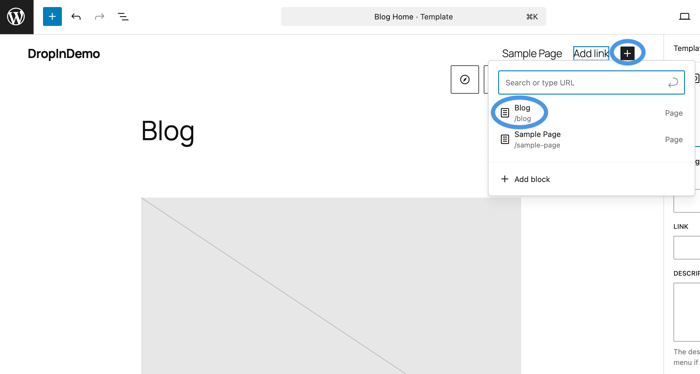
To do this, select Appearance, then Editor.

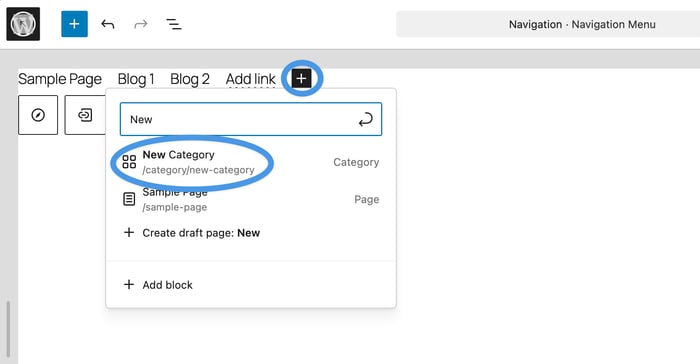
Click anywhere inside the page to open the editor. Next, click inside the navigation menu in the top right, select the plus icon on the right, and choose your blog page from the dropdown.
Mission complete! ✨
Pros and Cons of Using DropInBlog for Creating a Second WordPress Blog
| Pros | Cons |
|---|---|
✓ Simple setup | ✗ No free plan |
✓ Easy to use | ✗ Separate platforms for managing multiple blogs |
✓ SEO-friendly blog | |
✓ Text-to-speech engine | |
| ✓ AI-powered topic discovery | |
✓ Inherits your site’s design automatically | |
✓ Supports multiple users and custom roles | |
✓ Decreases the load on a WordPress site |
Best for users looking for a quick setup and a low-maintenance, SEO-friendly blog.
DropInBlog Troubleshooting
Using DropInBlog to add a second blog to WordPress may sometimes remove the script tags that are part of the DropInBlog embed code.
If you have super-admin access, you can correct this easily once logged in. If you do not, you can contact your website administrator so they can modify the configuration of the website to enable you to add this code.
Alternatively, you can use the WP Coder plugin. This WordPress plugin gives you better ability to edit the HTML of your pages, allowing you to add the custom embed code for DropInBlog.
Method 2: Add a Second Blog to WordPress With Categories
Another simple way to add a second WordPress blog is to use categories. This method, however, isn’t ideal for blogs with a lot of content and multiple users. It also can’t separate your content in the true sense of the word. To get the most out of it, make sure your blog doesn’t check these boxes.
The steps below will show you how to add a second WordPress blog with categories:
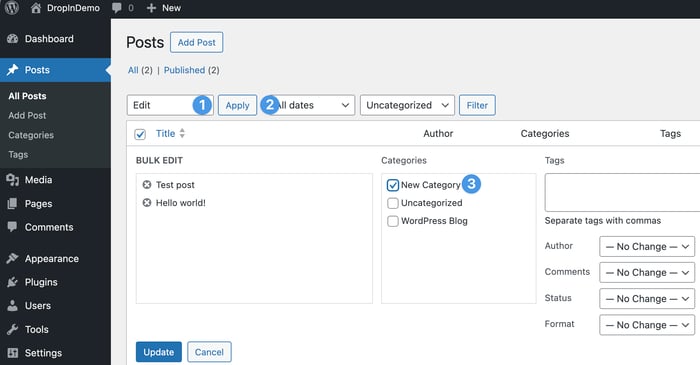
Open the Categories tab in your dashboard, then add a new category.
Next, open the Posts tab, select the posts you want to add to your category, and, using the menu at the top, select Edit, then Apply.
After that, open your site’s menu settings by going to Appearance → Editor → Navigation.
Use the kebab menu next to Navigation to open the site editor.
Once there, click inside the menu, then click on the plus sign to add a new menu item, find Category Links in the blocks menu, and select your new category.
When you save your changes, all the posts you add to your new category will look like they’re on a separate site page.
Pros and Cons of Using Categories for Adding a Second Blog to WordPress
| Pros | Cons |
|---|---|
✓ Multiple blogs under one WordPress installation | ✗ Complicated to manage blog settings, menus, and widgets |
✓ Centralized content, plugin, and user management | ✗ Not suitable for large blogs with lots of content |
✗ No (easy) way to manage user access to all your blog content | |
✗ Navigation can be confusing for blog visitors | |
✗ Difficult to scale |
Method 3: Adding a Second Blog to WordPress Using Custom Post Types
This approach is similar to filtering blog posts through categories, but with custom post types (CPTs), you have greater control over your content. You can manage your blogs independently and grant user permissions accordingly.
Your blogs will have a better SEO structure (compared to the categories approach), but you’ll also have to manage structured data, indexing rules, and metadata for each blog.
The easiest way to add a second blog to WordPress via CPTs is to install a plugin like Simple CPT.

The problem appears when you only have the option to add custom post types through code, and you’re not comfortable with modifying functions.php files.
Additionally, your theme needs to support CPTs, because if it doesn’t, you’ll need to create templates manually.
Pros and Cons of Using CPTs for Adding Multiple Blogs to WordPress
| Pros | Cons |
|---|---|
✓ Add multiple WordPress blogs with custom fields | ✗ Complex setup |
✓ Separate admin menus for easier content management | ✗ May require custom coding |
✗ Potential plugin conflicts | |
✗ May not be compatible with your theme | |
✗ Required ongoing maintenance |
Best for advanced WordPress users who need multiple blogs inside one WordPress installation.
Method 4: Adding a Second Blog to WordPress with Multisite
With WordPress's Multisite feature, you can manage multiple independent blogs from one installation, which is ideal for those managing various blogs with unique content and designs. However, setting up and maintaining a Multisite network requires more technical skills. If you're new to this, consulting a WordPress developer is recommended.
This approach is perfect if you're looking at a setup like:
subdomain: blog1.your_website.com
subdomain: blog2.your_website.com
To add a second blog to WordPress using Multisite, you need to complete the following steps:
Enable multisite via the wp-config.php file.
Create a new site network.
Add network configuration rules to the wp-config.php and .htaccess files.
Add a blog from a new network admin.
The downside of adding a second blog to WordPress using this method is that it requires modifying WordPress configuration files, which can be an obstacle if you don’t have some coding knowledge.
Additionally, not all plugins function in the Multisite environment, and if one of them doesn’t work properly, it will affect all your blogs. The same applies to your site server and database, as they’re shared among all sites in your Multisite network.
Pros and Cons of Using Multisite to Add a Second Blog to WordPress
| Pros | Cons |
|---|---|
✓ Manage multiple blogs from a single WordPress installation | ✗ Technical setup |
✓ Simplified management of WordPress site, plugins, and blog content | ✗ Not compatible with all plugins |
✓ Easy to update and backup | ✗ Plugin, server, and database bugs affect all sites inside a Multisite network |
✗ Ongoing maintenance |
Best for agencies and businesses with 2+ blogs that need a single dashboard for managing multiple WordPress blogs.
Benefits of Using DropInBlog to Create Multiple Blogs on One WordPress Website
DropInBlog is a user-friendly blogging app that doesn’t require a complex setup. In just a few easy steps, you can add a second blog to your WordPress site.
With DropInBlog’s unified login feature, you can access multiple blogs via a single login – just like you’d do with Multisite, only without the complicated setup.
Each blog you create can be customized individually with its own users, categories, and design settings.
This method is suitable if you're aiming for a setup like this:
your_website.com/blog1
your_website.com/blog2
Compared to the other three methods, DropInBlog is more centralized, giving you better control over your blogs and users.
This is true even compared to the WordPress Multisite blog setup, which offers far greater flexibility for managing content and users than categories and custom post types.
Here’s a quick comparison of these two methods.
WordPress Multisite vs. DropInBlog
Unlike the WordPress Multisite feature, DropInBlog doesn’t require a complex technical setup. It also doesn’t limit you to the WordPress ecosystem, and if you decide to migrate to another platform, you can easily export your content from DropInBlog and take it with you.
Another plus side of using DropInBlog to add multiple blog pages to one WordPress site is that you don’t have to rely on plugins or worry about potential conflicts or updates. It allows you to create and assign authors and users to each blog and manage their access.
You can also easily create SEO-friendly content using DropInBlog’s native SEO analysis tool. Plus, you can design each blog separately from the Advanced Customizations or Custom CSS sections.
| DropInBlog | WordPress Multisite | |
|---|---|---|
Easy to set up | ✓ | ✗ |
No plugins required | ✓ | ✗ |
Not affected by plugin/theme conflicts | ✓ | ✗ |
Compatible with multiple platforms | ✓ | ✗ |
SEO-ready out of the box | ✓ | ✗ |
Design flexibility | ✓ | ✓ (with effort) |
As for the other methods, see the table below to discover how they compare.
Comparison table: Categories vs. CPTs vs. DropInBlog
| Feature | Categories | Custom Post Types (CPTs) | DropInBlog |
|---|---|---|---|
Setup time | Fast – WordPress native feature | Moderate – create via code or plugin | Super fast – embed code snippet or shortcode in minutes |
Scalability | Low | Moderate | High |
Performance and resource isolation | None | Low | High |
Separate design | ✗ No – shares the same theme/template unless customized with code | ✓ Yes – via custom templates | ✓ Yes – can style embed blocks or use different blog feeds |
SEO friendly | ✓ Basic – shared metadata and structure | ✓ Yes – works well with SEO plugins | ✓ Yes – built-in SEO fields, clean URLs, schema markup |
Coding required | None – beginner-friendly | Some – basic PHP or plugin knowledge | No coding required |
Maintenance | Low – everything runs on one WP installation | Moderate – one WP site to maintain, but CPT logic can grow | Low – DropInBlog handles updates, backups, and hosting |
SEO and Maintenance Best Practices for Multiple WordPress Blogs
Regardless of your choice, consider the following additional tips:
Customize blog links for better navigability and relevance.
Manage user roles, particularly in a multi-author setup, to ensure security and efficient workflow.
Implement SEO strategies for each blog to enhance online visibility and search rankings.
Add schema markup to your WordPress blog to enable rich results for your content. DropInBlog implements schema automatically, but with the other three methods, you’ll have to do this manually or use a plugin.
Add meta titles and descriptions to your posts, and add your keyword. The ideal length for titles is 50-60 characters, and between 130 and 160 characters for descriptions.
Add internal links to your content using meaningful anchor text. This practice helps search bots and users understand your content structure.
Use a mobile-first design, starting with a responsive template. Check how your site looks on mobile devices and remove any elements that clutter the interface.
Ensure your blogs load fast by implementing lazy loading, compressing images, and decreasing the number of plugins on your site.
Regularly update and maintain each blog for optimal performance and relevance.
Use analytics tools to monitor performance, adapting your strategies based on audience engagement and feedback. This ensures each blog thrives within your WordPress website.
Use DropInBlog for Your WordPress Blog
The embeddable blogging tool can be easily added to a WordPress site. Some of the features you’ll get by adding a second blog to a WordPress site using DropInBlog include the following:
The SEO Analyzer: Built-in tool for optimizing your blog for search engines. You don’t need a plugin to make your content SEO-friendly.
Mention Boost™: With DropInBlog’s content enhancement tool, you can easily make your content AI-friendly and earn some AI mentions in the process.
Blog Voice AI™: The platform’s text-to-speech engine turns your written content into audio, which allows you to serve your content in two formats.
Authors and user roles: DropInBlog also lets you create author profiles and optimize them for Google’s E-E-A-T algorithm. And you can invite your team members to help you manage your blog, too, since the blogging tool also supports (customizable) user roles.
Custom CSS: If you want to make big design changes to your blog, you can apply your own CSS from your DropInBlog account.
Clean exports: The platform has a built-in export tool, allowing you to back up your content or move away from DropInBlog.
Customizable blog feed: You can easily customize your blog feed and display your content by category or author on one of your WordPress blogs.
FAQs
Can you have two blogs on one WordPress site?
Yes, you can create two or more blogs on one WordPress site. You can use categories, custom post types, WordPress Multisite, or a dedicated blogging app like DropInBlog.
Why should I add a second blog to WordPress?
By adding a second blog to WordPress, you can increase your earnings, but also keep your content and blogs separate and distinct from each other.
Maybe you have a second blog idea, but don’t want to mix the two topics on one blog. Then, you can start an entirely separate blog (with a second advertising revenue stream). Alternatively, creating a second blog with a similar focus can be useful for affiliate marketing or blog cross-promotion.
What’s the easiest way to manage multiple blogs?
The easiest way to manage multiple blogs on WordPress is by using categories or a third-party blogging app. The other two options, WordPress Multisite and custom post types, require some coding knowledge and a more technical setup.
Do I need WordPress Multisite to create a second blog?
You don’t need WordPress Multisite to create a second blog. Alternative options include adding a second blog with categories, custom post types, or a dedicated blogging app.
How do categories differ from having separate blogs?
Separate blogs have their own URLs, while with categories, your blogs live on a single URL. Categories are intended to help you organize your content better, while separate blogs allow you to manage content for each instance independently.
Can I embed an external blog in WordPress?
Yes! Blogging apps like DropInBlog are platform-independent, which makes it possible to create a blog on any platform, including WordPress. Regardless of the size of your business, small or enterprise, DropInBlog caters to companies of all sizes.
Creating Multiple Blog Pages in WordPress: Which Method to Use
To sum it all up, here’s the ideal use case for each of the discussed methods:
Categories are great for beginners who want to organize their blog content quickly.
Custom post types are geared towards intermediate to advanced WordPress users who want to manage two or more blogs independently and have greater design and SEO control.
WordPress Multisite is best suited for creating multiple independent blogs and separately managing each blog’s design and SEO.
DropInBlog is a beginner-friendly blogging solution perfect for creating multiple WordPress blogs and managing content, design, and user permissions for each of them independently.
If you decide to use DropInBlog for adding a second WordPress blog, be sure to sign up for a free trial. And if you need some assistance getting set up, please get in touch.
We’ll be more than happy to help out.
Happy blogging!


