

Key Takeaways
- The best way to add a blog to your Magento site is with DropInBlog!
- The free trial and quick setup let you test it in a few minutes.
- DropInBlog has different pricing plans for individuals and teams.
The typical blog setup for Magento stores involves purchasing a blog extension, installing it via Composer, and running the usual “bin/magento setup:upgrade” command. The problem with this setup isn’t that the Magento 2 blog extensions are lacking, since you have quite a few choices, including Aheadworks, Magefan, and Amasty’s Blog Pro. The problem is that these extensions can cause conflicts with themes like Hyvä and add complexity to the upgrade process. You should go down the extension route if you are a developer or work with one.
On the other hand, you can also add a blog to Magento 2 without extensions. For that, you’ll need DropInBlog, which is an embeddable blogging solution that doesn’t require server access, module installation, or creating a dev ticket for every blog post you create. DropInBlog comes with a simple copy-paste setup and works with Breeze, Hyvä, and custom themes.
In this guide, we’ll show you how to install a Magento blog without Composer and help you decide whether you should install one without a blog extension.
TL;DR: Add a Blog to Magento 2 with DropInBlog in Three Easy Steps
Magento doesn’t have a native blogging tool, so use DropInBlog instead.
To create a blog on Magento 2, just add the HTML Code element from your DropInBlog account.
Optimize your Magento blog for search engines and easily add and manage your blog content.
Table of Contents
- Key Takeaways
- TL;DR: Add a Blog to Magento 2 with DropInBlog in Three Easy Steps
- Extension vs. No-code (Embed) Blog Setup: Which One Is Right for You?
- How Do I Create a Blog for My Magento Store with DropInBlog?
- How to Create Blog Posts in Magento with DropInBlog
- Customize Your Blog’s Design
- Other Notable DropInBlog Features
- Migrating an Existing WordPress Blog to Your Magento Store
- FAQs
- Start Blogging on Magento with DropInBlog Today
Extension vs. No-code (Embed) Blog Setup: Which One Is Right for You?
Using an extension to install a blog on Magento 2 makes sense for users who have access to Composer and are comfortable installing and configuring extensions. Another scenario in which extensions are a better fit than embedding a blog into your store is if you want to store your blog content in Magento’s database. If you decide to take this route, you’ll have a few strong candidates: Magefan ($149-$349 one-time fee), Amasty Blog Pro ($349-$949 + ongoing subscription), and Aheadworks ($280/year).
The other route for setting up a blog on Magento 2 doesn’t involve extensions, complex setups, or possible theme conflicts. You can simply embed a blog into your store and publish your content from a browser-based editor without ever entering Magento’s admin. This no-code blog setup also means that your content won’t be stored in Magento's database, but on the servers of the selected blog embed service.
However, because the content isn’t stored in Magento’s database, you can easily move it to another platform. To set up a Magento 2 blog this way, you can use DropInBlog, which runs on a simple monthly subscription and starts with a free trial.
How Do I Create a Blog for My Magento Store with DropInBlog?
Before you can add a blog to your Magento store, you’ll need to create a DropInBlog account. You can use the blogging platform’s free trial to try this blog integration method at no cost. Once you’ve set up your account, proceed to Step 1.
Step 1: Create a New Page in Your Magento Account
Log in to your Magento account, and using the left-hand side menu in your dashboard, select Pages from the Content menu.
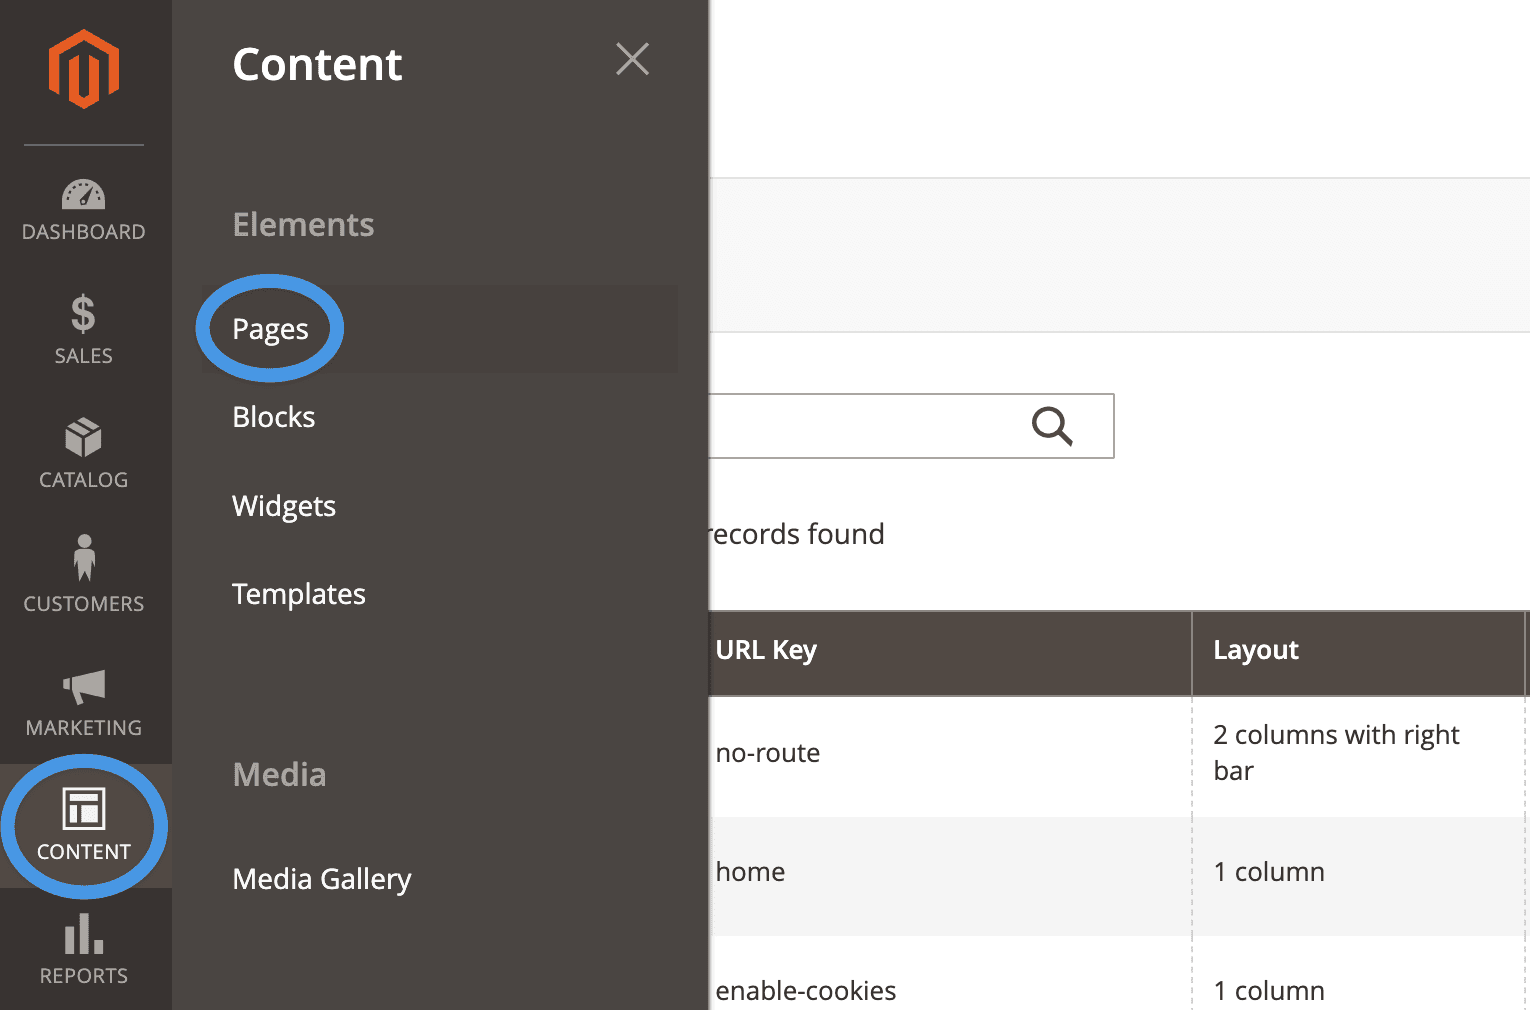
You’ll be directed to the Pages page, where you need to select Add New Page to create a new page for your blog.
Step 2: Add the HTML Code Element to Your New Magento Page
On the following page, add the name of your blog in the text box next to Page Title, then expand the Content section, and click on the Edit with Page Builder button.
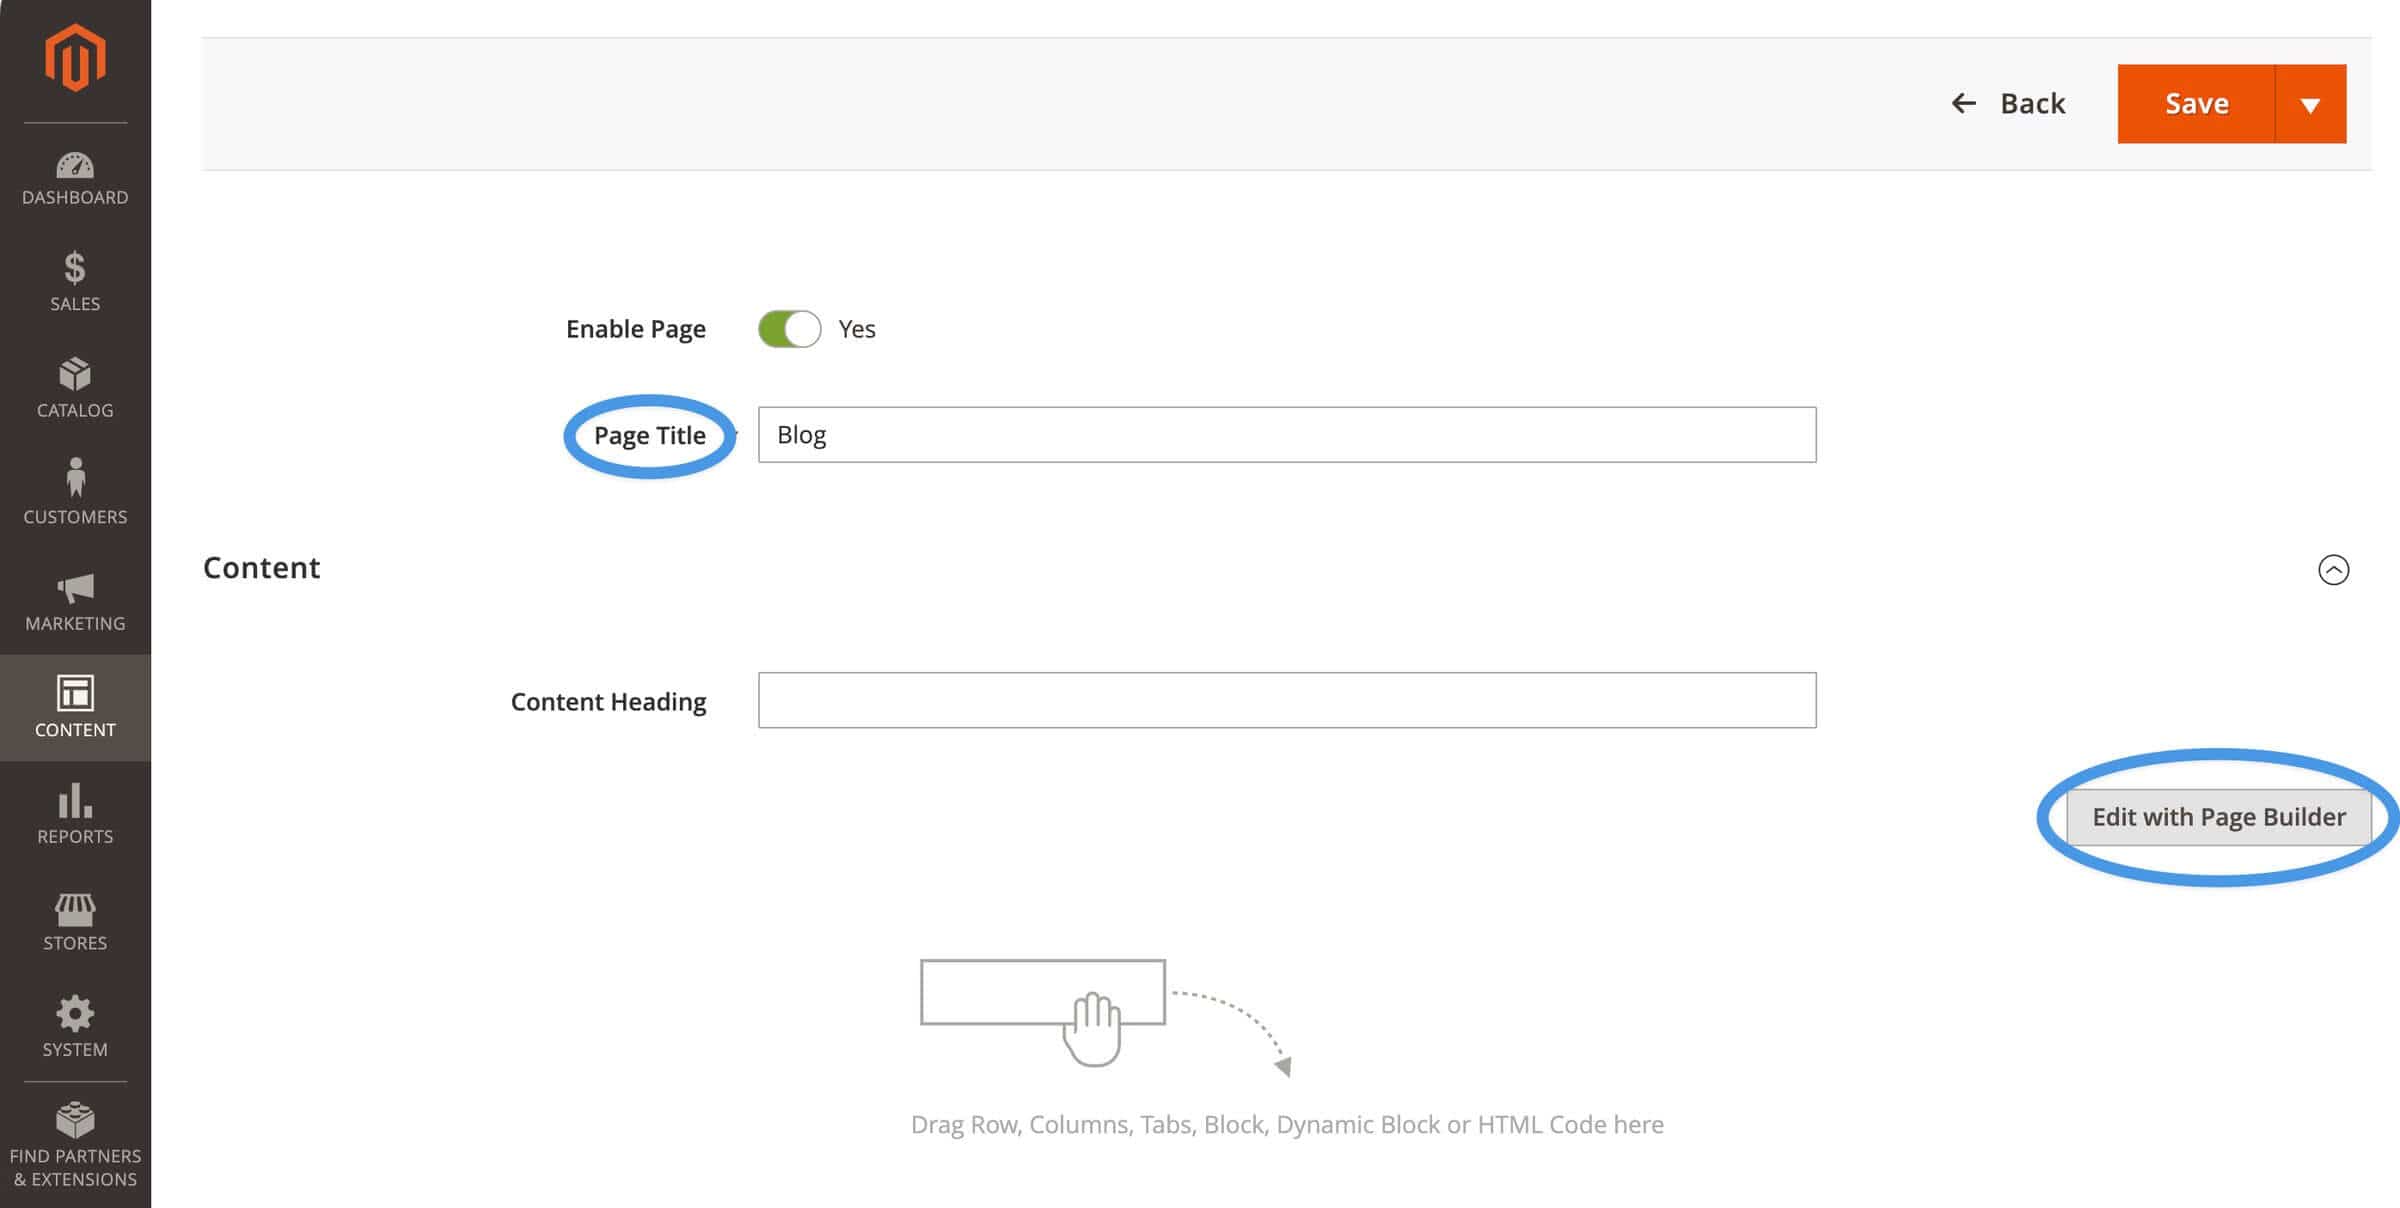
Doing so will take you to Magento’s page builder. From here, you can add the HTML Code element where you’ll insert your DropInBlog blog code.
You’ll find HTML Code in the Elements section. Drag the element and drop it inside the editing area.
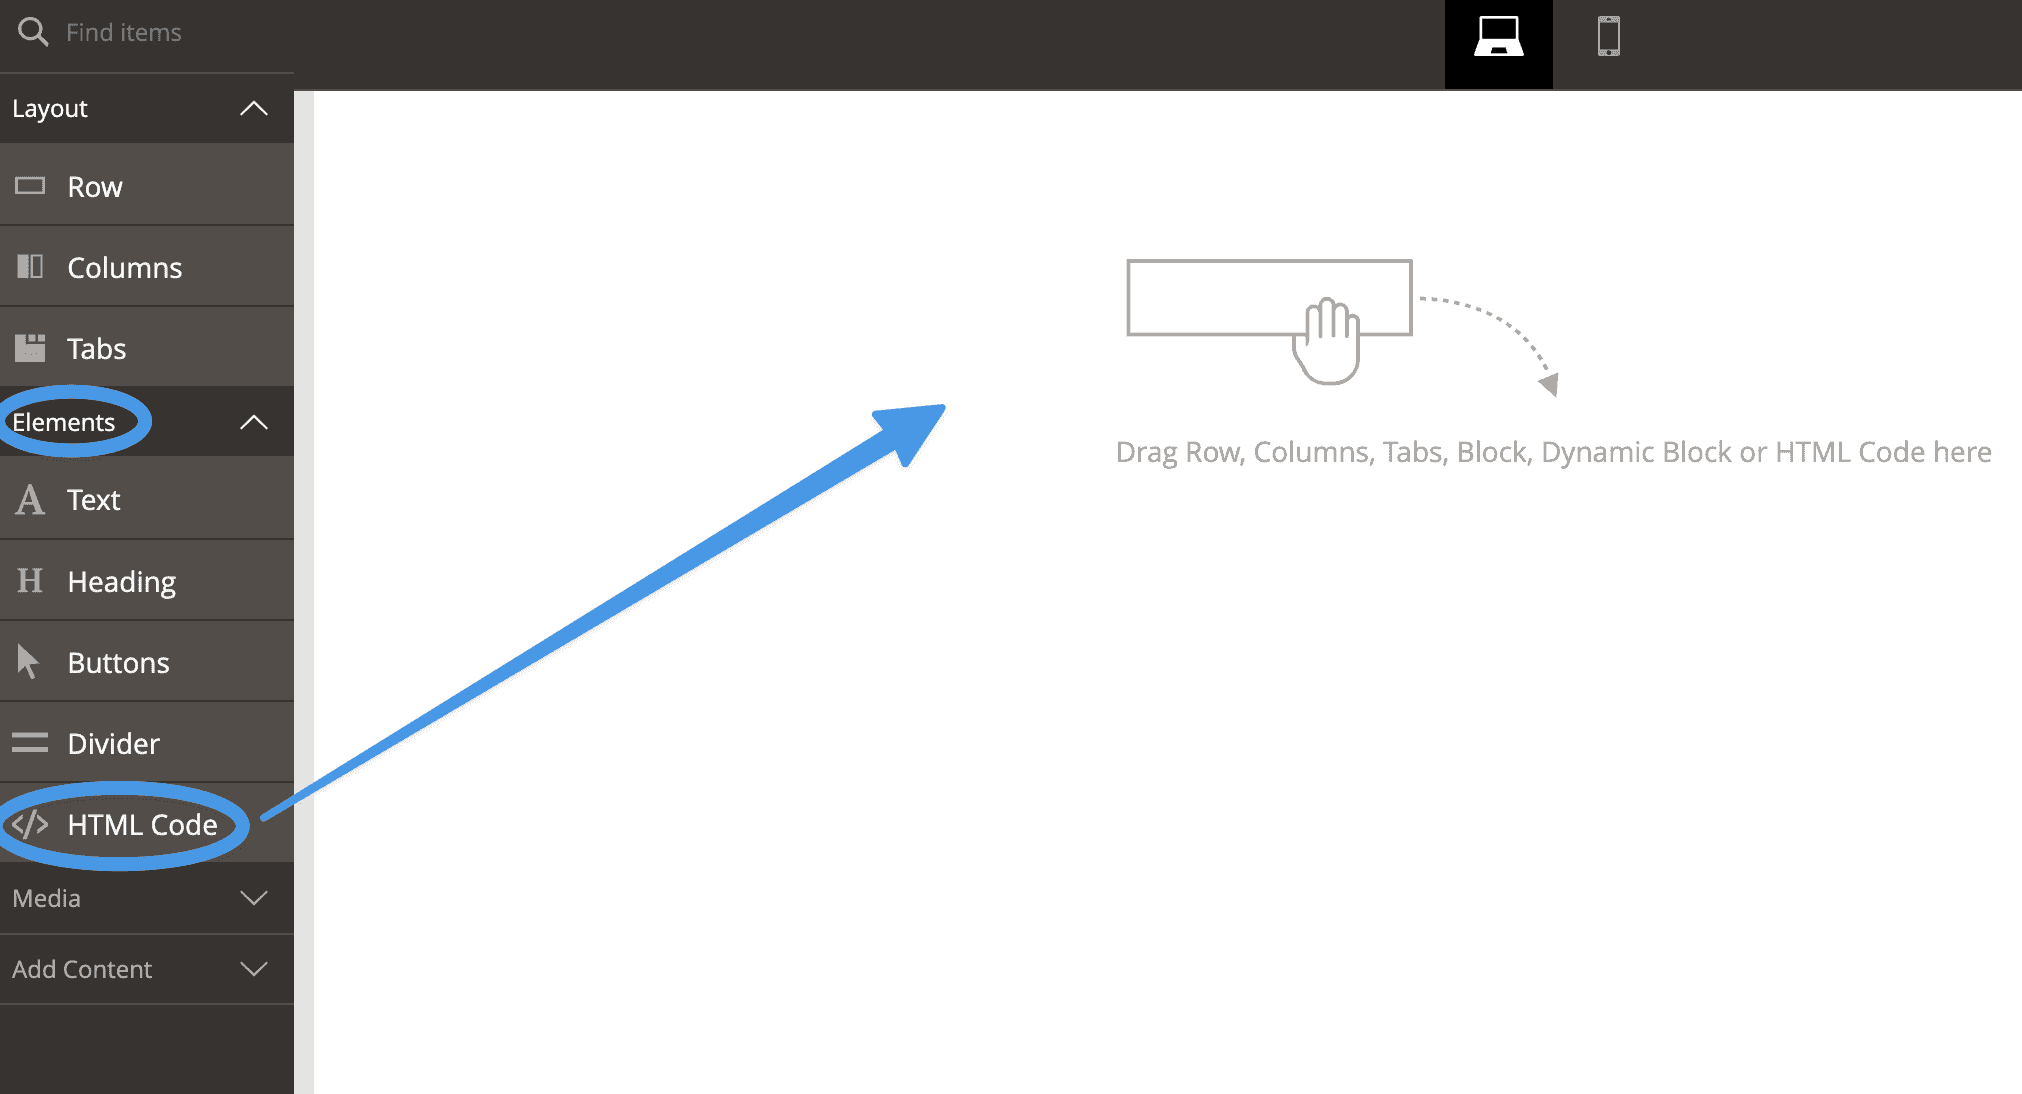
Step 3: Add Your Blog Snippet to the HTML Code
Next, hover over the HTML Code element, then click the gear icon to open the HTML editor.
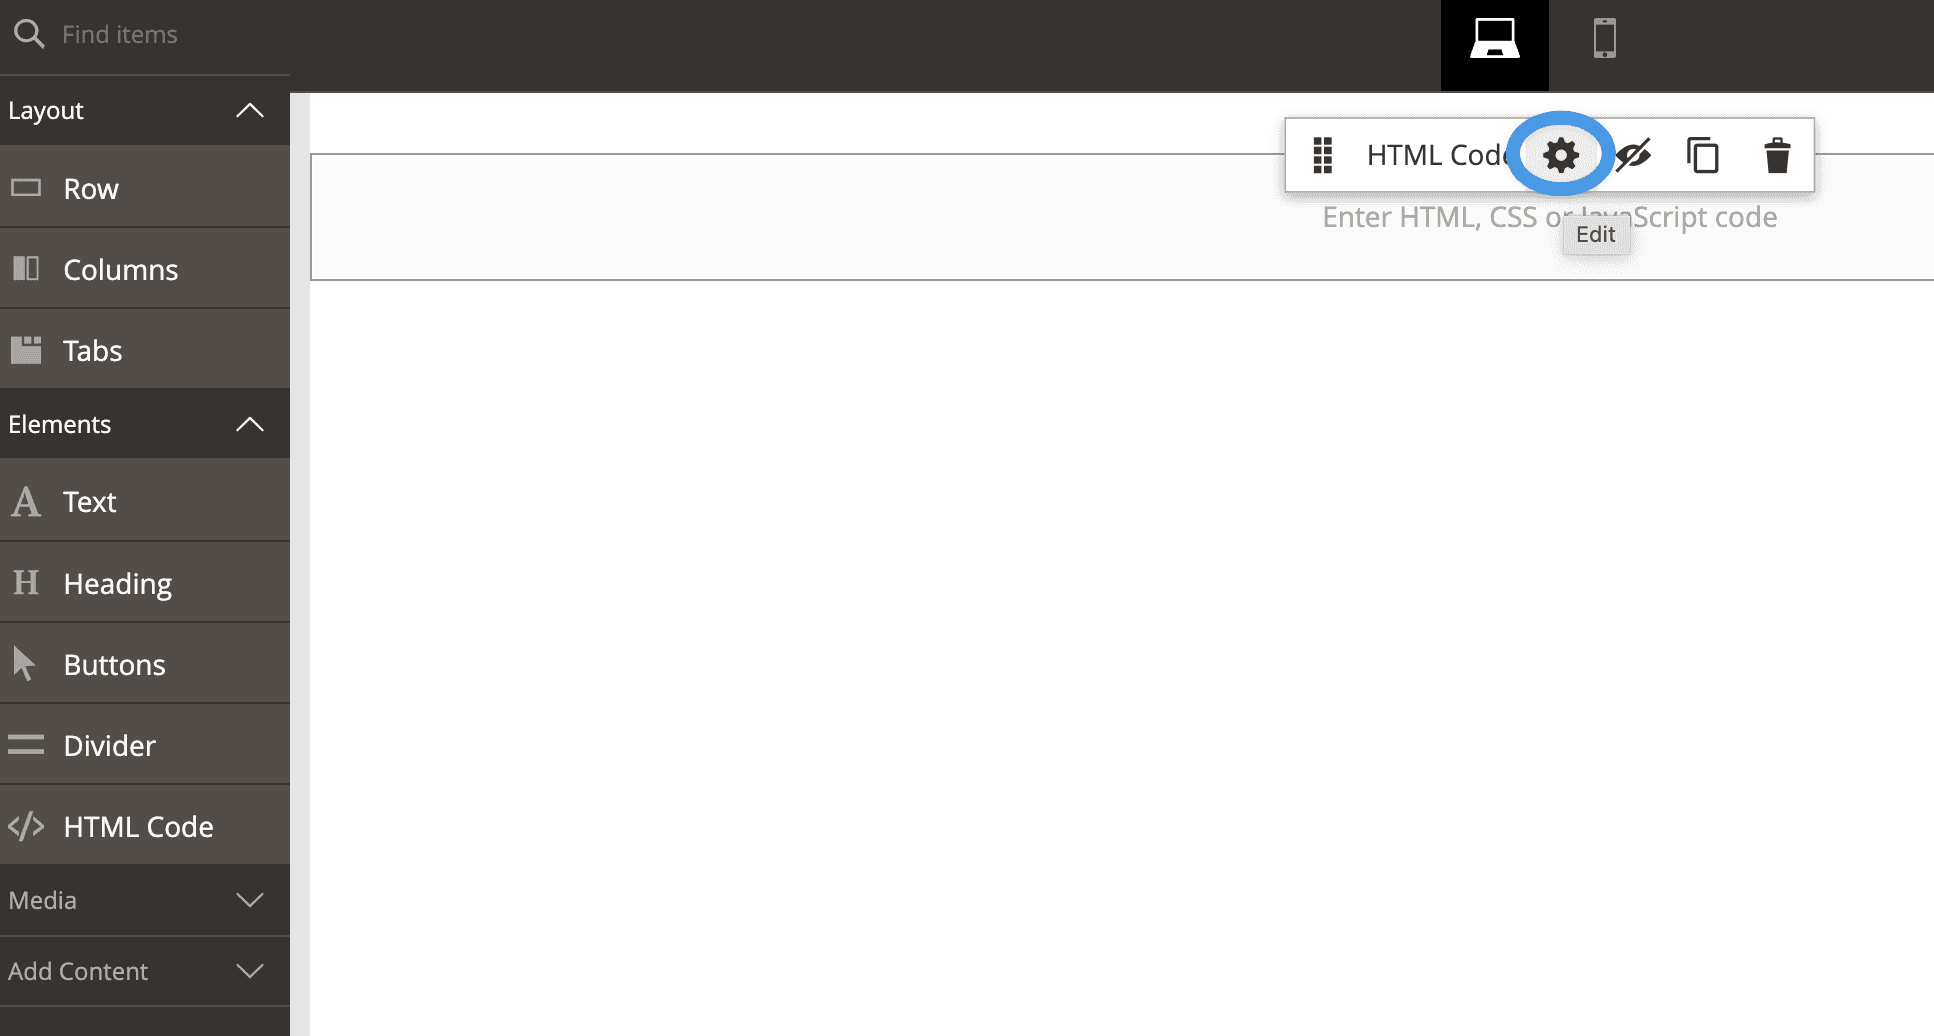
Then, go to the Code & Layout page of your DropInBlog account, and copy the code under Blog Script.
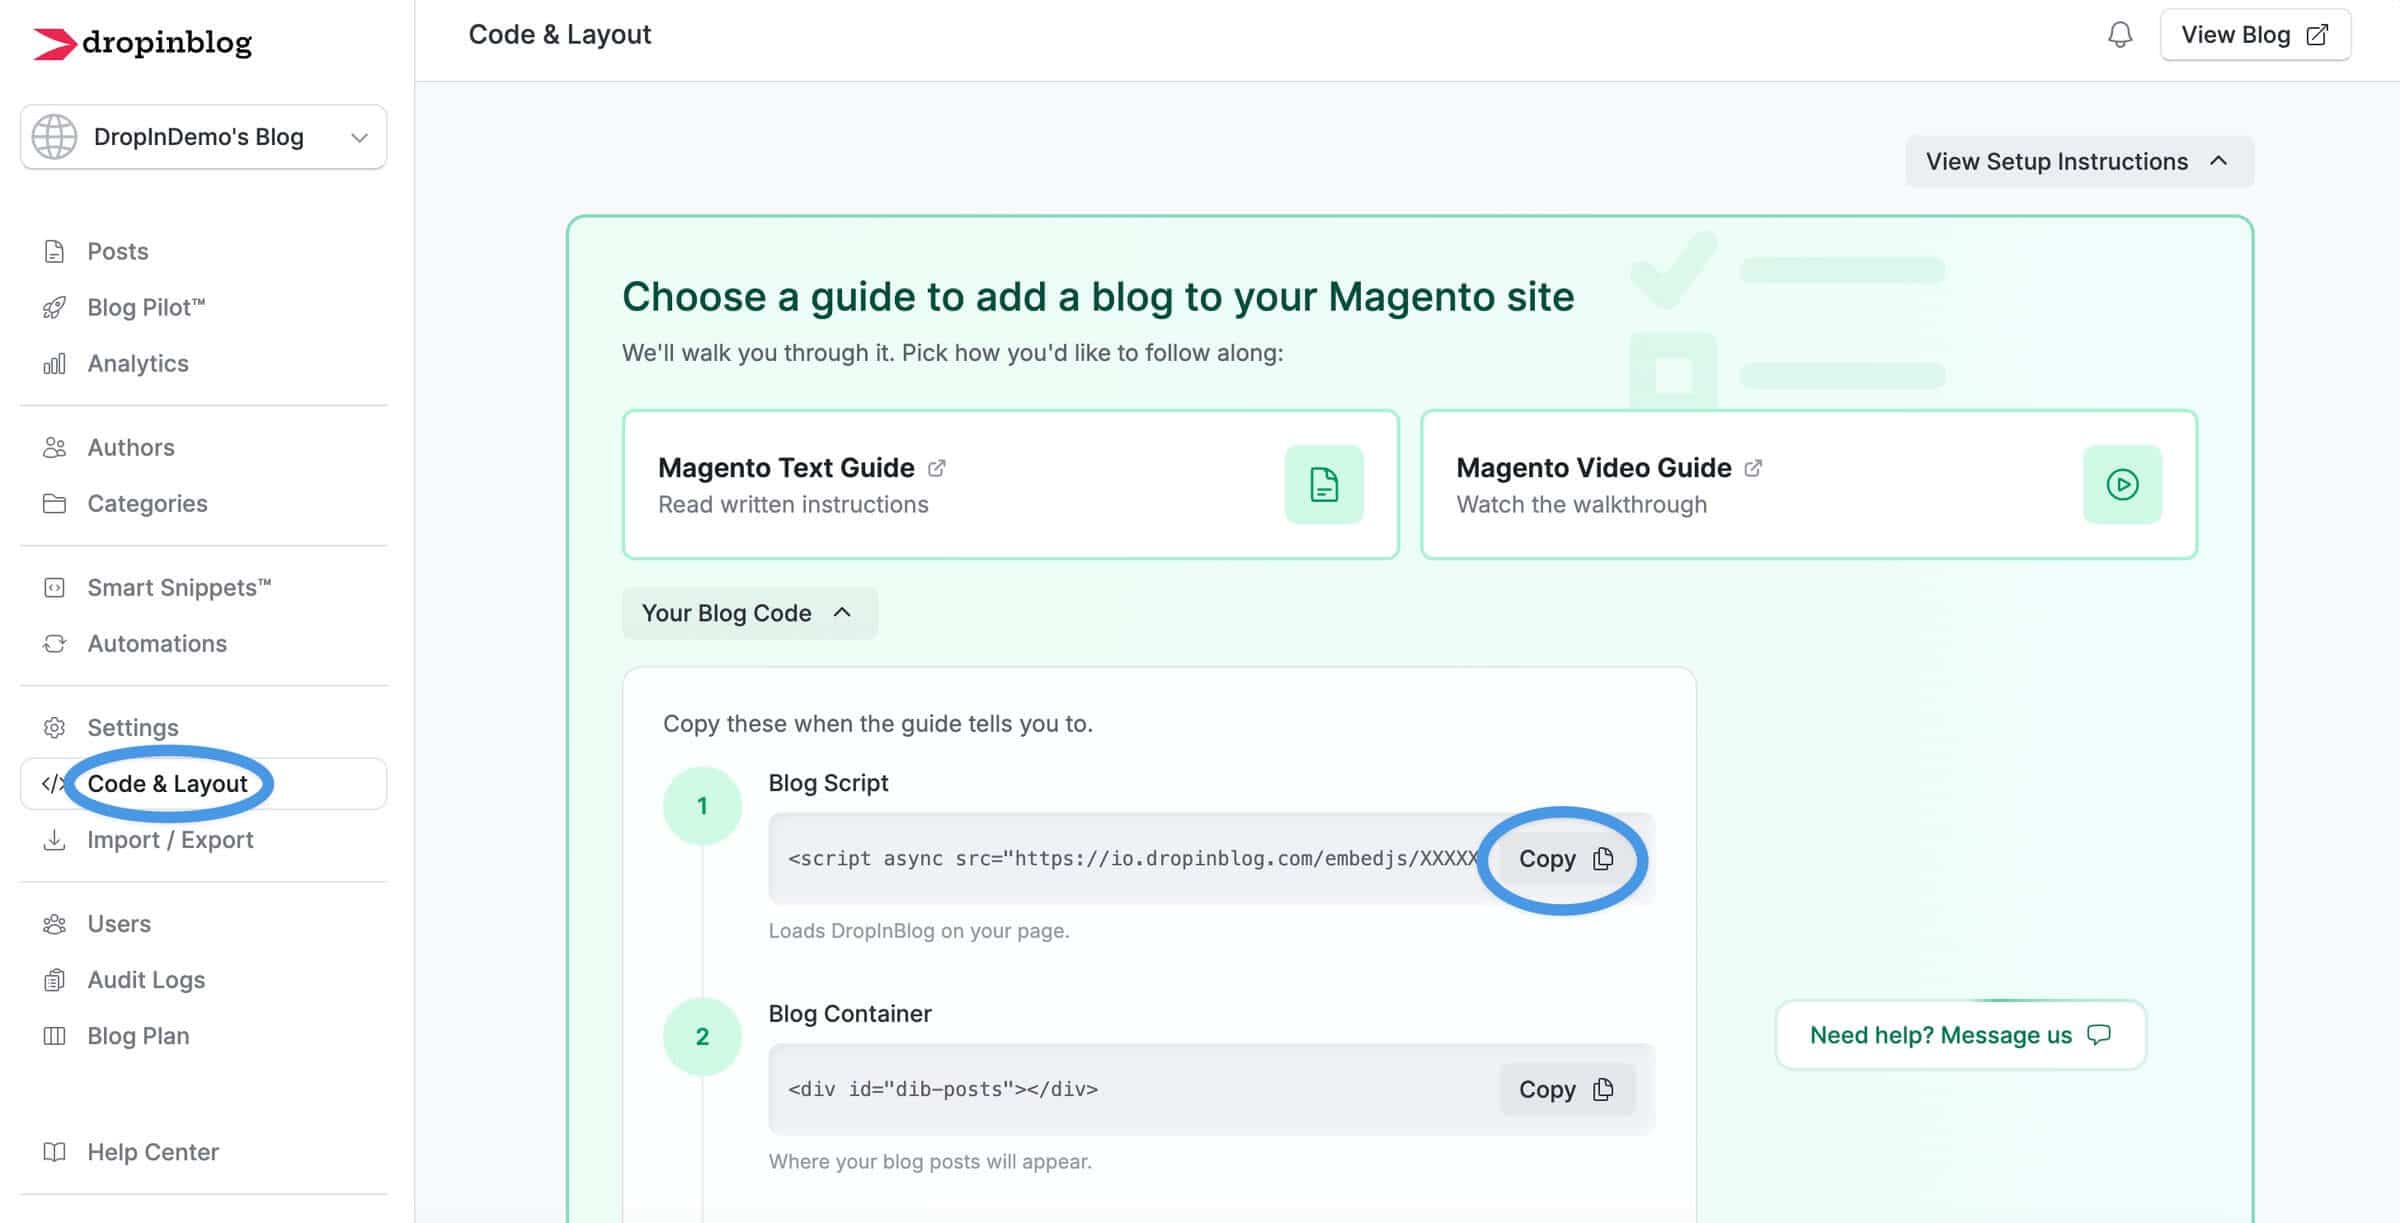
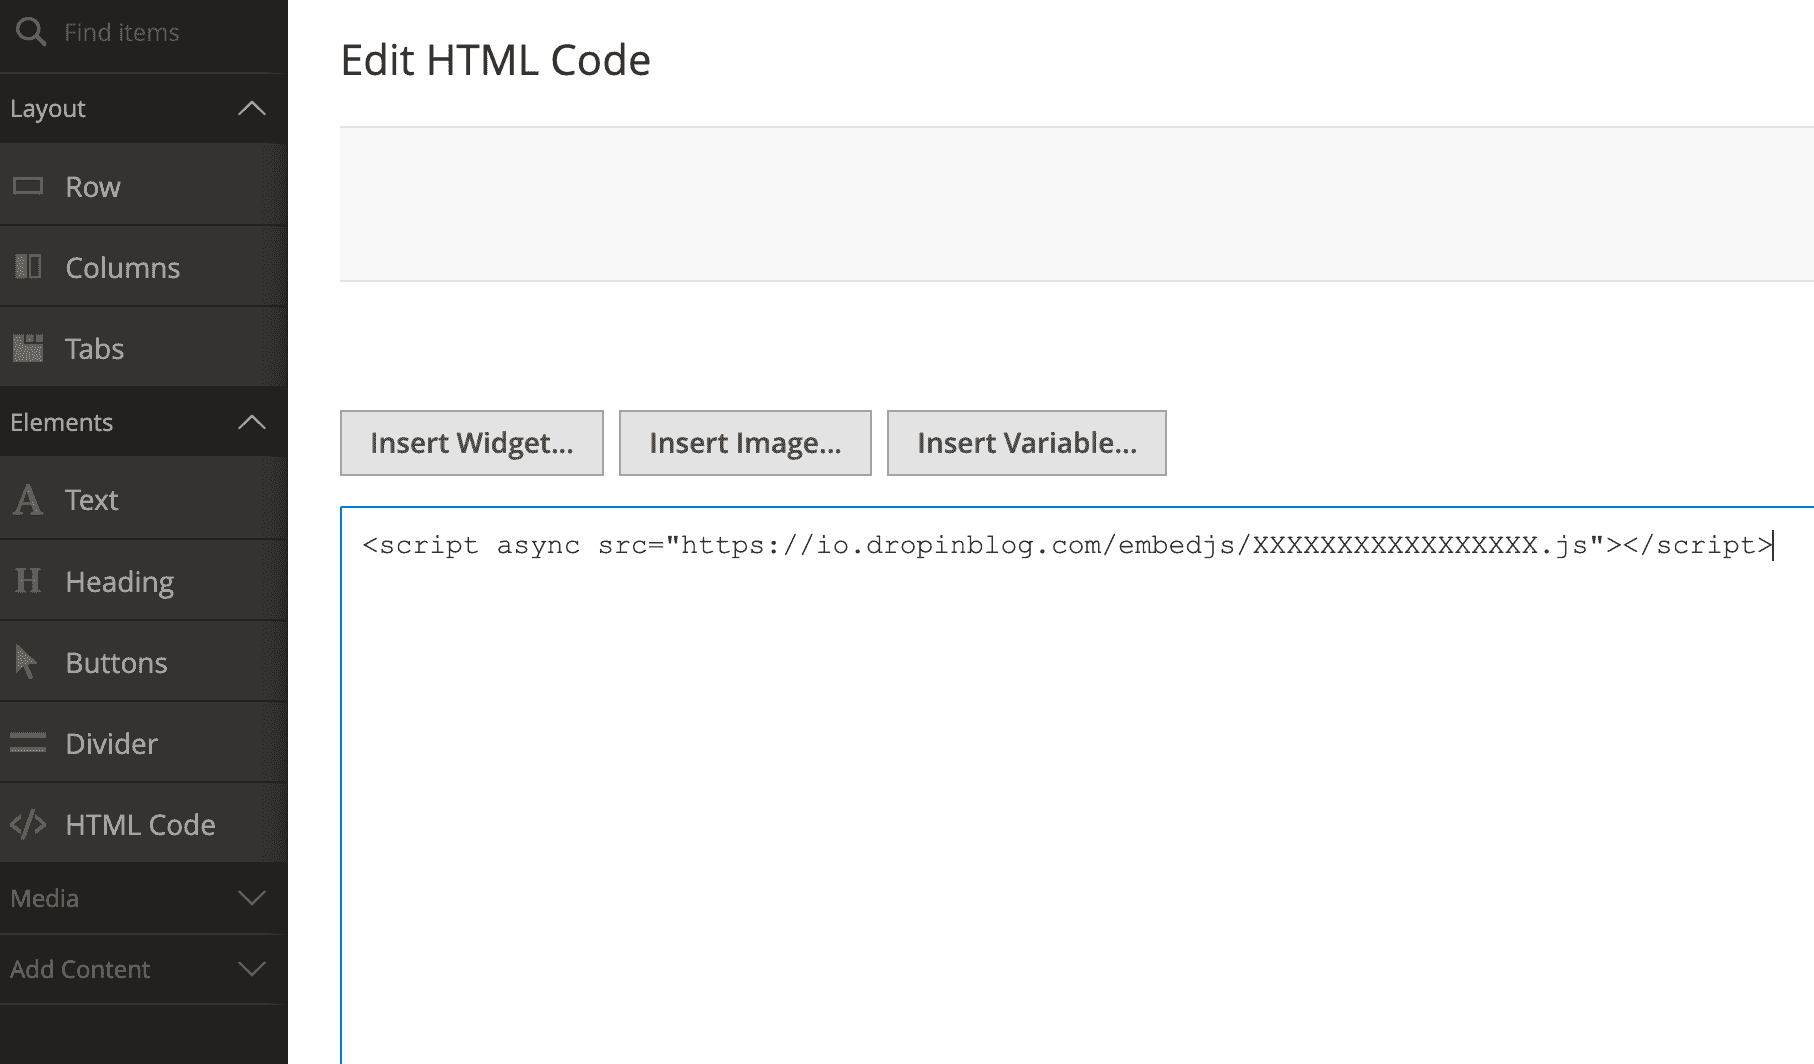
Go back to your Magento account and paste the code you copied inside the HTML Code element.
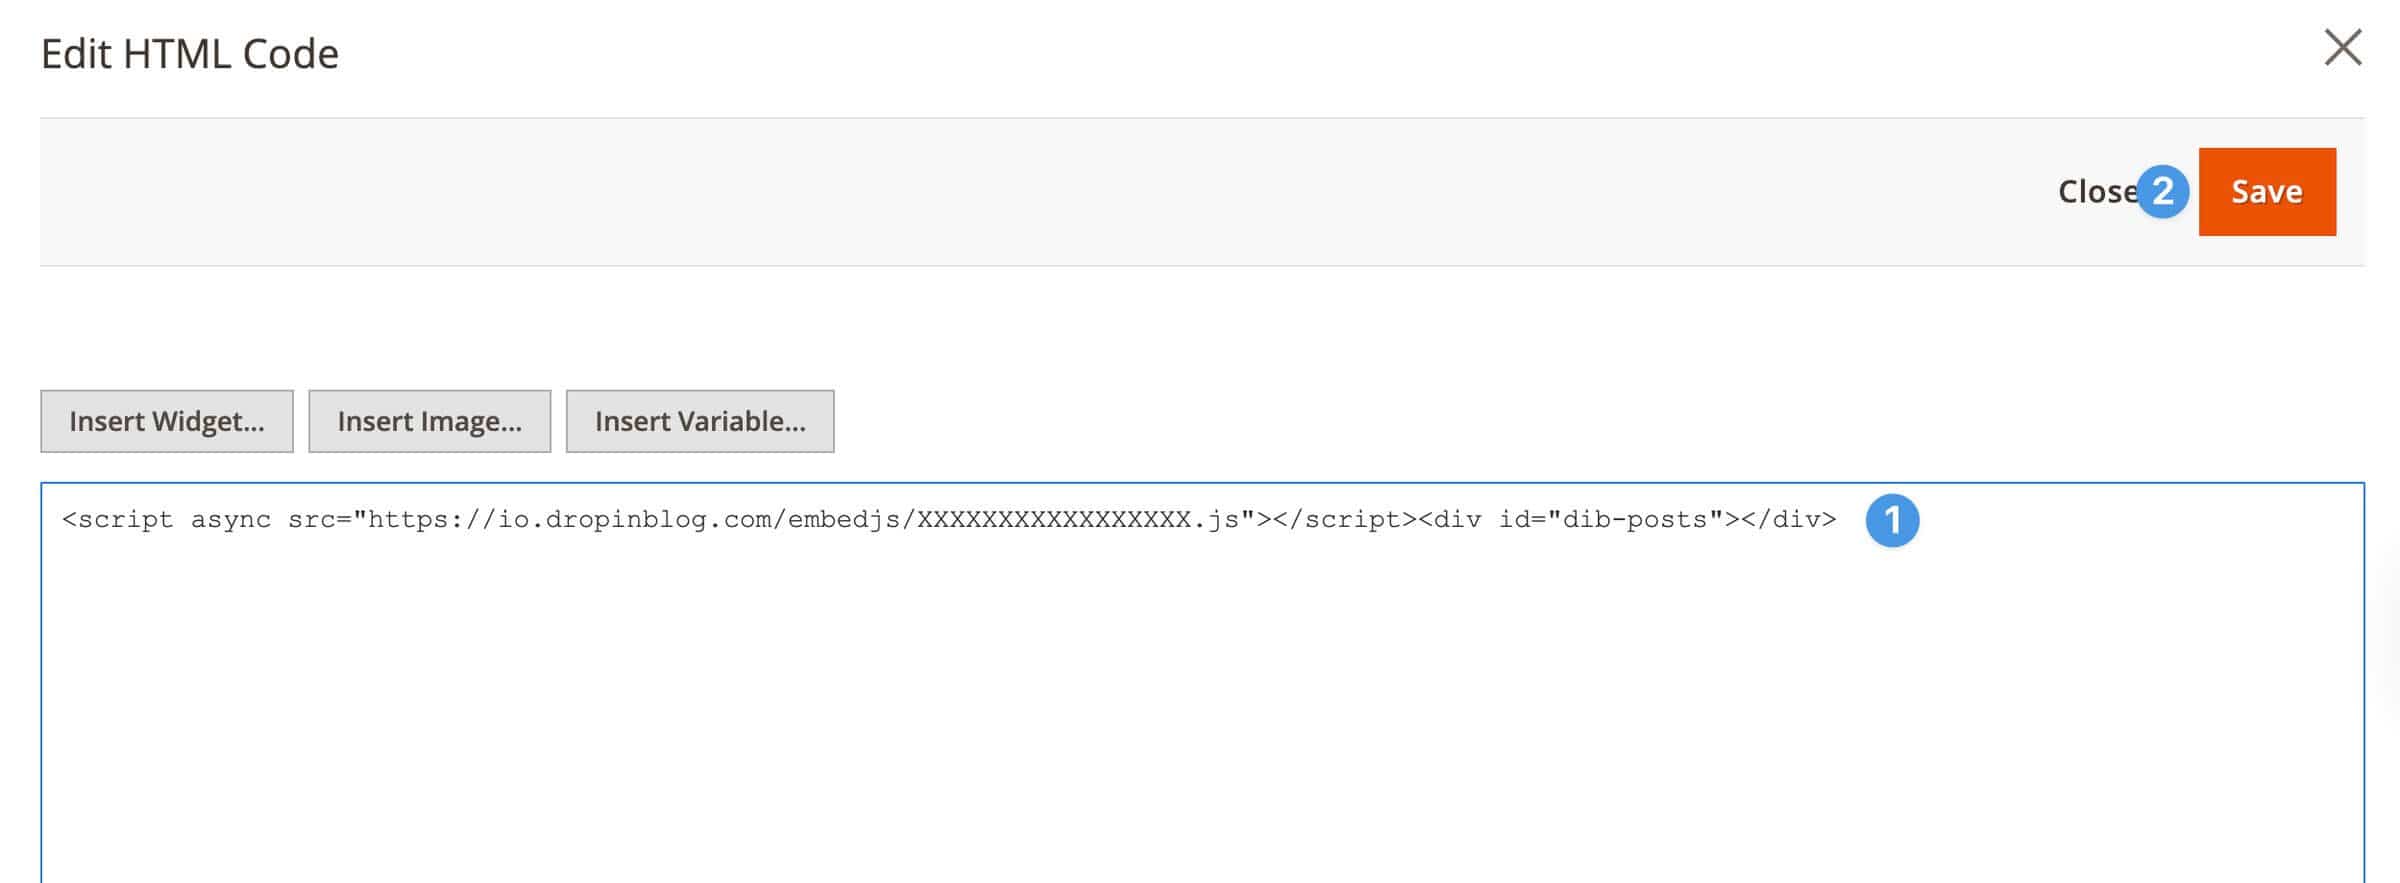
Repeat this step to copy the code under Blog Container and paste it into the code editor in your Magento account right after the first line of code. Then save your changes.
Close the page editor, and view your new blog by selecting the View option from the Select dropdown.
This is how it turned out for us.

Note: To make your blog accessible to your visitors, add your new blog page to your store’s menu using the method of your choice.
Before you start adding content to your new Magento 2 blog, return to your DropInBlog’s Code & Layout page, and click on the Verify Integration button.
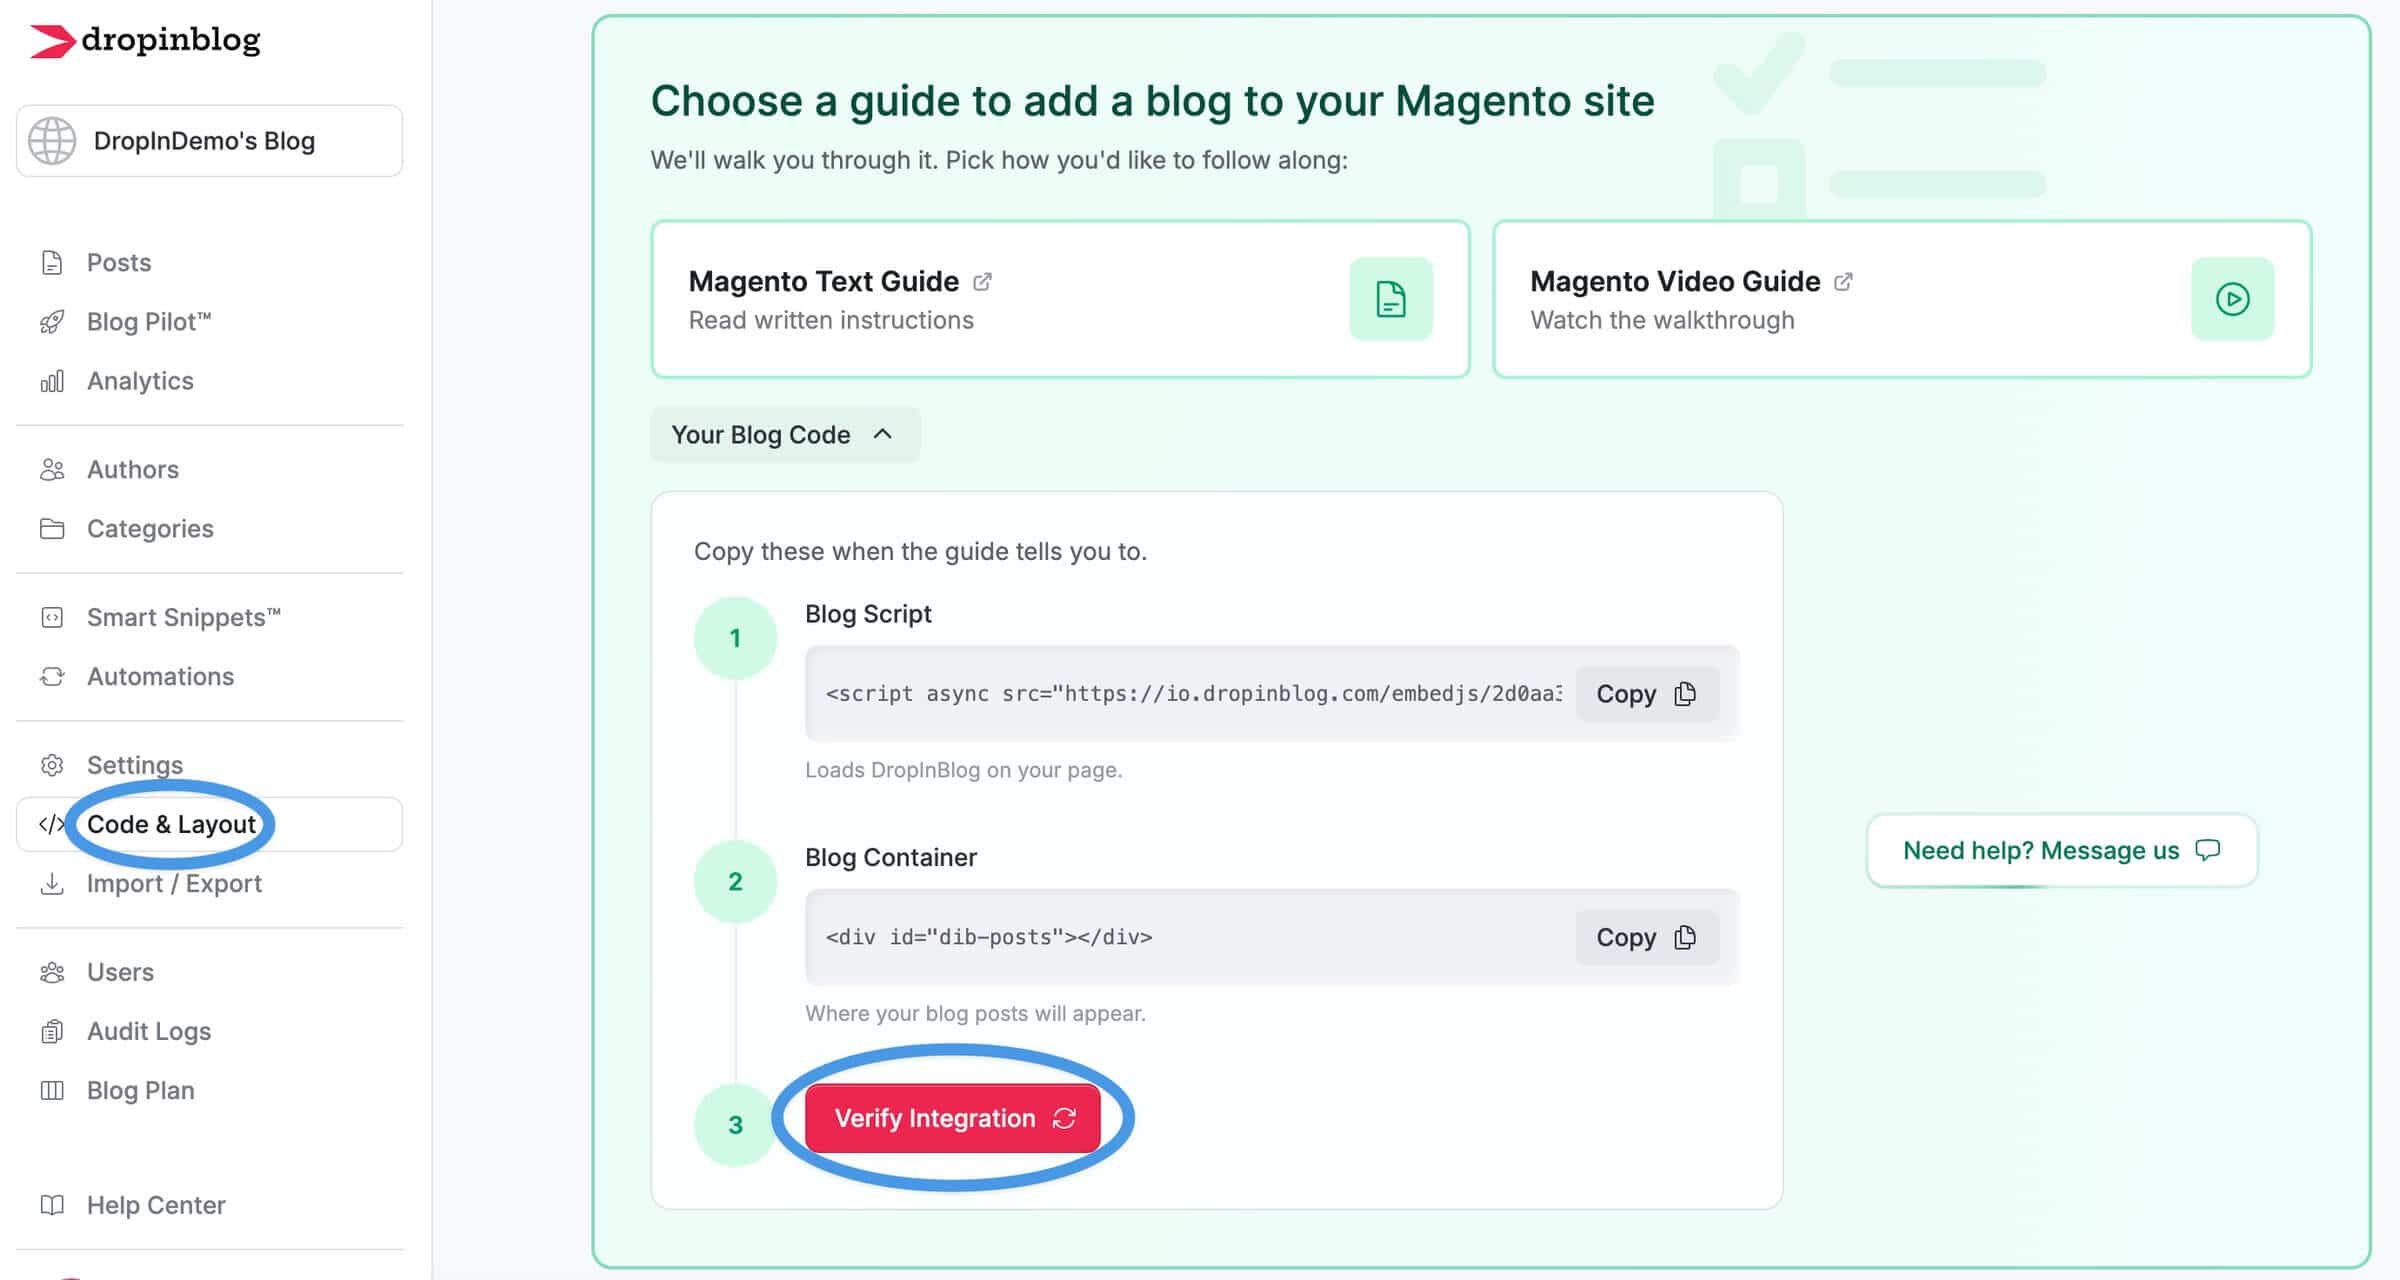
You may be asked to add your blog link under Paste Your Blog Page URL.
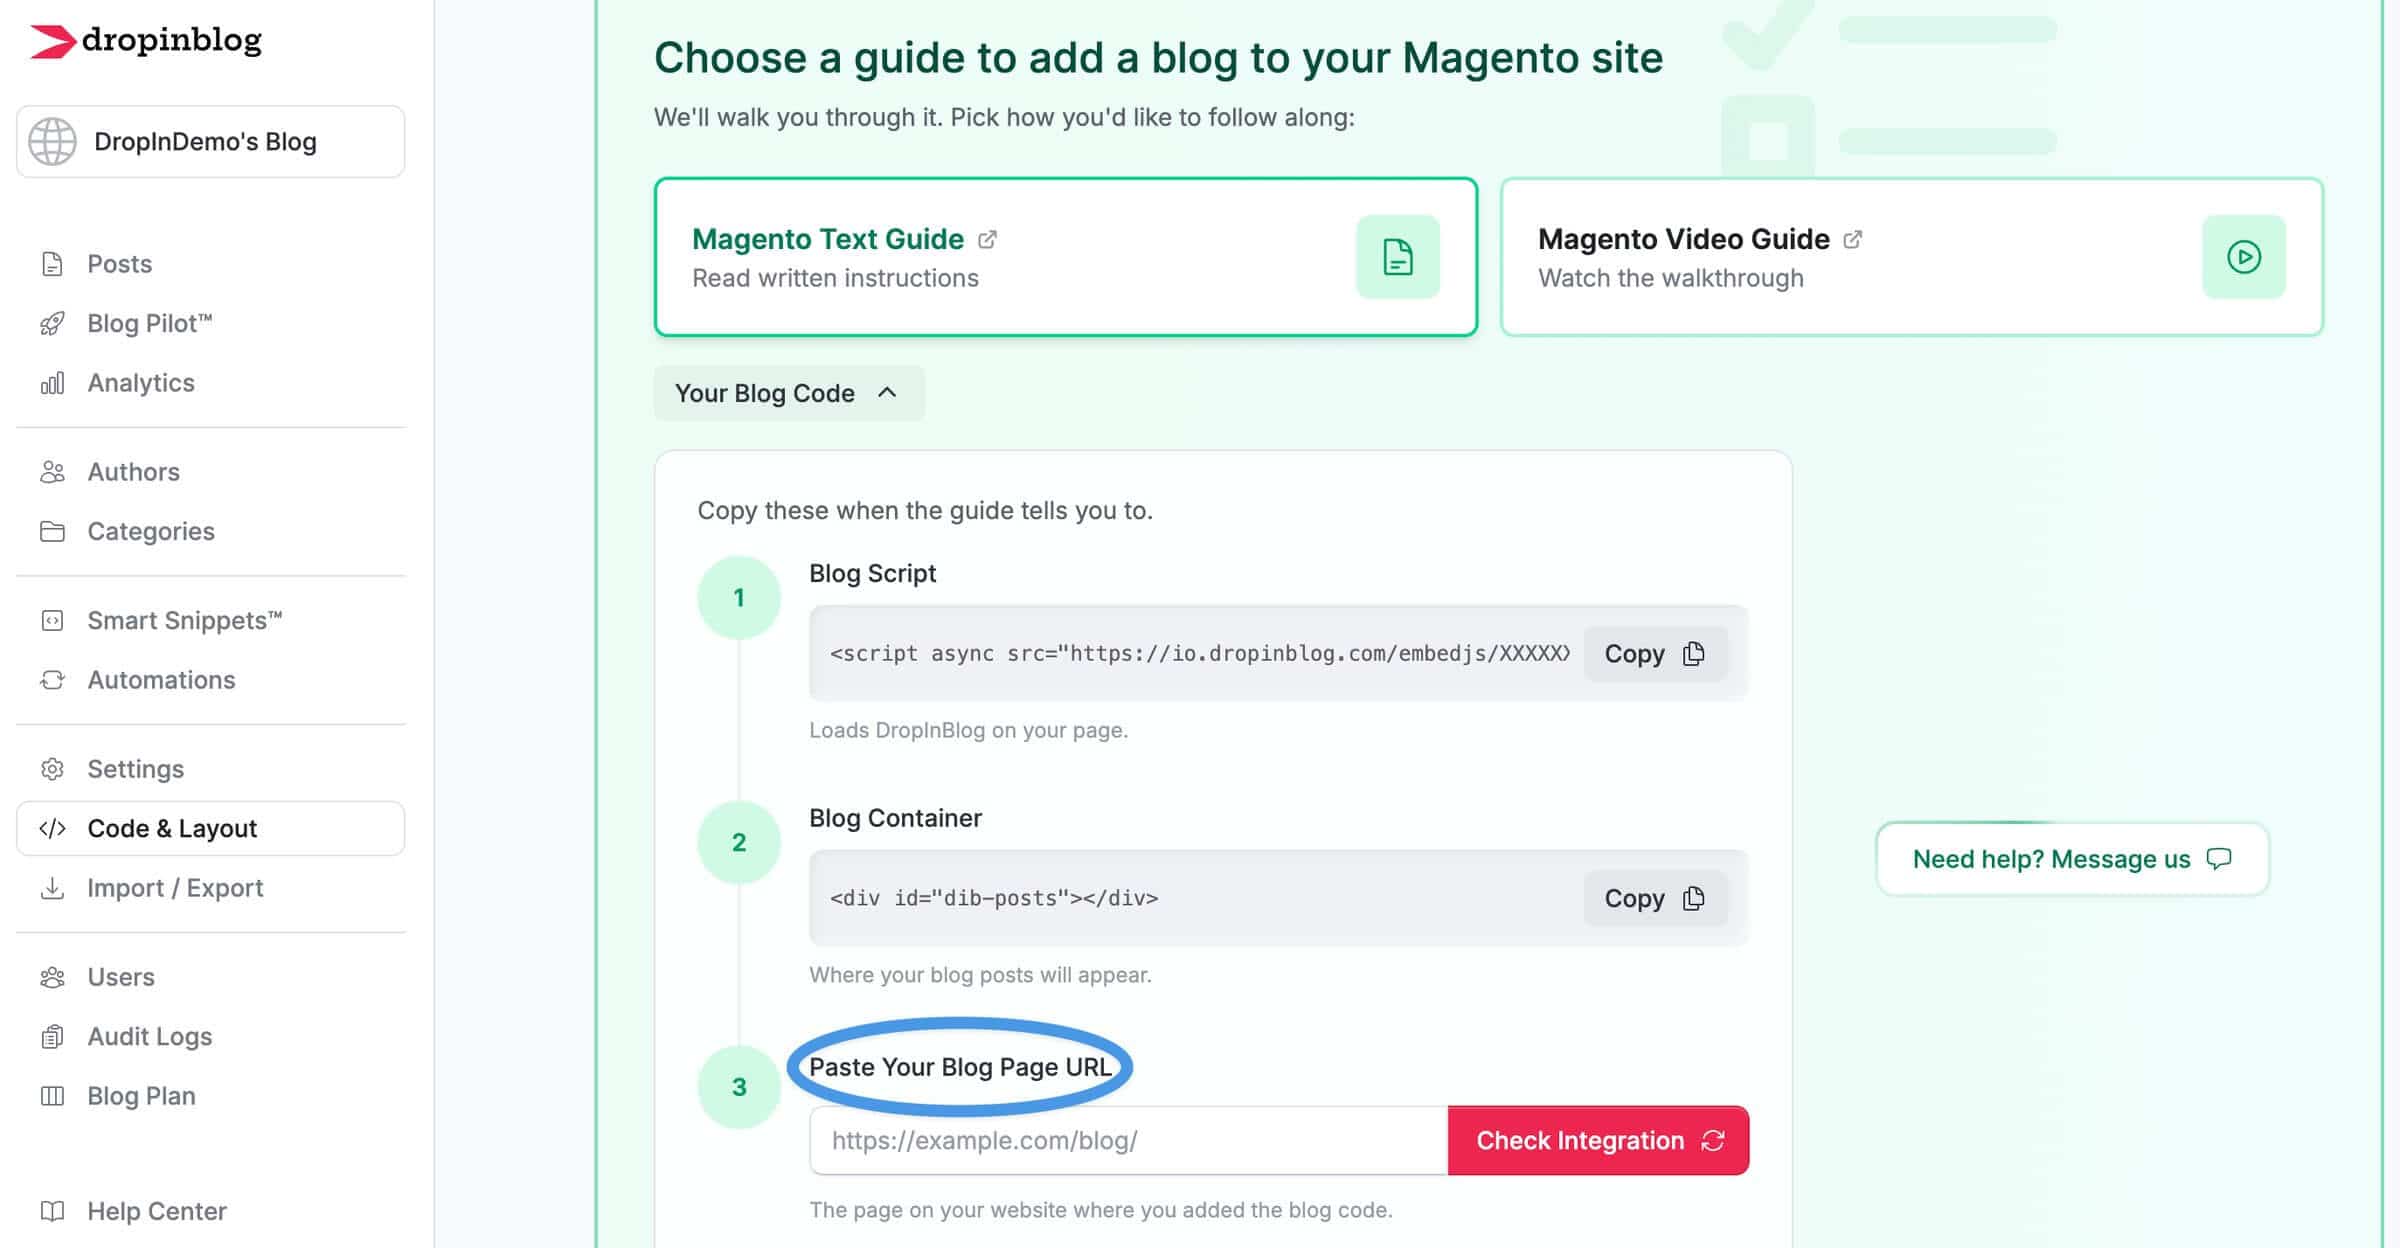
When you click on the Check Integration button, you should see a confirmation message, letting you know that your blog is live.
How to Create Blog Posts in Magento with DropInBlog
Once you’ve successfully added a blog to your Magento store, you can start writing!
To do that, first go to your DropInBlog account because this is where you’ll be creating and managing all your blog content.
To start a new post:
Open the Posts page in your DropInBlog account and click on Add Blog Post to open the editor.
If you need some inspiration, use the menu on the left to launch Blog Pilot™ and generate a post title and an outline. Then select the Open in Editor option to launch the DropInBlog editor.
Add your content inside the content area and use the editor’s top menu to format your content.
Use the menu to the right of the editor to assign a blog category and author to your content.
Optimize Your Magento 2 Blog for Search Engines
Before you publish your new blog content, you should optimize it for search engines using DropInBlog’s built-in SEO analysis tool, located under the post editor.
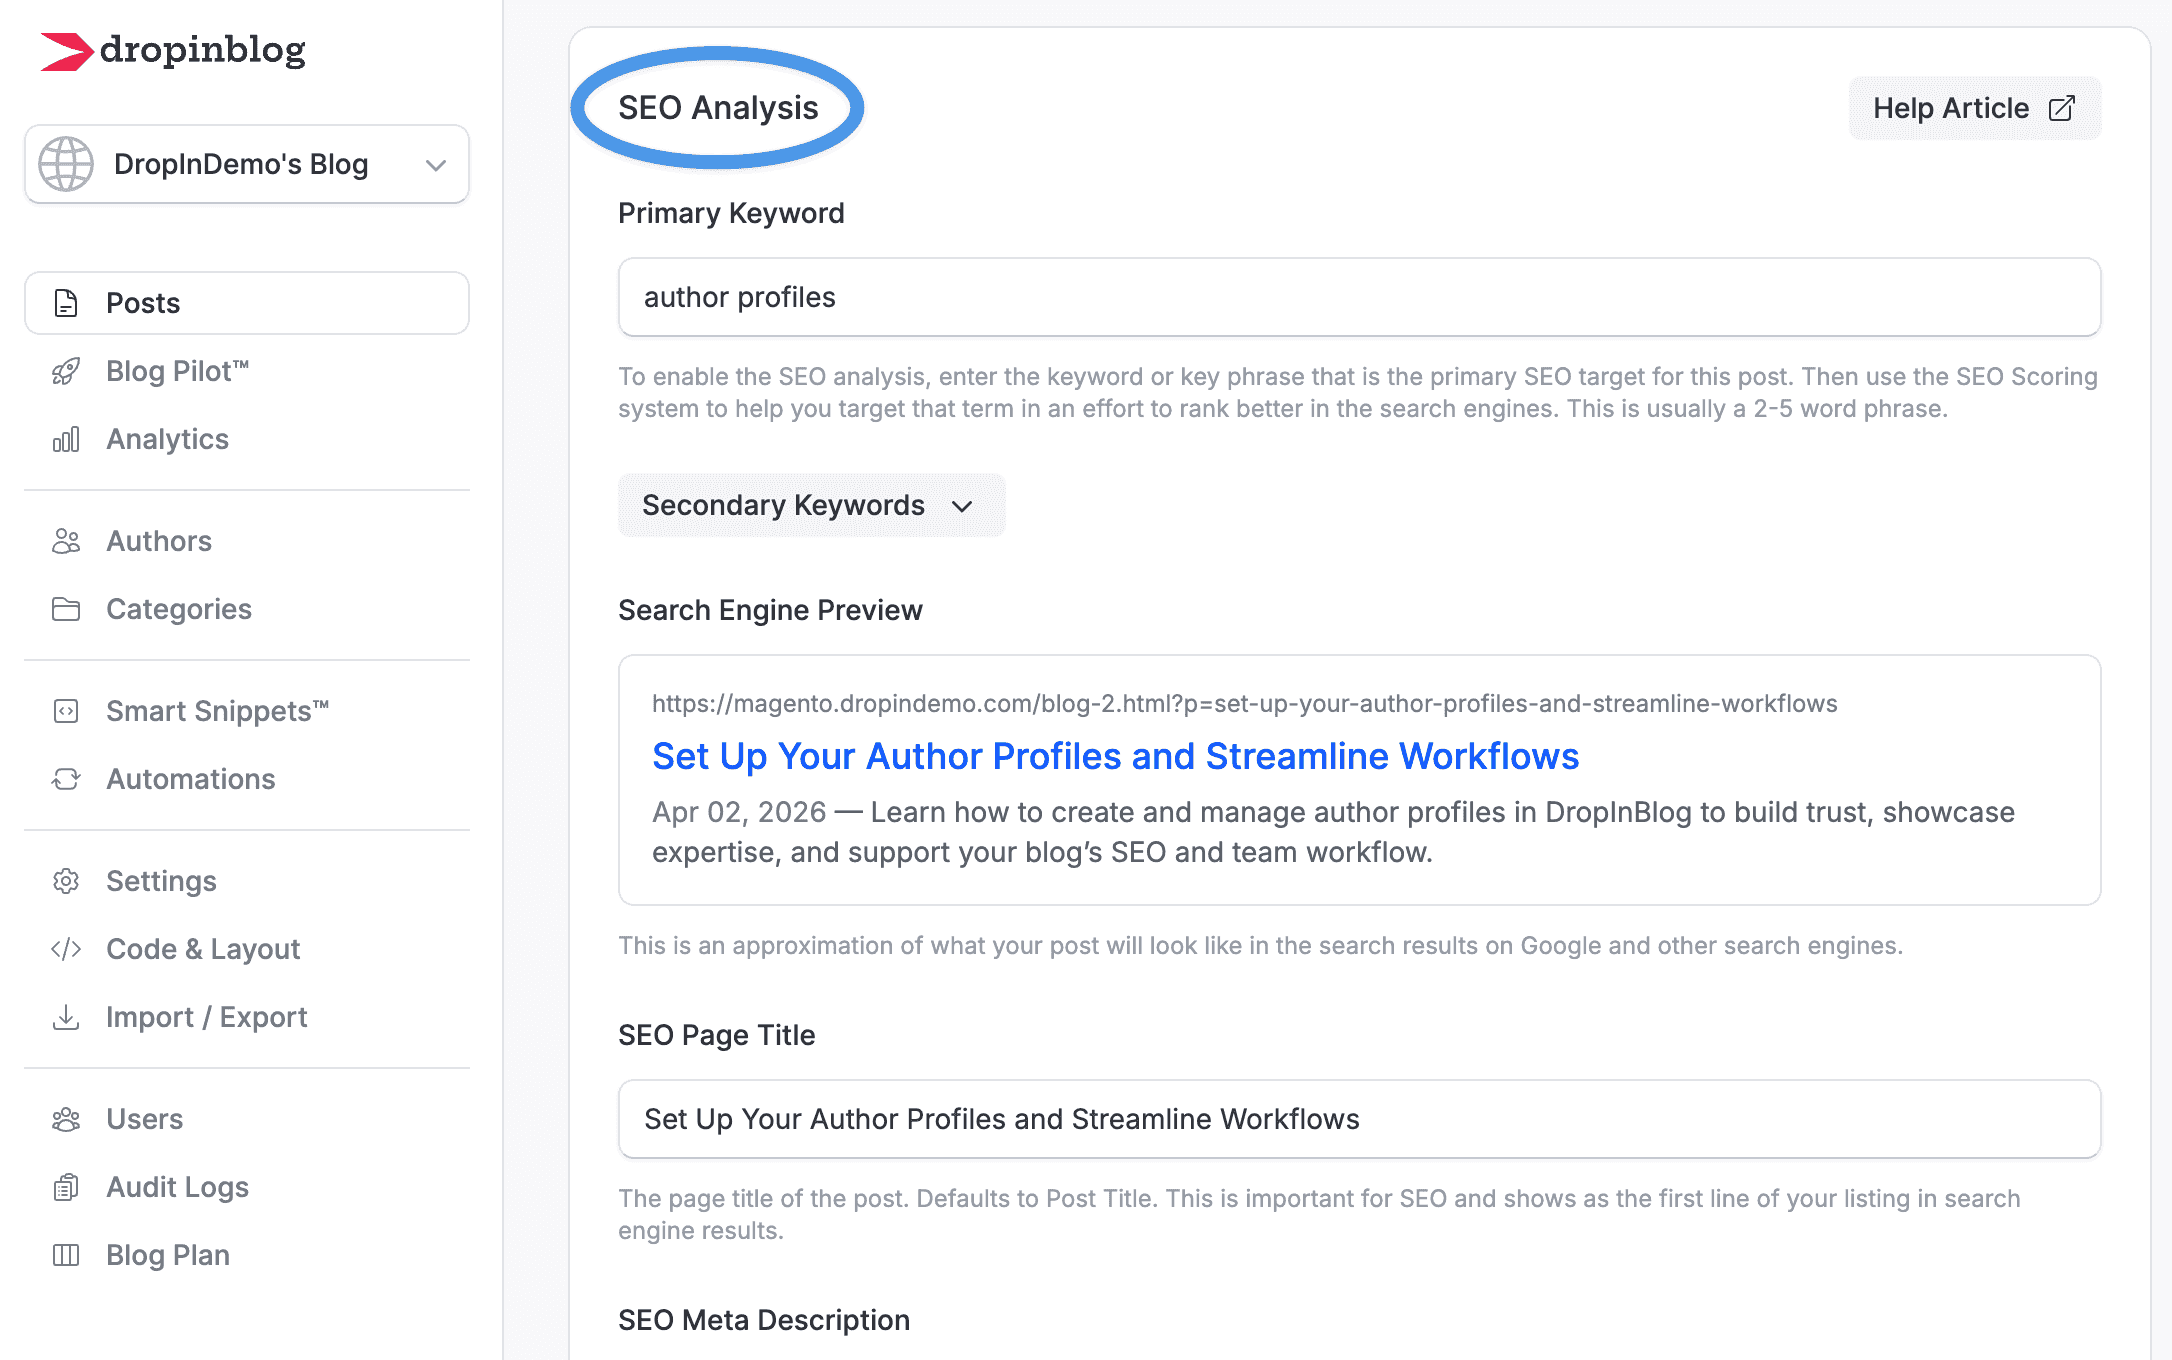
To start optimizing your content, enter the keyword for which you want your post to rank in SERPs inside the text box under Primary Keyword.
If you don’t have an SEO specialist on your team but manage your content on your own, you may find some useful tips in our keyword research guide.
After that, simply follow the tool’s suggestions to make your content SEO-friendly.
Optimize Your Content for AI Searches
Besides traditional searches, your content can now appear in AI-based search engines as well. Don’t worry, DropInBlog’s Mention Boost™ tool will help you prepare your content for AI searches.
To improve your content’s chances of getting AI mentions, navigate to the Mention Boost™ section from within the content editor. Much like the SEO Analyzer, Mention Boost™ is located under the content editor. To jump to this section, click on the Mention Boost™ link on the editor’s right side.
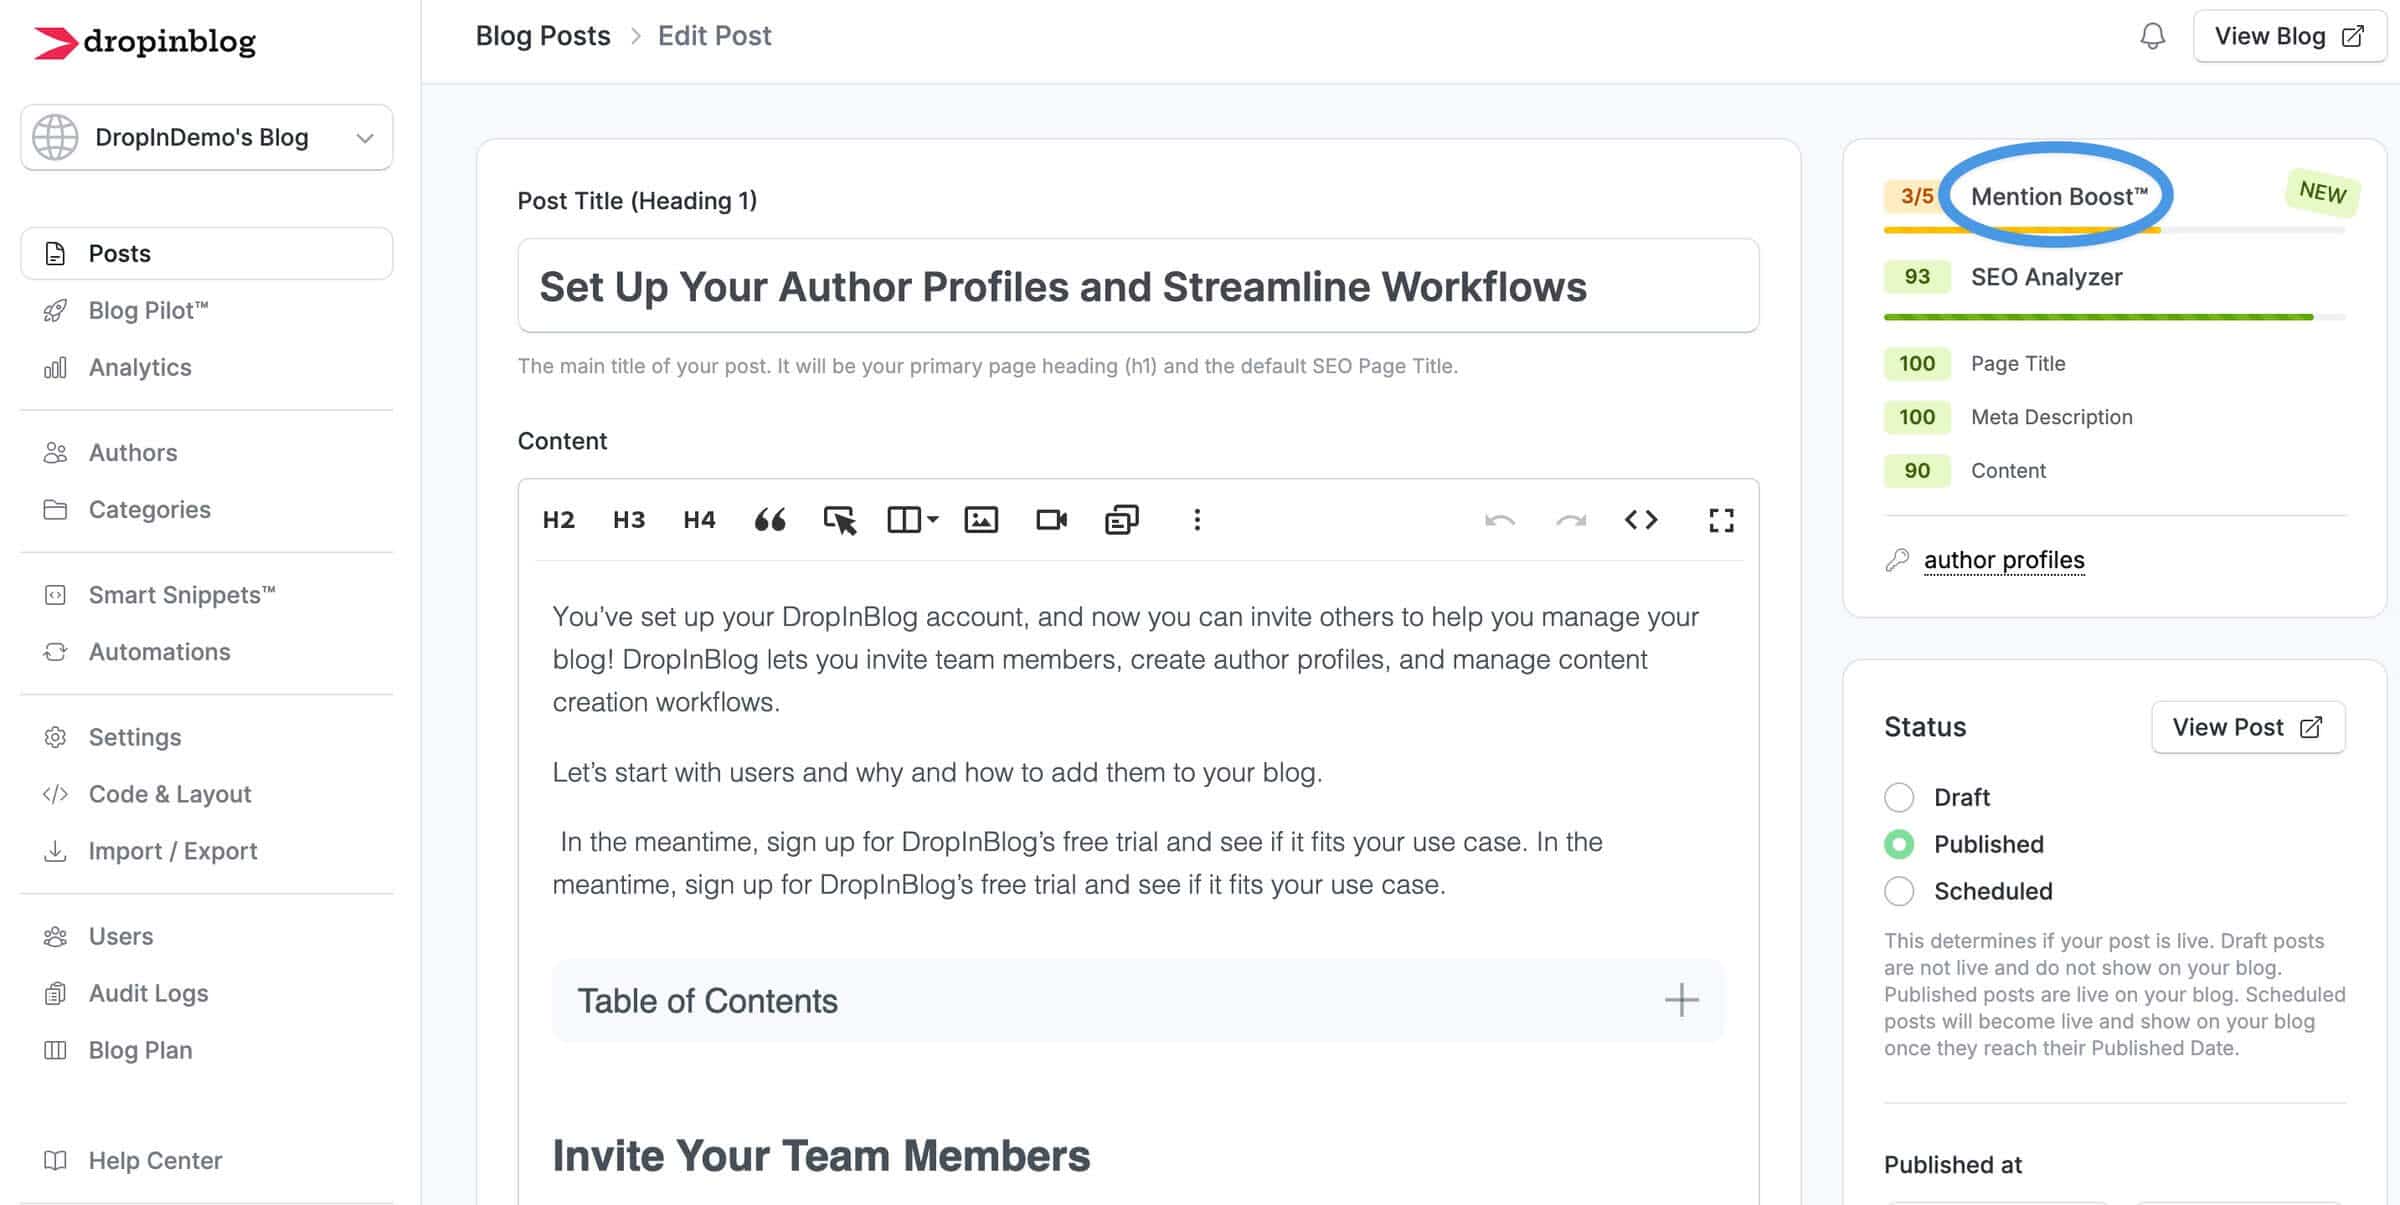
Some of the suggestions you’ll get from this tool include:
Revising your heading structure when needed
Now, you won’t be left wondering how to implement these suggestions. You also won’t need extensions to make your blog AI-friendly. Everything you need is inside the DropInBlog’s editor.
Customize Your Blog’s Design
When you create a blog in Magento with DropInBlog, your blog will automatically inherit your site’s design. However, if you want to tweak your blog’s design, you can use DropInBlog’s Design Customizer to change your blog’s fonts, links, and images.
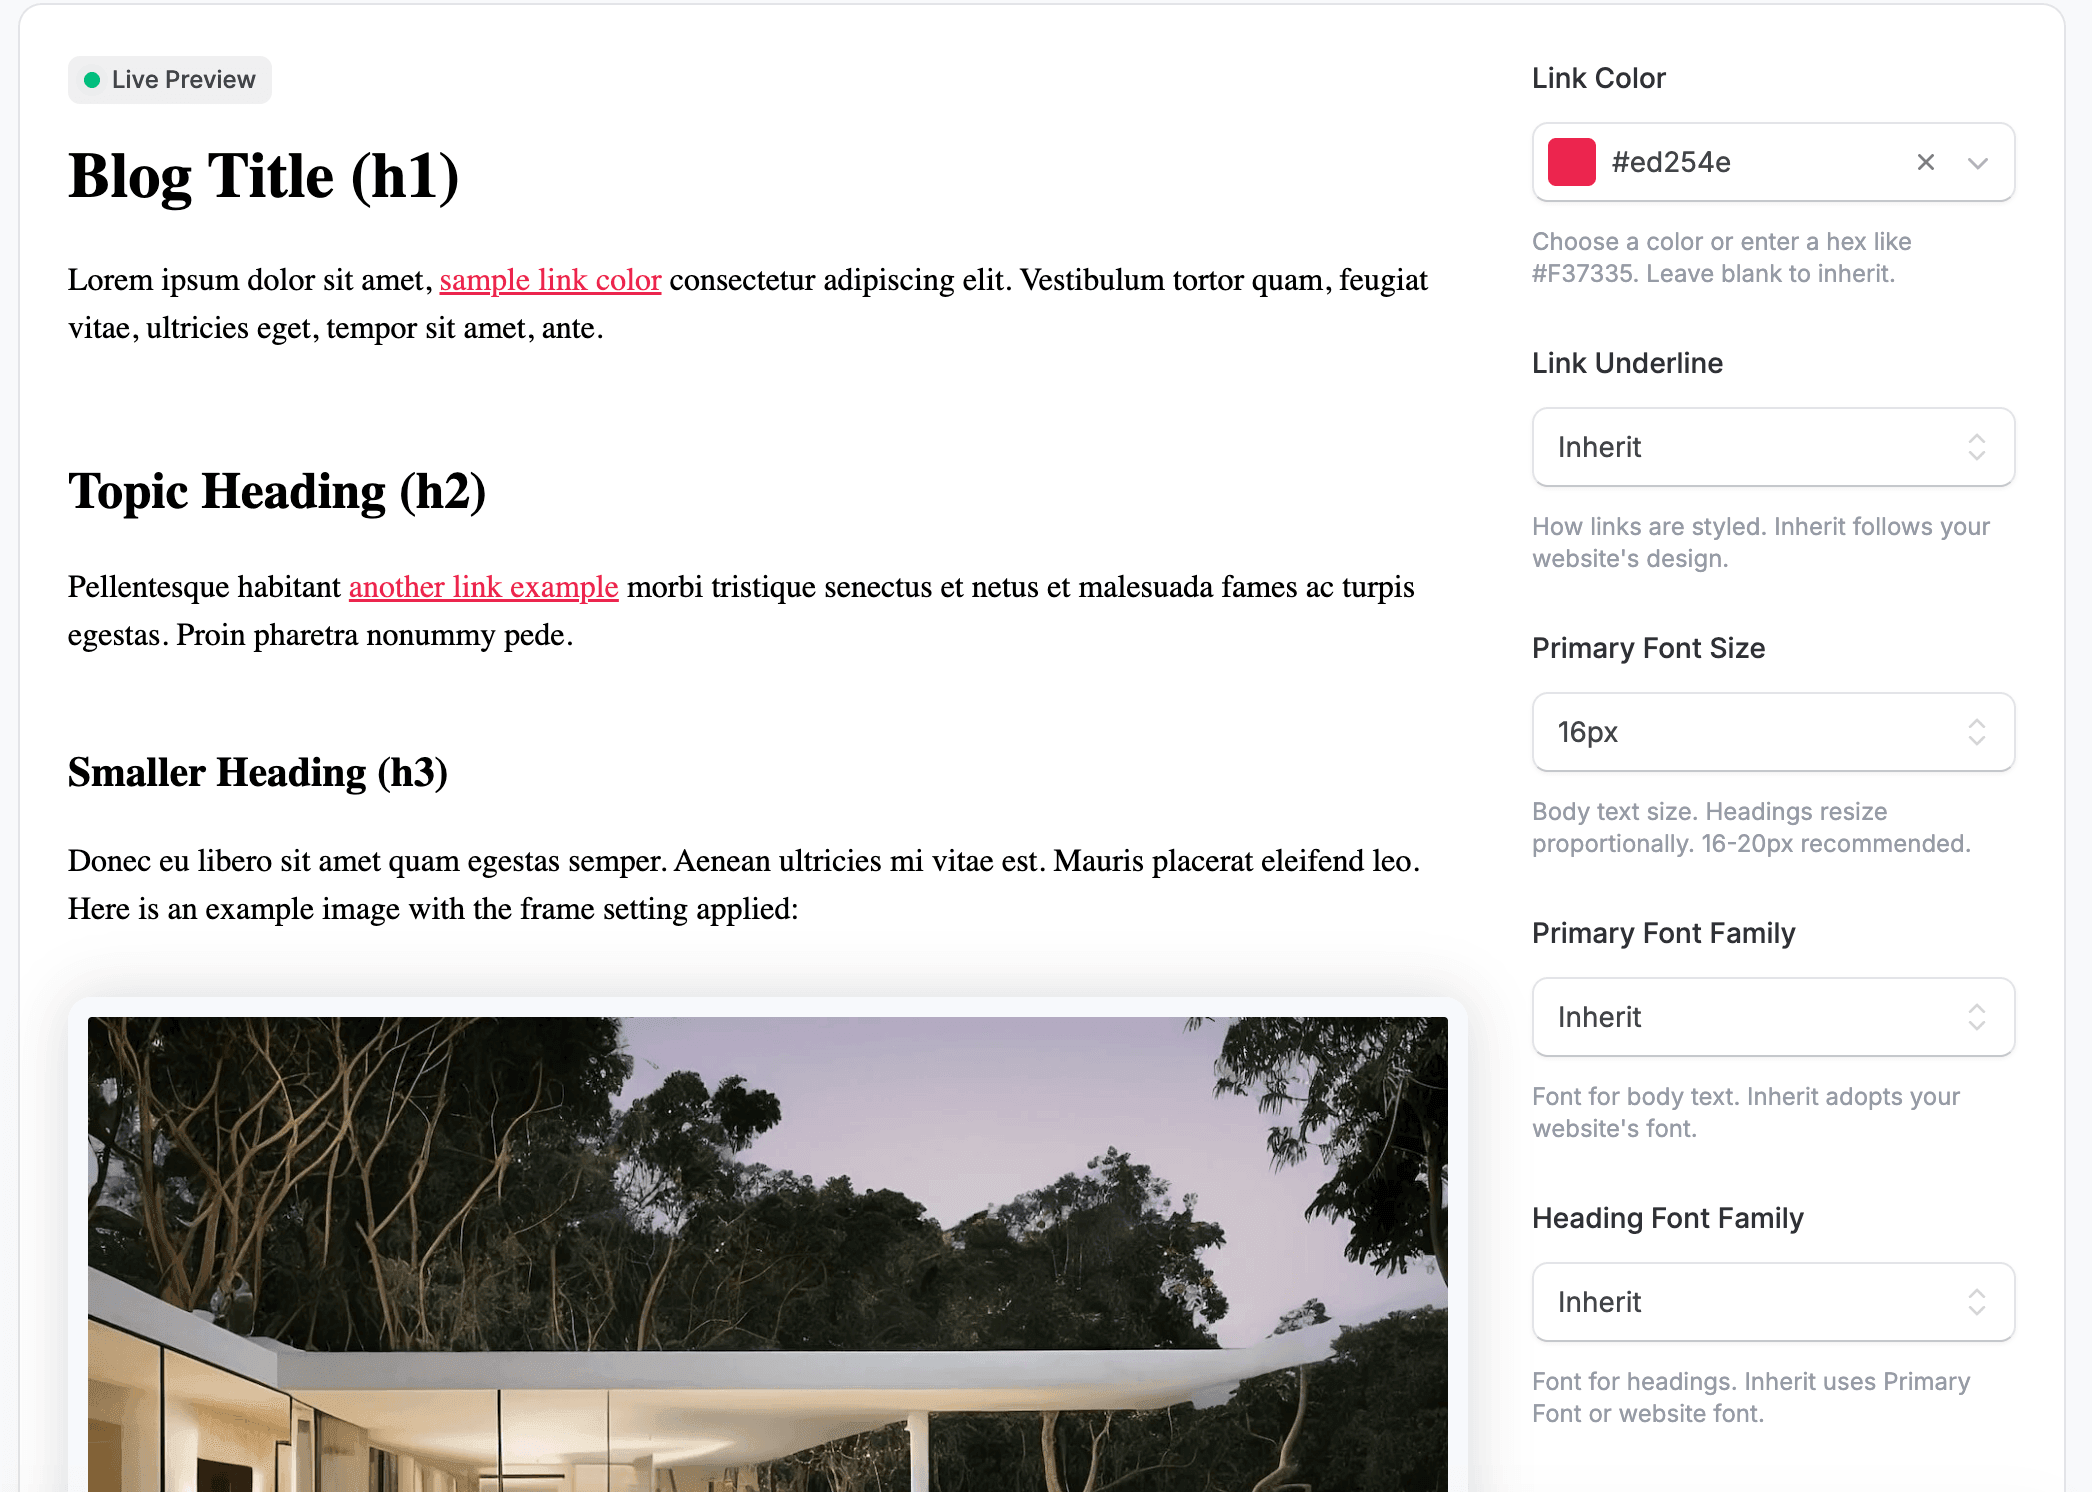
Additionally, you can apply your own CSS using the Custom CSS section on the Code & Layout page.
Other Notable DropInBlog Features
Apart from all the features we covered so far, DropInBlog offers several more features that make blogging on Magento easy:
Smart Snippets™: This feature lets you create a single piece of content and display it across your blog – perfect for promotional content and newsletter signup forms.
Blog Voice AI™: With DropInBlog’s text-to-speech engine, you can play your posts like a podcast.
FAQ builder: You can easily add frequently asked questions and answers to individual posts without a plugin.
Quick search: Enable this feature to help your visitors find relevant content easily.
Schema markup: DropInBlog supports multiple schema types and automatically implements them. You don’t have to add structured data manually.
Platform-agnostic blogging tool: If you decide to switch to another e-commerce platform in the future, you can take your blog with you – DropInBlog is an embeddable blogging tool that works with almost any platform.
Migrating an Existing WordPress Blog to Your Magento Store
If you already have a blog on WordPress and want to move it to your Magento store, you can go down two different paths.
The first path is to find a Magento 2 blog extension that has an import tool. Magefan has a built-in import tool that allows you to import blog posts and categories from your WordPress blog.
The second path, with embedding a blog and DropInBlog, is similar to the first one. You can easily move your WordPress content over to Magento 2 using DropInBlog’s import plugin. The difference is that with this approach, there are no modules to install. All of your content is moved into your DropInBlog account, which is where you’ll manage your blog content.
Whichever path you take, make sure to set up 301 redirects from old WordPress URLs to the new blog URLs to preserve the ranking equity of the existing blog posts.
The choice is yours. If you don’t mind the install-and-compile workflow, the first option, importing your blog through an extension like Magefan, will help you migrate your WordPress blog to Magento 2. But if you don’t want to work with modules and prefer a no-code approach, DropInBlog will better suit your needs.
FAQs
Does Magento have a blog built in?
No, Magento 2 doesn’t have a blog built in. To add a blog, you’ll need either an extension like Magefan or an embeddable blogging tool like DropInBlog.
Can I add a blog to Magento without installing an extension?
Yes, you can use DropInBlog to add a blog to Magento without installing an extension.
Does DropInBlog work with Hyvä and Breeze themes?
Yes, DropInBlog works with Hyvä and Breeze themes. The no-code Magento 2 blog solution relies on code embeds, which aren’t known to come with theme constraints, so you shouldn’t have any problems using DropInBlog with any Magento 2 theme.
Does it work with Adobe Commerce and Magento Open Source?
Yes, DropInBlog works with both Adobe Commerce and Magento Open Source.
Will a Magento blog extension slow my store down?
A Magento blog extension can slow your store down if it’s poorly coded or misconfigured. A well-coded blog extension, on the other hand, should have a minimal impact on your store’s speed.
How do I keep an embedded Magento blog SEO-friendly?
To keep an embedded Magento blog SEO-friendly, choose an embeddable blog solution that supports metadata control, customizable URLs, and, if possible, on-page SEO guidance. DropInBlog has all of these features built in, so you won’t need additional SEO extensions.
Can I manage a blog across multiple Magento stores from one place?
Yes, most Magento 2 blog extensions and embeds, including Magefan, DropInBlog, and Aheadworks, allow you to manage multiple blogs from a single dashboard.
What happens to my posts if I later switch to a native Magento blog extension?
Magento 2 doesn’t have a native blog extension. If you already use a blog extension and want to switch to another extension or embed a blog, you’ll have to migrate your content. This shouldn’t be a problem since most blog solutions have an import tool.
Start Blogging on Magento with DropInBlog Today
You can start a blog on Magento by following the three easy steps we presented above. Simply add a new page with an HTML Code element, and paste your DropInBlog blog code snippets. After that, you’ll be able to create and manage your blog content easily.Start a free trial to add a blog to your Magento store today!
If you have any questions, feel free to reach out to our support team.
Happy blogging!