
Lodgify is built for vacation rental management, including direct bookings, channel sync, and calendar management, but not for content publishing. It has no native blog engine. Lodgify themselves recommend DropInBlog as the solution (you can find their endorsement on the Lodgify blog).
The integration takes just three steps and takes about 5 minutes to complete. For vacation rental hosts who want blog content with all the features they need to drive organic traffic to their direct booking site, this is the cleanest 2026 setup.
TL;DR
Lodgify doesn’t have a blogging engine.
DropInBlog allows you to embed a blog directly into your Lodgify site.
Adding a blog to Lodgify with DropInBlog is simple and takes only a few minutes.
Once installed, you can manage and publish blog content easily.
Table of Contents
Why Your Vacation Rental Website Needs a Blog
The benefits of blogging have been confirmed repeatedly across industries, from IT to agriculture to travel and hospitality.
A blog gives you more opportunities to show up in Google, which is where most people discover vacation rental sites.
It’s a place where people go to get answers before booking.
It’s a place where you can share helpful content, which is how you build trust with your potential customers.
It allows you to share your expertise in your niche.
It gives your business a human voice.
And most importantly: a blog helps you turn visitors into loyal customers.
Since Lodgify doesn't offer a blogging feature, many vacation rental websites miss out on the benefits of blogging. DropInBlog fills this gap by providing an effortless way to add a modern blog with built-in SEO and content planning tools. Wonder how? We'll walk you through it!
Does Lodgify Have a Blog Feature?
No, Lodgify doesn’t have a built-in blog feature. If you want to add a blog to Lodgify, you’ll need a third-party blogging tool that you’ll have to integrate with your Lodgify website.
How to Add a Blog to a Lodgify Site
Prerequisites
Before creating a blog, you need to create a Lodgify account and a DropInBlog account. DropInBlog lets you start with a free trial to see how it all works.
Step 1: Create a Blog Page on Lodgify
From your Lodgify dashboard, choose Website builder using the menu on the left. Then, select the Pages tab, and click the plus sign next to Header Navigation to add a new page.
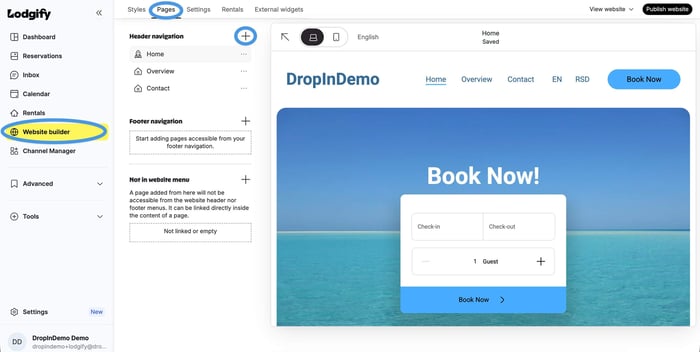
A pop-up window will appear. Select the Page tab and add a title to your new page. We suggest "Blog" since you're creating a blog page. Then, click on the Add button to create the page.

To save the newly created page, click the Publish website button in the upper-right corner and click Publish in the pop-up box.
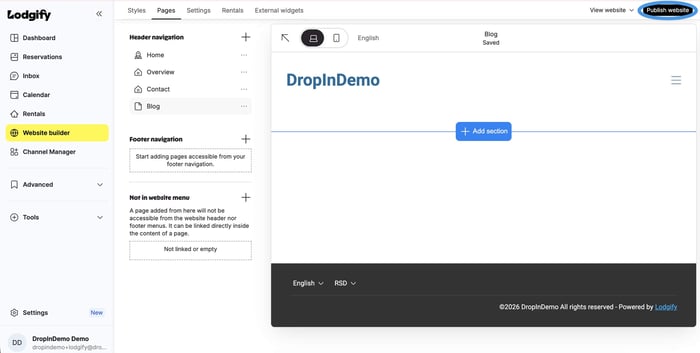
Now, if you go to View website and click Live Version, you'll see Blog among the buttons on the navigation menu on your live website. When you click it, it shows your blog page. For now, it's a blank page. But we'll fix that.
Step 2: Connect DropInBlog to Lodgify
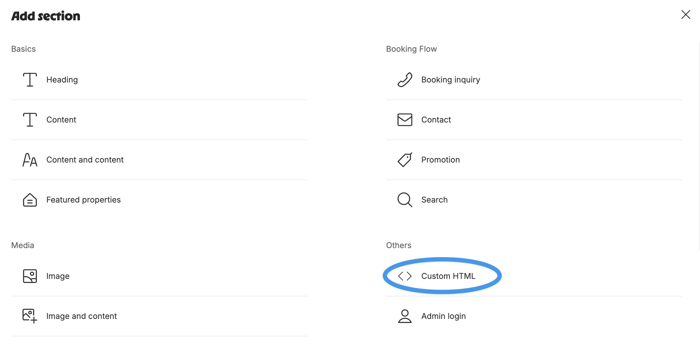
After creating your blog page, it's time to connect DropInBlog to Lodgify. Select your blog page from the left-hand sidebar, then click Add section.
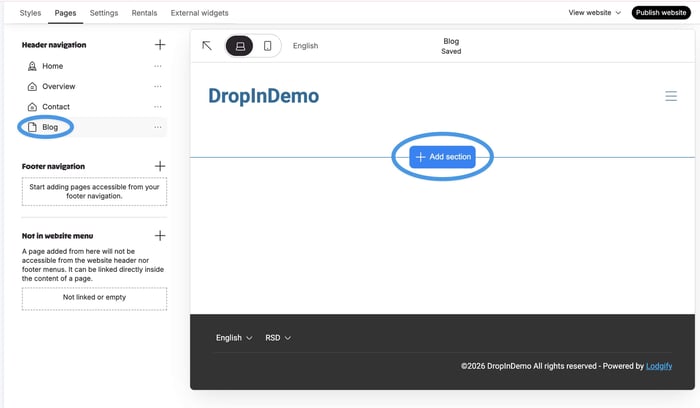
A pop-up window will appear. Here, you should select Custom HTML under Others.
Next, place your cursor inside the Custom HTML section, then head over to your DropInBlog account. Find the Code & Layout tab on the left-hand side menu, and copy the code under Blog Script and Blog Container:
<script src="https://io.dropinblog.com/embedjs/XXXXXXXXXXXXXXXXXXXX.js"></script> <div id="dib-posts"></div>
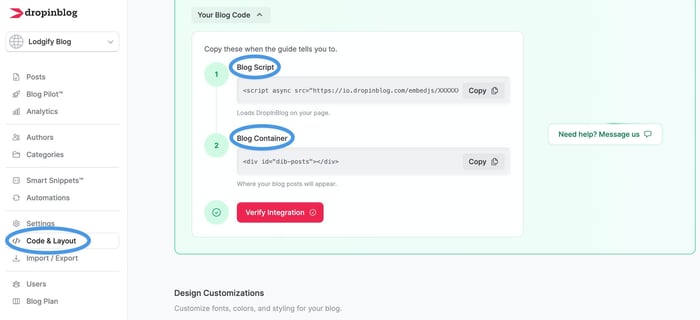
The "XXXXXXXXXXXXXXXXX" part in the Blog Script code is where your DropInBlog ID (a combination of alphanumeric characters) will appear. Our ID is hidden here for privacy and security reasons. For the same reasons, you should not share your DropInBlog ID with others.
Head back to Lodgify and paste the two lines of code in the Custom HTML window.
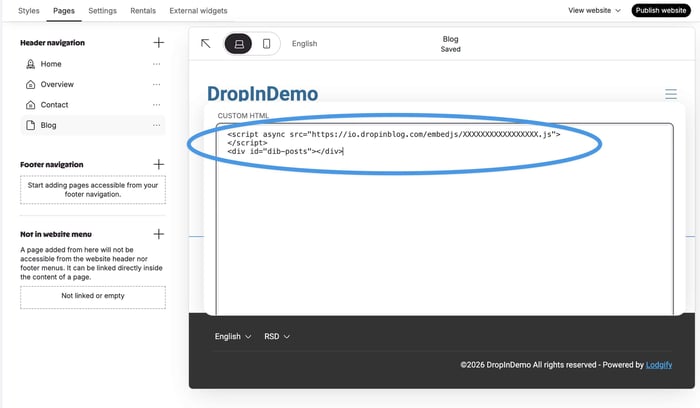
You can preview your changes or save them directly by clicking Publish website.
Now, when you check your Lodgify blog, you'll see it's no longer a blank page. Congrats, your blog is now live!
Step 3: Connect Lodgify to DropInBlog
To finalize the integration between DropInBlog and Lodgify, copy the URL of your Lodgify blog page and return to DropInBlog. Click Settings in the menu on the left and paste the URL in the Blog URL field. Click Save Settings, and that's it!

Congratulations! Your Lodgify blog is up and running!
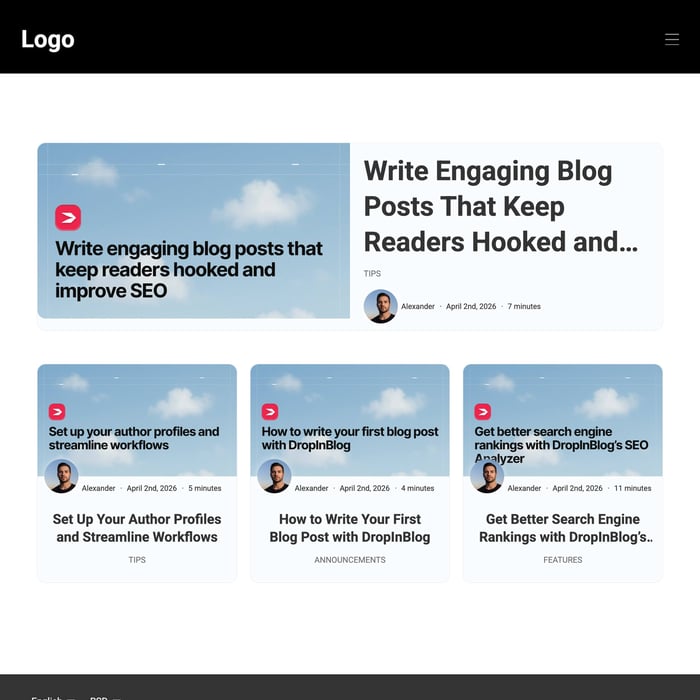
See how easy it is to add a blog to Lodgify?
What Happens After Setup?
Once you add a blog to Lodgify, you’ll be managing all your blog content from your DropInBlog account. Each time you publish a new post through DropInBlog, it will automatically show up on the blog page you’ve created in Lodgify.
When you’re ready to start your first post, open the Posts tab in your DropInBlog account, then select Add Blog Post.
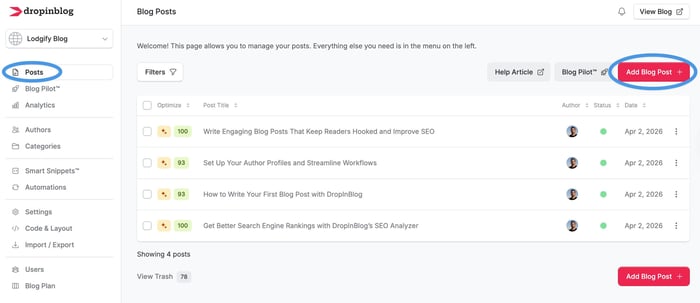
If you’re unsure what to write about, start by opening the Blog Pilot™ tab, which is located under the Posts tab. Selecting this option will launch DropInBlog’s AI-powered blog topic discovery tool, which will generate blog post title ideas for your blog in minutes. It will also automatically create post outlines for the topics you select, so that you can focus on creating your content.
To increase your blog’s chances of appearing in search results, DropInBlog offers a built-in SEO analysis tool. It’s located under the post editor and comes with easy-to-implement suggestions to improve your content score.
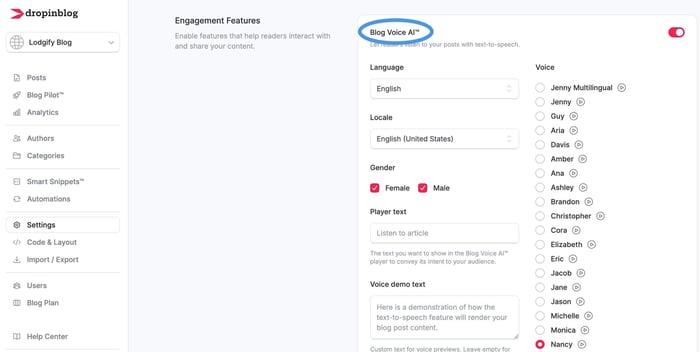
Under the Settings tab, you’ll find DropInBlog’s text-to-speech engine, Blog Voice AI™. You should turn this feature on if you want to offer your written content in an audio format.
And if you want to add a newsletter sign-up form to one, two, or fifty blog posts, you should explore Smart Snippets™. These reusable pieces of content aren’t just for embedding newsletter forms, but for any piece of content you want to display on your blog.
These are only some of the many tools and features DropInBlog offers. If you want to learn the ins and outs of our blogging solution, read our comprehensive DropInBlog review.
What Should You Blog About?
Every vacation rental business needs a blog where it can share ideas on where its readers should travel, help them plan their trips, and provide local insights.
Below is a list of ideas you can use for your next blog post:
Itineraries, places to stay, and things to do in a specific destination
Coffee places, hotels, and restaurants recommended by the locals
Best places for families, pet-owners, and digital nomads
Underrated and rarely visited places
Seasonal guides that tell users what to expect from Christmases and summers in different destinations.
If you’ve already covered some of these topics, you can use Blog Pilot™ to find even more ideas for your next blog post.
Design Customization
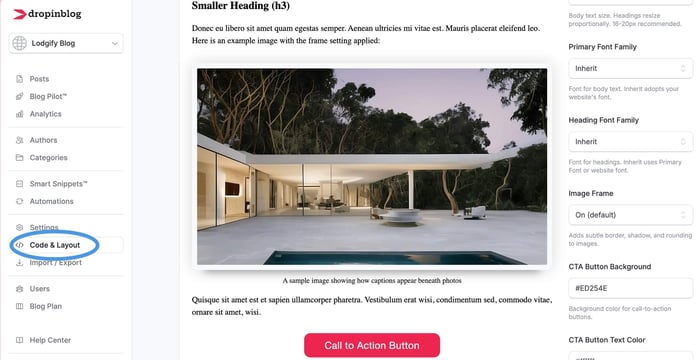
With DropInBlog, you have the freedom to tweak several design elements to your liking, including link and CTA colors, font family, and blog layout. All of this can be done in DropInBlog’s Design Customizer that comes with a preview feature and allows you to fine-tune your blog’s design in real time.
To access design customizations in DropInBlog, go to the Code & Layout section. Here, you can personalize various design elements of your blog.
How a Blog Helps Your Lodgify Site Grow
A blog helps your Lodgify site attract visitors and turn them into bookings.
Let’s say you have a vacation rental property in Venice. You can write a blog post about seeing Venice in two days. Then you can write another post discussing ways to get around Venice. Then another one about the best times to visit the city of canals. All of these blog posts can link to your site’s listings and recommend your property as the place to stay. This way, you can use your blog to guide readers from thinking about visiting Venice to booking a stay in your Venice rental.
DropInBlog supports you in your content strategy by offering everything you need to create high-converting blog posts:
It gives you a flexible editor that makes it easy to create your content.
It offers a live SEO-scoring tool that helps your content get noticed in online searches.
It lets you add images, videos, and links to showcase your property listings in the best light.
And, you can easily see what it can do without any commitment. You just need to sign up for a free trial.
FAQs
Is Lodgify easy to use?
Yes, most reviewers and customers state that Lodgify is easy to use, and we agree.
The vacation rental software is not bloated with confusing and complex features, and the dashboard makes it easy to get from one part to another. "Intuitive" may be an overused term, but it's the most appropriate word for Lodgify, especially its website builder.
Does Lodgify support blogging?
No, not natively. It doesn’t have a built-in blogging tool, so if you want to create a blog on Lodgify, you’ll have to use a third-party blogging tool like DropInBlog.
Can I add a blog to Lodgify?
Yes, you can use DropInBlog to create a blog on your Lodgify site. The integration is straightforward and takes just a few minutes.
How do I add content to a Lodgify site?
You’ll add all your content to your Lodgify site from the Website Builder tab. Simply add a new page using the Pages tab, and then you can add text, images, and other sections to your site’s pages.
If you want to add blog content to your Lodgify site, you’ll have to use a dedicated blogging app like DropInBlog since Lodgify doesn’t support blogging natively.
Is blogging useful for vacation rental sites?
Yes, blogging is a powerful tool for attracting organic traffic and increasing your site’s booking rates. You can use your vacation rental blog to educate and inspire your readers, and ultimately turn them into customers.
Start Blogging with DropInBlog Today
Lodgify is great for managing your rental business, but it doesn’t have a blog. If you want to improve the user experience on your site and increase its traffic and visibility on Google, you should consider adding a blog.
The easiest way to create a blog on Lodgify is with DropInBlog. Give it a try!
Need help getting started? We’re here for you.
Happy blogging!


