Key Takeaways
- The best way to add a blog to your ClickFunnels 1.0 site is with DropInBlog!
- The free trial and quick setup lets you to test it in a few minutes.
- DropInBlog has different pricing plans for individuals and teams.
In this tutorial, we’ll guide you through the process of integrating DropInBlog with ClickFunnels 1.0 and show you how to create a blog on ClickFunnels. This process consists of several simple steps, and the upshot is having ClickFunnels 1.0 enriched with a fully-featured modern blog.
A blog is an invaluable asset to any business today. It’s one of the most economical and efficient ways to promote your company and build your brand. For many successful companies, adding a blog is a no-brainer.
So, let’s see how you can add a blog to ClickFunnels and start blogging in no time.
Table of Contents
- What Is ClickFunnels?
- Can You Blog on ClickFunnels 1.0?
- Prerequisites
- Building Multi-Page Websites on ClickFunnels 1.0
- Create a Sales Funnel
- Create and Configure a New Page
- Clean Up Your New Page
- Add a New Row
- Copy and Paste the DropInBlog Integration Code
- Copy and Paste the Blog Page URL
- Custom Styles
- FAQs
- Happy Blogging!
What Is ClickFunnels?
ClickFunnels is one of the most widely known sales funnel builders. In addition to sales funnels, it allows you to create landing pages.
As far as building websites is concerned, though, this is not one of ClickFunnels 1.0’s primary focuses. You can’t just build a multipage website in ClickFunnels 1.0 the same way you'd create one with any standard site builder.
However, there’s a workaround for this problem, which we’ll apply in this tutorial. So, in addition to showing you how to integrate DropInBlog with ClickFunnels 1.0, we’ll also show you how to build a multipage website in ClickFunnels 1.0.
Can You Blog on ClickFunnels 1.0?
ClickFunnels 1.0 doesn’t include separate blogging and CMS (content management system) functionalities. However, even though the platform is not known for blogging, you can still create a blog page on ClickFunnels 1.0.
Some users prefer to start with a blank page and build their blog from scratch, somewhat emulating existing blog designs, such as ClickFunnels’ own blog. Others find the available ClickFunnels templates satisfactory and create a blog based on them.
Since ClickFunnels allows you to configure the SEO metadata (title, description, keywords, author, social image, etc.), some users deem this a valid workaround.
There are other ways to create a blog on ClickFunnels 1.0 as well. However, they can be very tedious for most users and a far cry from a robust, fully-featured blogging solution. In the end, it’s just better to look for a third-party solution – nothing beats the convenience and performance of an app made exclusively for blogging.
Prerequisites
A subscription to the basic ClickFunnels 1.0 plan ($97/month), will suffice for you to be able to add DropInBlog to ClickFunnels. As for DropInBlog, registering for a free trial is all you need to take this app for a spin.
Building Multi-Page Websites on ClickFunnels 1.0
As we implied earlier, ClickFunnels 1.0 is much more suitable for building landing pages than websites. Despite that, we’ll show you one way to create something that functions like a standard multi-page website. However, since the platform was never intended to be a site builder, keep in mind that it’s a little clunky to set up a complete website on ClickFunnels 1.0.
But why do we need a website in the first place? Because showing you how to create a multi-page website is probably the most convenient way to show you how to integrate DropInBlog with ClickFunnels. Now, let’s prepare the ground for DropInBlog by creating a ClickFunnels sales funnel first.
Create a Sales Funnel
Didn’t we say that we’ll create a website? Then why are we talking about sales funnels now? The answer is very simple: a sales funnel in ClickFunnels 1.0 is basically just a (regular) page or several pages linked together. So, we’ll create a page that we’ll use as the basis for our website.
Since this is not a tutorial on how to create a sales funnel in ClickFunnels, we won’t describe the process of building a funnel in too much detail. Besides, we suppose that you already have a certain knowledge of ClickFunnels as well as some experience with the platform, hence your interest in learning how to create a blog on ClickFunnels. Nevertheless, just in case you need a reminder, to create a funnel in ClickFunnels, you need to do the following:
Click the green Build a Funnel button in your admin dashboard.
Choose one of the suggested types of funnels or create a custom funnel.
Give your funnel a name.
Select a group tag (something that shows which category this particular funnel belongs to).
Choose a page template, and you’re done.
Create and Configure a New Page
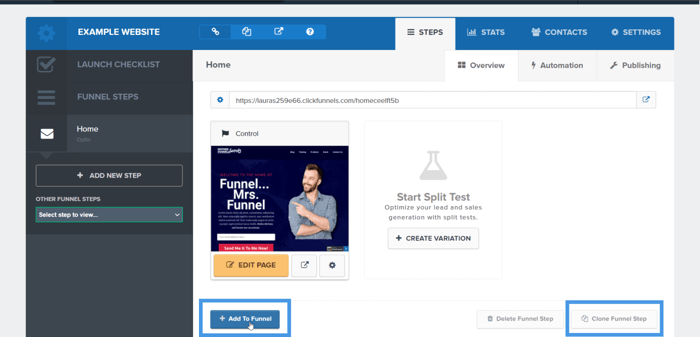
This is where things start to get more interesting. After you create your first funnel page, you need to clone it and create a new page. The new page will be reserved for your blog. Cloning is necessary if you want your new page styles to match the design of the rest of your site – in this case, the design of the first page you created.
When creating the first page of our sales funnel, we chose the custom funnel option. If you’ve already built your first funnel page as well, the next thing to do is click the Clone Funnel Step and then the Add to Funnel options, just like in the image below:
After you add the cloned page to your funnel, you need to click the Publishing option placed near the upper-right corner:
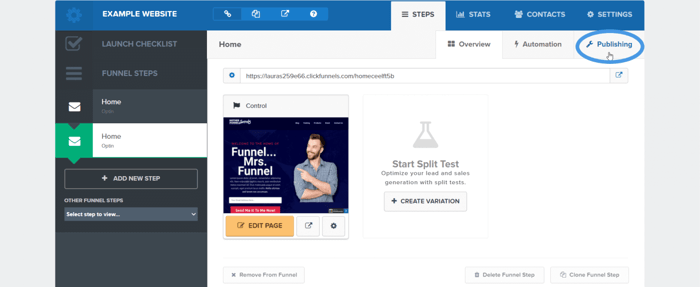
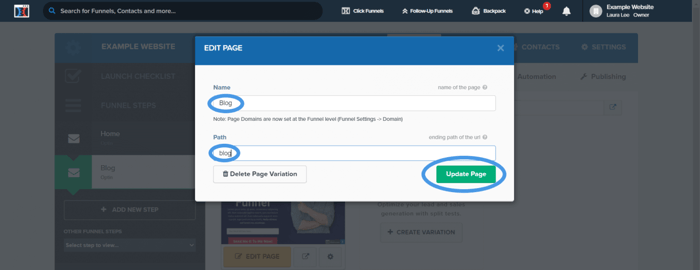
Now you need to change the page name, modify the page path, and click the big green button Update Funnel Step. We’ll give our new page the name “Blog” and enter the path that corresponds to this name. You can do it differently, but keep in mind that it’s good practice to give your page a name that clearly shows its purpose.

If everything went well, you should see your new blog page on the left sidebar. Now, click the Edit Page Split Test Settings option right below the image that shows your new page:
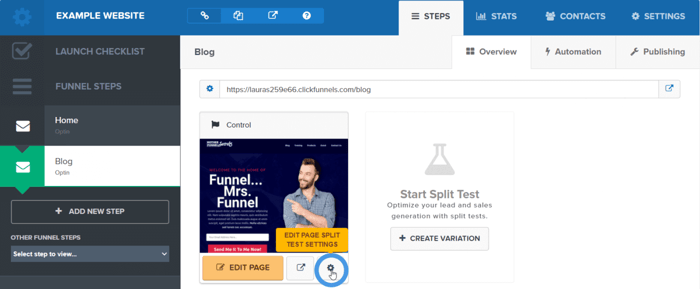
This will show you a dialog box where you need to enter the same values for the page name and path that you entered a moment ago. When you’re done, click Update Page.
Clean Up Your New Page
The next step is to clean up the cloned page to prepare it for integrating DropInBlog. We’ll start by clicking the big yellow Edit Page button below your newly-created page image.

This will open the ClickFunnels easy-to-use visual page editor. You can use it to customize your pages later, but for now, we’ll just need it to remove sections and individual elements from our blog page.
For this tutorial, we’ll keep the header and footer but remove everything else. You can choose which of the existing elements and sections on your page to keep and which to delete.
To remove a full section, just move your mouse cursor over that section until you see the delete (trash bin) icon in the right, upper corner. It will look like this:

It’s similar to when you want to delete an element. Just mouse over a particular element until you see the delete icon. Click the element to remove it from your page.

When you’ve cleaned up the page to your liking, keep it open in the editor. We have to do one more thing before we'll head over to DropInBlog and copy the integration code.
Add a New Row
We’re very close to the most important step in the integration process: adding the integration code from DropInBlog. However, before that, we need to do one more thing in the ClickFunnels editor: add a new row to the section where we’ll add the integration code. This is the section where you’ll see your DropInBlog content after adding the app to ClickFunnels.
To add a new row, click the Row button on the top menu bar of the ClickFunnels editor and click Add Row.
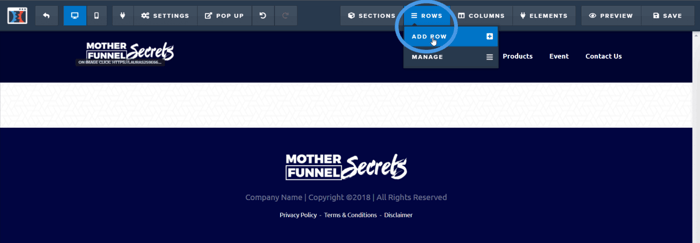
Alternatively, you may see a plus sign that shows you the Add New Row option when you hover over the section where you want to add a new row. When you click Add Row, ClickFunnels will show you a menu with multiple options. Click 1 Column, as shown in the image below:
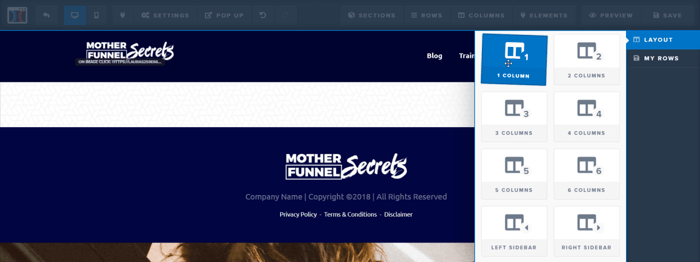
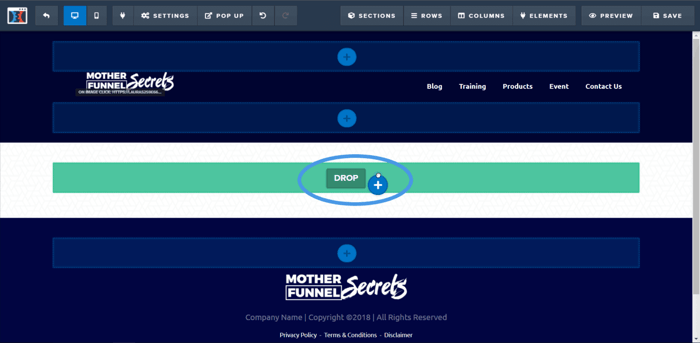
This time, you’ll have to drag and drop to add the row onto the page section you reserved for DropInBlog. Our recommendation is to place DropInBlog on a white or light-colored background, as this is where your blog content will look its best.
Copy and Paste the DropInBlog Integration Code
This is the most crucial and most exciting step. This is where we do the actual integration by copying the integration code from DropInBlog and pasting it into ClickFunnels.
After you add a new row, you need to add a new page element where you’ll paste the integration code. Hover over your newly added row, and click the Add New Element button in the middle of the row.
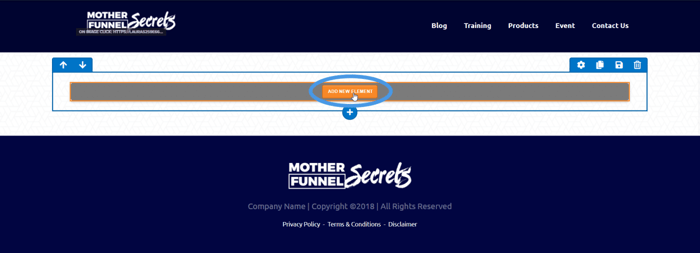
When you click this button, ClickFunnels will show you all the different types of elements that you can add on the right side of the editor. Scroll down to the bottom, where you’ll find the Custom JS/HTML element.
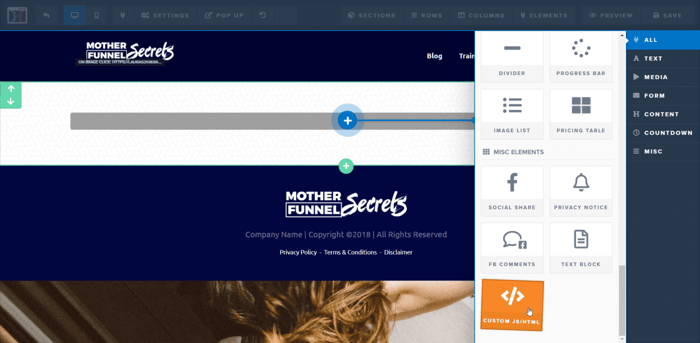
You can either click this element or drag and drop it into the indicated area on your page. When done successfully, you'll see something along these lines:
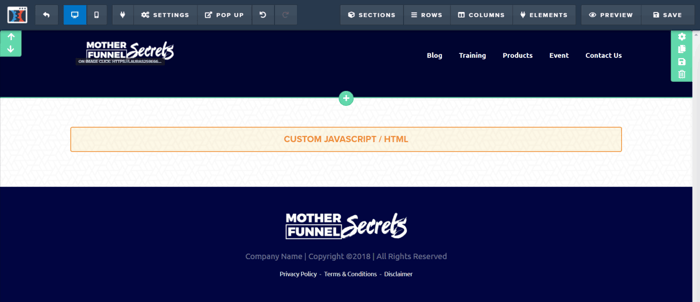
Click the Custom JavaScript/HTML block in the center of your section reserved for DropInBlog. You’ll see a big blue Open Code Editor button on the right.
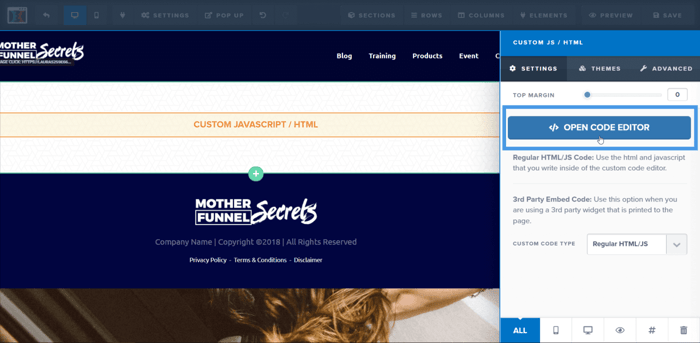
Before you click the button, open a new tab in your browser and log in to your DropInBlog account (without closing ClickFunnels or its page editor). Clicking the Code & Layout option in the navigation bar will take you to the DropInBlog page with the integration code:

You can see the integration code in the image above, but here it is one more time:
Step 1:
<script src="https://io.dropinblog.com/embedjs/XXXXXXXXXXXXXXXXX.js"></script>Step 2:
<div id="dib-posts"></div>All those X’s in the code from Step 1 is where you’ll see your unique DropInBlog ID. It’s a mixture of letters and numerals, and it’s used to differentiate your DropInBlog account from all the others.
Copy the code from Step 1, head back to ClickFunnels, and click the Open Code Editor button. Paste the code into the Custom JavaScript/HTML window. Do the same with the code from Step 2.
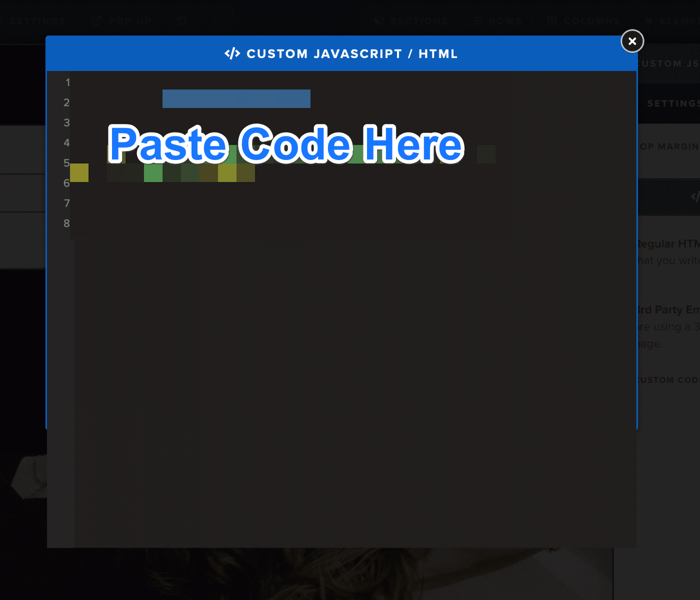
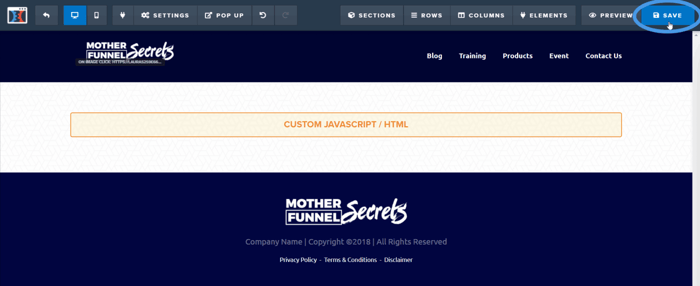
The Code Editor will save the code automatically, so just close the Custom JavaScript/HTML window. Save all the changes you made so far by clicking the Save button in the upper right corner.
On the first save, ClickFunnels will ask you to fill in some SEO metadata. We entered some of the required information, and this is what it looks like:
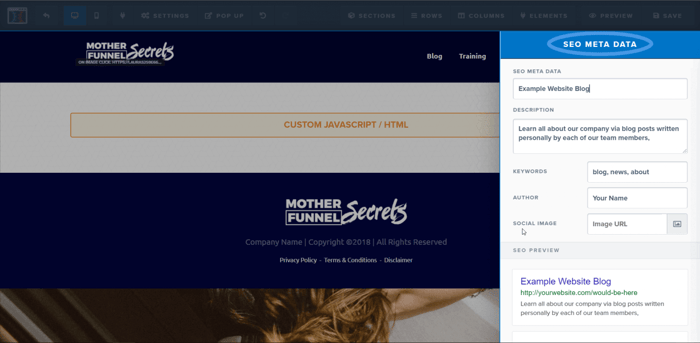
When you enter all the necessary information, click anywhere you want on the page. You’ll be able to see the same Save button again. When you click it once again, ClickFunnels will show you a short message on the bottom right side saying that the new updates will appear live.
Copy and Paste the Blog Page URL
This is the last step of the integration process. Exit the ClickFunnels page editor and copy your blog page URL.
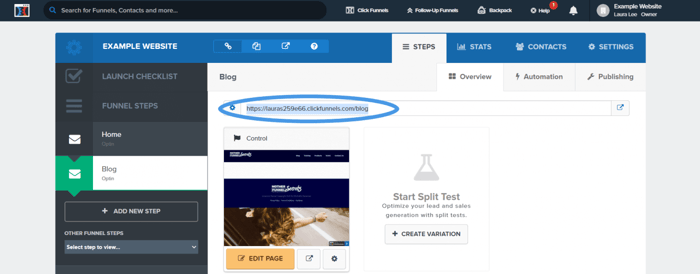
Open DropInBlog again and click Settings in the navigation bar. Paste your ClickFunnels blog page URL in the Blog URL field on the Settings page.
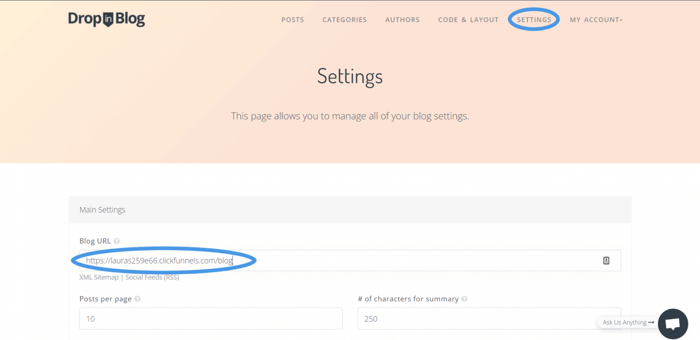
Scroll down a bit and click Save All Changes before you leave DropInBlog. Head over to your ClickFunnels admin dashboard and click Preview Page Split Test Version to see your blog page in its glory.

This is what we see when we preview our blog:
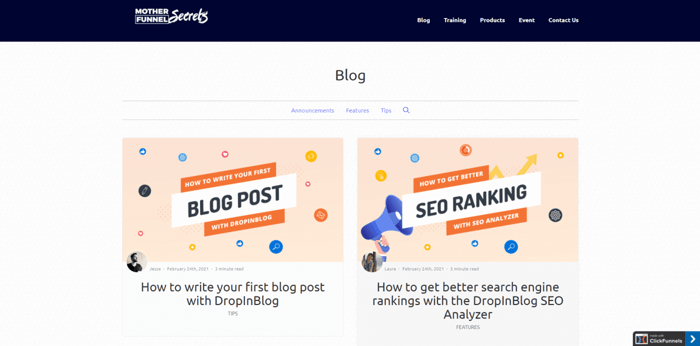
Keep in mind that sometimes it takes time for changes to update on your ClickFunnels website URL, so don’t worry if you can’t see your changes live right after you make them. However, this does not apply to the preview option – if you follow the step we described here, you can preview the changes you make instantly.
Custom Styles
One of the things you can do after you integrate DropInBlog with ClickFunnels is to customize your blog page by adding custom styles. You can add custom styles, i.e., custom CSS code, either in the ClickFunnels code editor or from within DropInBlog. This is what it looks like when adding your own styles in ClickFunnels:
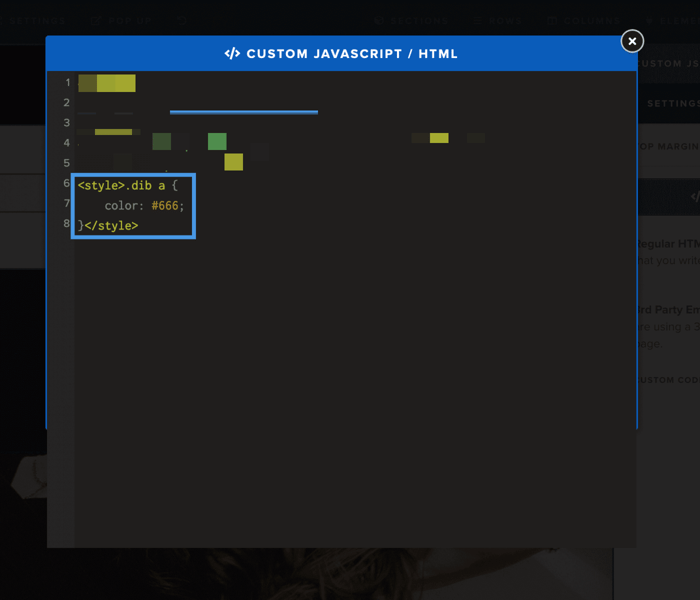
As you remember, we used the code editor to add the integration code from DropInBlog, so finding this function in ClickFunnels should be a breeze for you.
Or, this is what adding custom CSS directly in DropInBlog looks like:
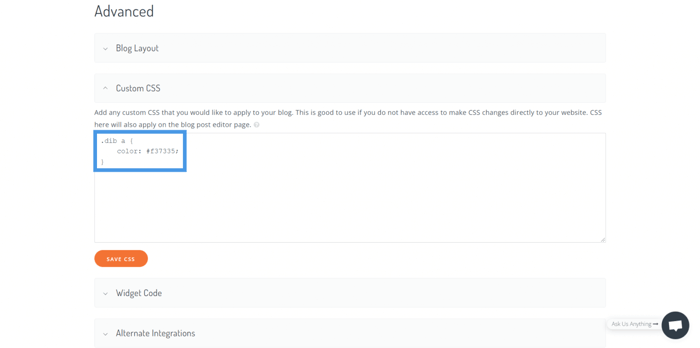
To add custom code within your DropInBlog account, you need to open the Code & Layout page – the same page that we copied the integration code from. When you scroll down, you’ll see the Advanced section. Click the Custom Code subsection, and you can write or paste your custom CSS code just like in the image above.
Speaking of style changes, keep in mind that since your ClickFunnels 1.0 site is not a standard website, customization on ClickFunnels 1.0 will work differently as well. More specifically, in ClickFunnels 1.0, you can’t apply global changes to your site.
Technically, unlike standard site pages, each page of your ClickFunnels 1.0 site is separate from the rest. This means that if you update a link or make a style change to the header, footer, navigation, etc. on one page, you need to make it on every other page.
FAQs
What is the difference between ClickFunnels 1.0 and ClickFunnels 2.0?
There are many differences between ClickFunnels 1.0 and ClickFunnels 2.0. The latter is more than just your usual upgrade – so much so that it could be considered a separate platform.
The most obvious difference is the UI. While the user dashboard in ClickFunnels 1.0 consists of a decentralized set of pages organized into funnels, in ClickFunnels 2.0, you have access to all pages in one place. It’s like one big website where you can access your funnels, homepage, blog, customer center, products, and more.
Another feature that the ClickFunnels team added to the new 2.0 version is the Visual Automation Builder, which allows you to see both the funnel flow and the individual page you’re editing at the same time on a split screen.
ClickFunnels 2.0 now also supports the ability to build an e-commerce store, a feature that was only available on ClickFunnels 1.0 via integration with Shopify or BigCommerce, or other similar platforms.
Another super useful feature of the 2.0 builder is the ability to collaborate with multiple users, which is perfect for teamwork. Similar to how Google Suite works, you and our team will have access to the documents and can edit them simultaneously. This is an entirely new feature that ClickFunnels 1.0 doesn’t have.
Lastly, ClickFunnels 2.0 has a significantly faster load speed than ClickFunnels 1.0, which in turn affects the ranking on Google, as sites that load faster are ranked higher in the SERPs.
There are more differences than we’ve mentioned here, but it’s enough to understand where ClickFunnels 2.0 is going.
Can I blog on ClickFunnels 1.0?
You can certainly blog on ClickFunnels 1.0, although the platform itself doesn’t have blogging functionality. You can blog by using their other tools although it wouldn’t be a fully functional blog like the one you would get with other platforms.
The other way you can blog on ClickFunnels is by integrating with a third-party app, like DropInBlog, the super cool and super easy-to-use blog. It doesn’t take more than a few minutes to set it up, and the benefits will become obvious as soon as you start using it.
Happy Blogging!
This guide showed you all you need to do to create a blog on ClickFunnels 1.0, as well as customize it in line with your design preferences. If you have any questions and would like to get to know DropInBlog better, please drop us a line on our chat – we’ll be glad to write back and help you in any way we can. Thanks for your interest in DropInBlog. Have a great time with our app, and happy blogging!
