Key Takeaways
- The best way to add a blog to your LearnWorlds site is with DropInBlog!
- The free trial and quick setup lets you to test it in a few minutes.
- DropInBlog has different pricing plans for individuals and teams.
This tutorial will show you how to create a blog on LearnWorlds using the dedicated blogging solution DropInBlog. It’s a simple, breezy, and delightful experience.
LearnWorlds is a learning management system (LMS) that allows you to build a website and create a blog.
We can't dispute the merits of a LearnWorlds website; for anyone who's had a chance to see one, they're evident. However, the same does not apply to its built-in blogging solution. Keep reading and you'll learn precisely why.
Table of Contents
The Benefits of Using DropInBlog vs. LearnWorlds for Blogging
Knowing the marketing significance of blogging, LearnWorlds has developed its own blogging functionality. It's available as a feature of all the platform's pricing plans apart from the lowest tier, Starter.
It is remarkable that LearnWorlds includes a blogging option, but what's not so remarkable is that this functionality is unnecessarily complicated. A cursory look at the LearnWorlds tutorial on creating a blog is enough to get a feel for that complexity (for the lack of a better word).
That's why to create a blog on LearnWorlds we suggest you try a dedicated blogging solution that is also straightforward and convenient. LearnWorlds allows you to integrate third-party apps, so you can rely on DropInBlog to add a full-fledged yet simple blog to your LearnWorlds website in just a few easy steps.
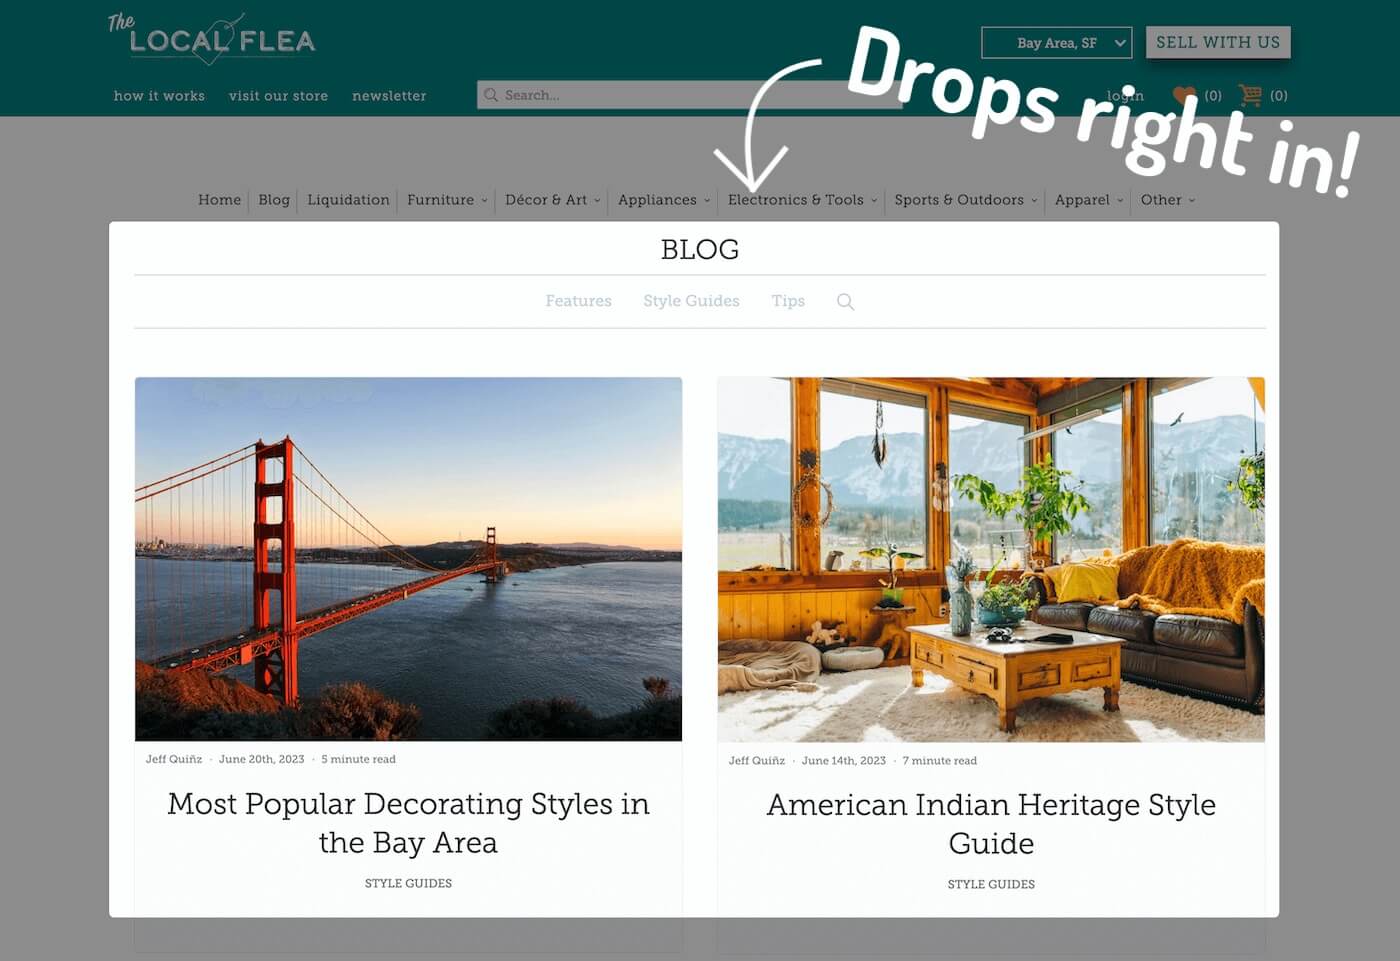
DropInBlog is one of the best-rated apps in the highly competitive ecosystems of Shopify and BigCommerce third-party apps. It has helped tons of businesses find their voice and establish themselves in their niches through blogging. But don't just take our word for it; see the blogging beauty others have brought to this world with a little help from DropInBlog.
How to Create a Blog on LearnWorlds using DropInBlog
Step 1: Find Blog Settings
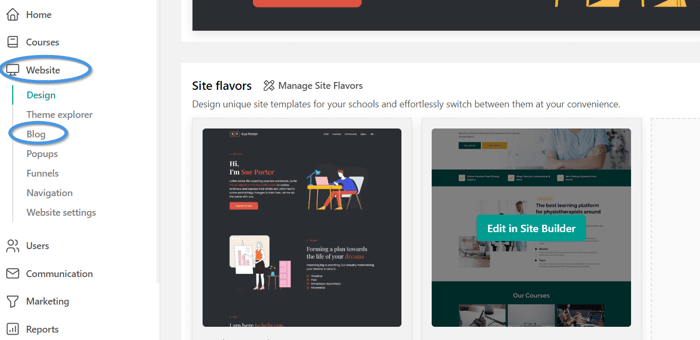
To create a blog for your LearnWorlds site, select Blog under the Website tab in your admin dashboard.
Step 2: Enable Blog
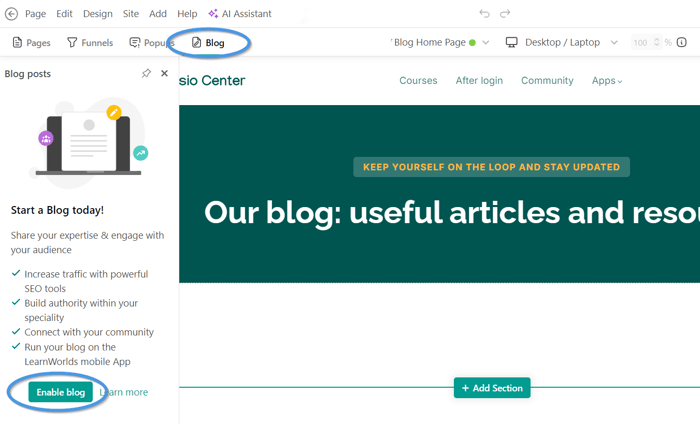
Selecting this option will open the page editor where you should find the Blog tab and click on it. Then, in the bottom-left side of the editor, click on the Enable blog button to open blog settings.
Step 3: Blog Settings
In the popup window that appears, click the Enable Blog toggle button so it shows "On," just like in the image below, and enter the name and the description of your blog.
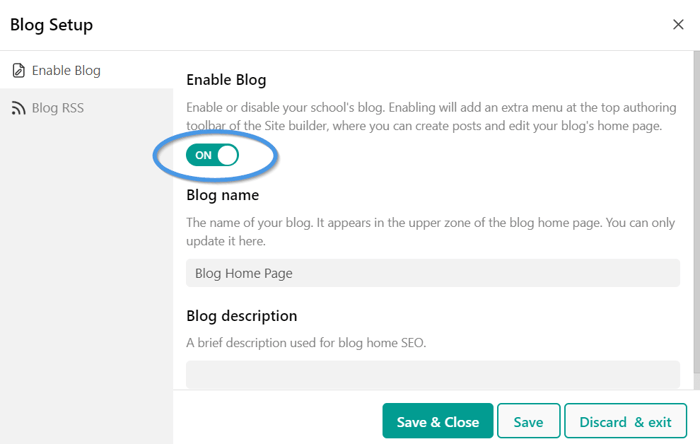
Once done, select the Save & Close option, and you’ll be taken to the page editor.
Step 4: Add Section
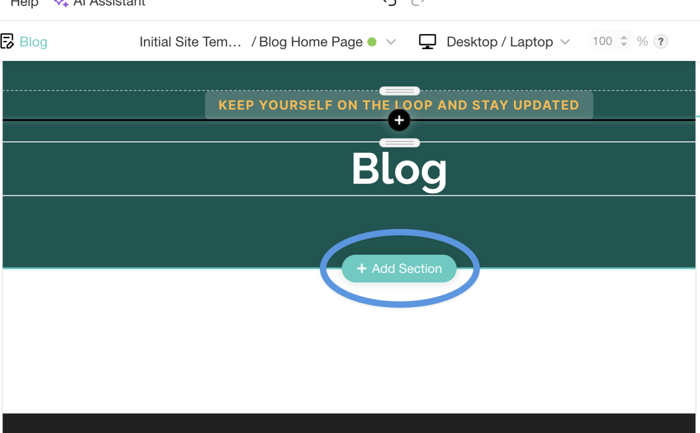
On the left side of the editor, you’ll see your blog page – the page you're editing. When you click on it, you'll be able to customize it to your liking, as well as add new sections, which is the option we'll use next.
Hover over any existing section on the page and the Add Section button will appear. Click on it to open a popup window with more options.
Step 5: Embed Section
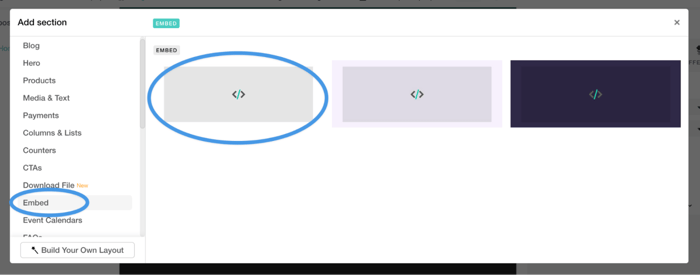
In the popup window, you'll see multiple section types you can add to your page. Choose Embed and click on the first option.
Step 6: Copy Code
Before you continue, you need to create a DropInBlog account if you haven't already. DropInBlog offers a free trial to start your blogging journey at no cost.
Now that you have a DropInBlog account, head over to it and click Code & Layout in the navigation bar. Copy the two lines of code you'll see in Steps 1 and 2 under the Blog Code section.

Step 7: Paste Code
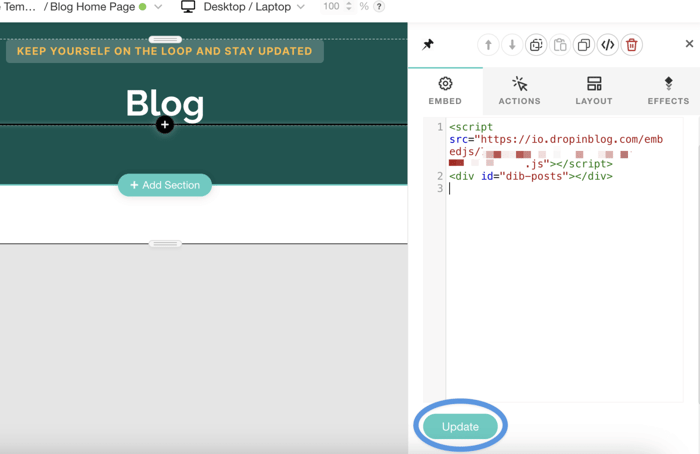
Return to LearnWorlds and click on the newly added section. You'll see a box on the right titled Embeddable script. That is where you paste your DropInBlog code. Click Update after you paste it.
Step 8: Save Changes
Now, click Save to ensure you keep the most recent changes.
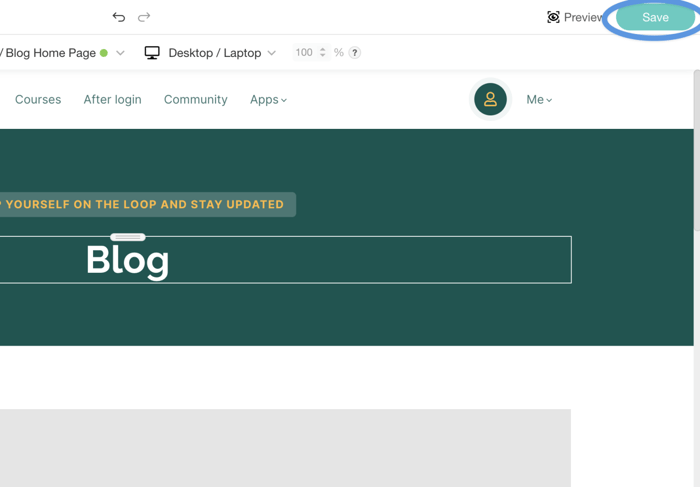
Click Preview on the left of the Save button to see what your blog looks like now.
That's all – you've completed the final step of connecting DropInBlog and LearnWorlds.
How to Add a Link to the Blog Page Menu on Your LearnWorlds Site
Step 1: School Topbar
While you're still on your Blog page (if you're not, return by clicking Website→Blog), hover over it until you see the Edit School Topbar button on the upper side; click on it. Now, click on the top navigation bar menu.

Step 2: Add a New Item
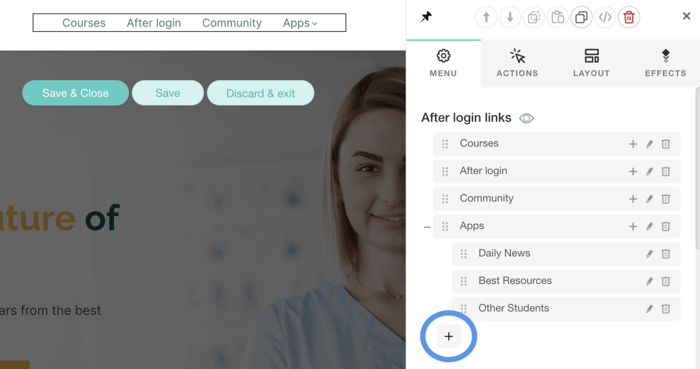
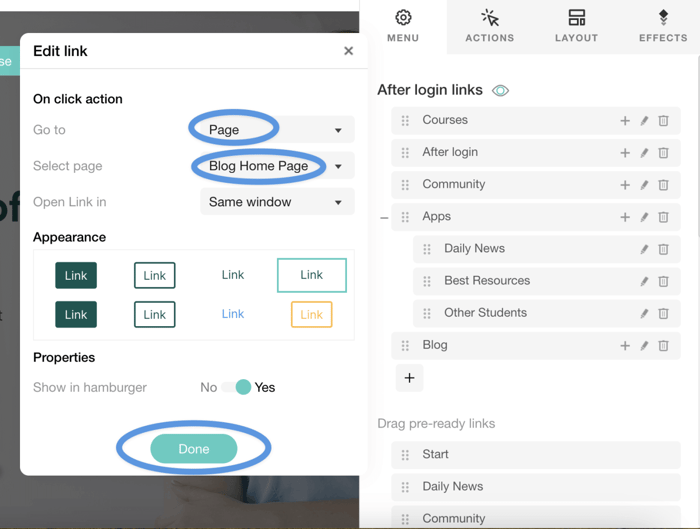
You'll see the menu items on the right side of the page, under After login links. Click the plus sign to add a new menu item with a link to your blogging page.
Step 3: Title the Item
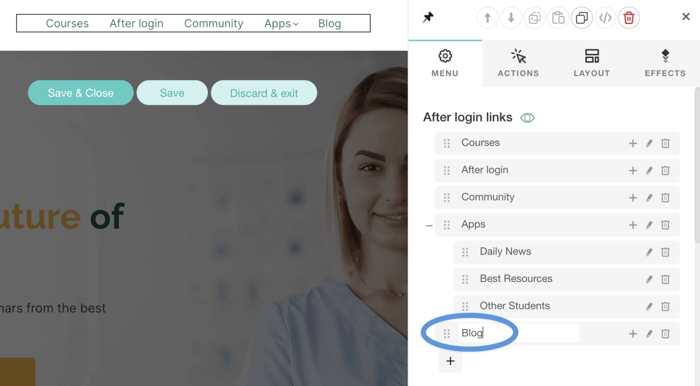
Title the new menu item Blog.
Step 4: Edit the Item
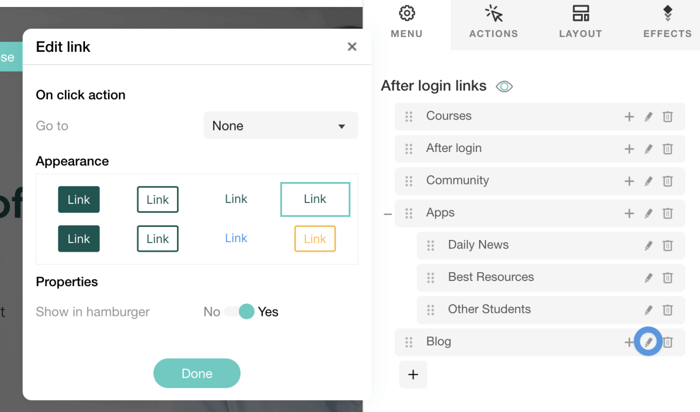
Next, click the pencil icon to make the necessary edits for the menu item to be functional.
Step 5: Blog Home Page
Click the field where you see None, and choose Page from the dropdown menu. Click About in the field below Page and choose Blog Home Page. Finally, click the green Done button.
Step 6: Save and Close
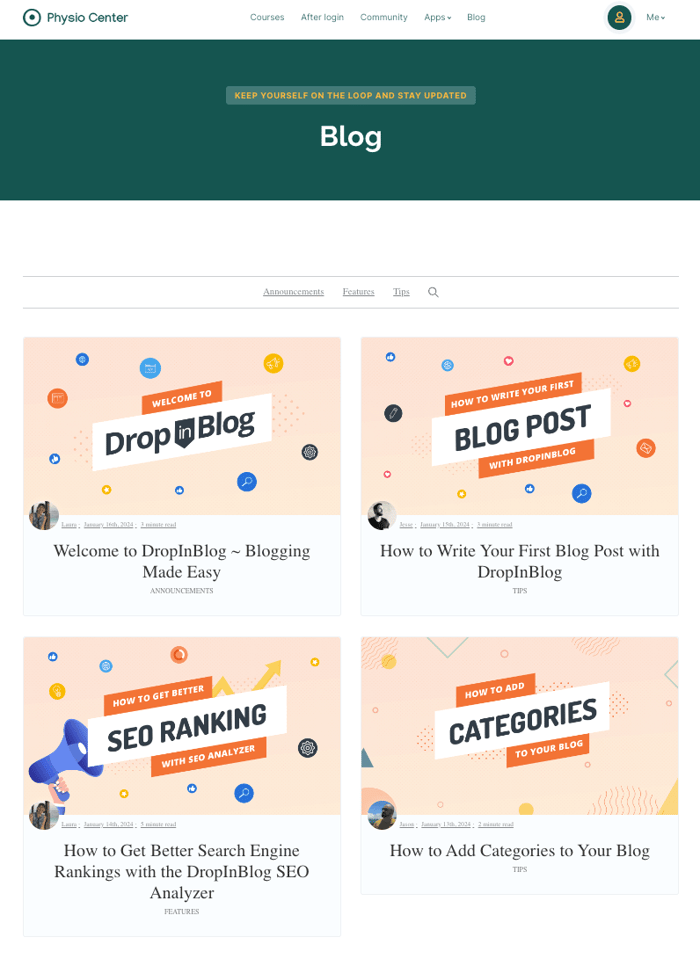
After you click Done, you’ll see the newly created menu item Blog in the top bar menu. Click the green Save & Close button to save your recent changes.

Step 7: Preview
Next, click Preview in the top right corner to see what your LearnWorlds website looks like with the edited top bar menu.

Step 8: Enjoy Your Blog
Finally, click the Blog menu item to check whether it works correctly. If you can see your brand new, shiny, happy blog, congratulations – you've got yourself a blog!
Step 9: Add New Content to Your Blog
After you've embedded DropInBlog into your LearnWorlds website, you'll be creating all your content from your DropInBlog admin dashboard. So, head over to your DropInBlog account, and on the Posts page, click on the Add Post button.
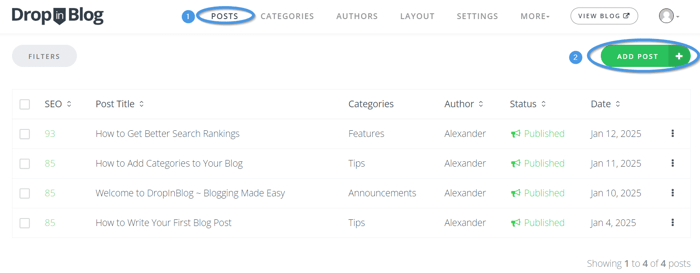
Add your content and simply publish your post, and it will be automatically shown on your LearnWorlds site.
Design Customization
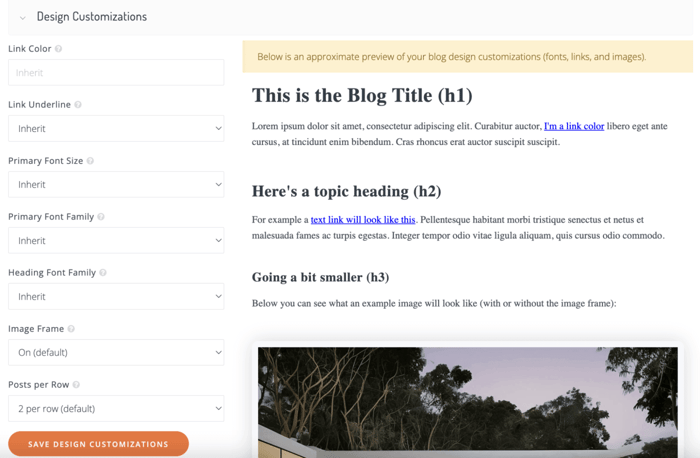
With DropInBlog, you have the freedom to tweak several design elements to your liking – which, like adding new blog posts, is something you need to do from your DropInBlog account.
These include adjusting the link color and underline options for better visibility, selecting the primary font and heading font family for a cohesive look, adjusting the image frame settings, and setting the number of posts per row for a neat layout.
DropInBlog offers a preview feature, allowing you to see and fine-tune these customizations in real time, ensuring your blog not only reads well but also looks stunning. To access Design Customizations in DropInBlog, go to the Code & Layout section, scroll down, and click on Advanced. Here, you can personalize various design elements of your blog.
FAQs
What is LearnWorlds used for?
LearnWorlds is a platform that allows you to create, manage, market, and sell online courses. It's a good choice for course creators, edupreneurs, and everyone in the e-learning niche.
LearnWorlds is known for its high-quality customer support, but that's not its only highlight. The platform also includes:
- White labeling
- A good number of integrations
- A streamlined drag-and-drop website builder
In addition, it allows you to create a mobile app for your e-learning business, and just like many other modern platforms, LearnWorlds, too, relies on artificial intelligence for more efficient work.
Can I use LearnWorlds for blogging?
As mentioned earlier, LearnWorlds does include native blogging functionality. In that sense, you can use it for blogging. However, more often than not, the built-in blogging options on platforms whose primary purpose is not blogging are not recommended if you're serious about content marketing.
Usually, these blogs lack features and scalability, which is only natural, considering that content marketing is more of an afterthought than a primary objective for those platforms. It's worth noting, however, that LearnWorlds' native blog fares much better than many others.
Nonetheless, blogging is just a secondary functionality, and starting a blog with LearnWorlds is more complicated than it should be. For these reasons, we recommend a third-party specialized blogging solution, such as DropInBlog.
Conclusion
In this tutorial, you learned how to add a full-fledged blog to your LearnWorlds site using the user-friendly DropInBlog. Happy blogging, and please do not hesitate to get in touch whenever you feel like talking about blogging and DropInBlog.


