
Key Takeaways
- The best way to add a blog to your ActiveCampaign site is with DropInBlog!
- The free trial and quick setup lets you to test it in a few minutes.
- DropInBlog has different pricing plans for individuals and teams.
ActiveCampaign gives you landing pages, forms, and automation, but it doesn't include a blogging CMS. To create a blog on ActiveCampaign, you need to build a page and embed a blogging platform into it.
The setup takes just a few minutes. You'll create a new page, paste two snippets from your DropInBlog account, publish, and connect the live URL back to DropInBlog. ActiveCampaign lists DropInBlog in its app directory, so this is a supported integration rather than a workaround.
And because ActiveCampaign is an automation platform, your blog can feed it directly. Connect your blog's RSS feed to an ActiveCampaign automation and every post you publish emails your subscribers on its own. We'll cover both halves: getting the blog live, then sending it to your list.
Table of Contents
How to Create a Blog on ActiveCampaign
To add a blog to ActiveCampaign, you'll need an account on the Plus plan or higher. Landing pages aren't included on Starter, and you need a page to embed the blog into. ActiveCampaign now prices by contact volume across three tracks (Email, WhatsApp, or both), so check their current pricing for your list size.
You'll also need a DropInBlog account. The free trial covers the full integration, no credit card required.
Step 1: Create a Blog Page
Assuming you’ve already built your first ActiveCampaign site page, you can simply duplicate it to create a new page for your blog.
Alternatively, you can create a brand new page using a blank template or any of the expertly designed layouts ActiveCampaign has to offer.
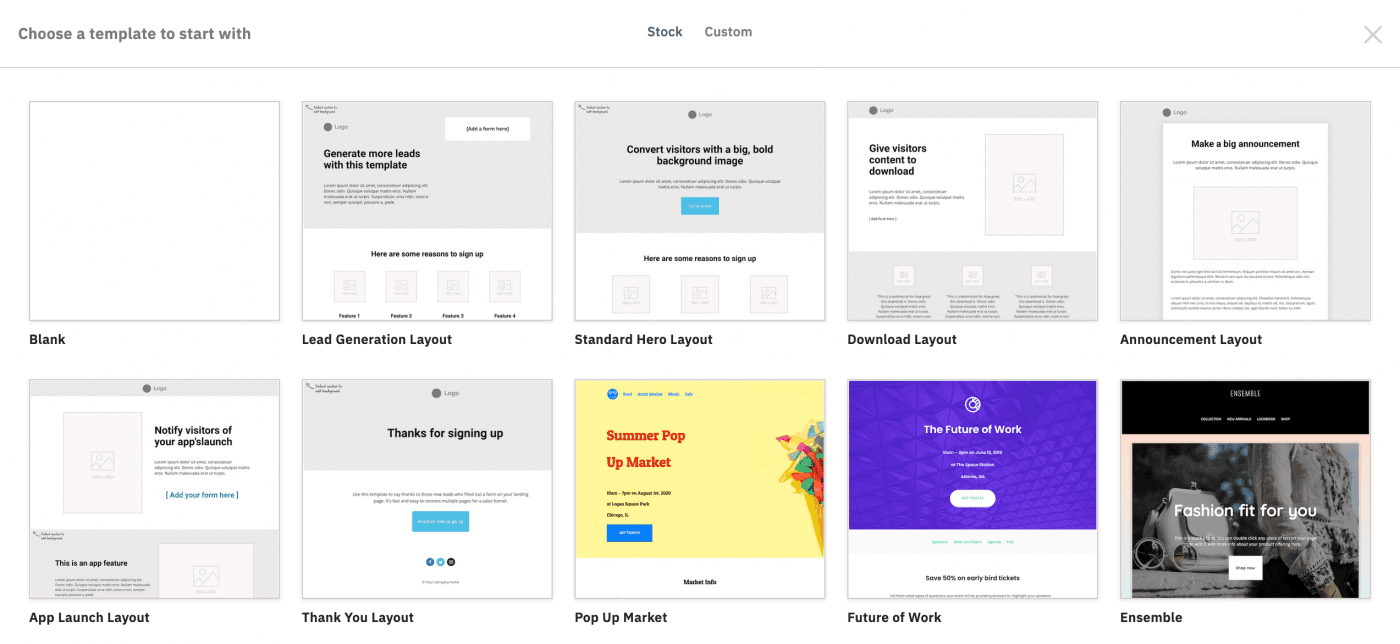
Once your new page is created, you can give it a name. I’d like to suggest “blog,” but you can be as creative here as you’d like.
Step 2: Add Your Blog Script to the Page
There are a few simple steps we need to take to get DropInBlog and ActiveCampaign talking to each other.
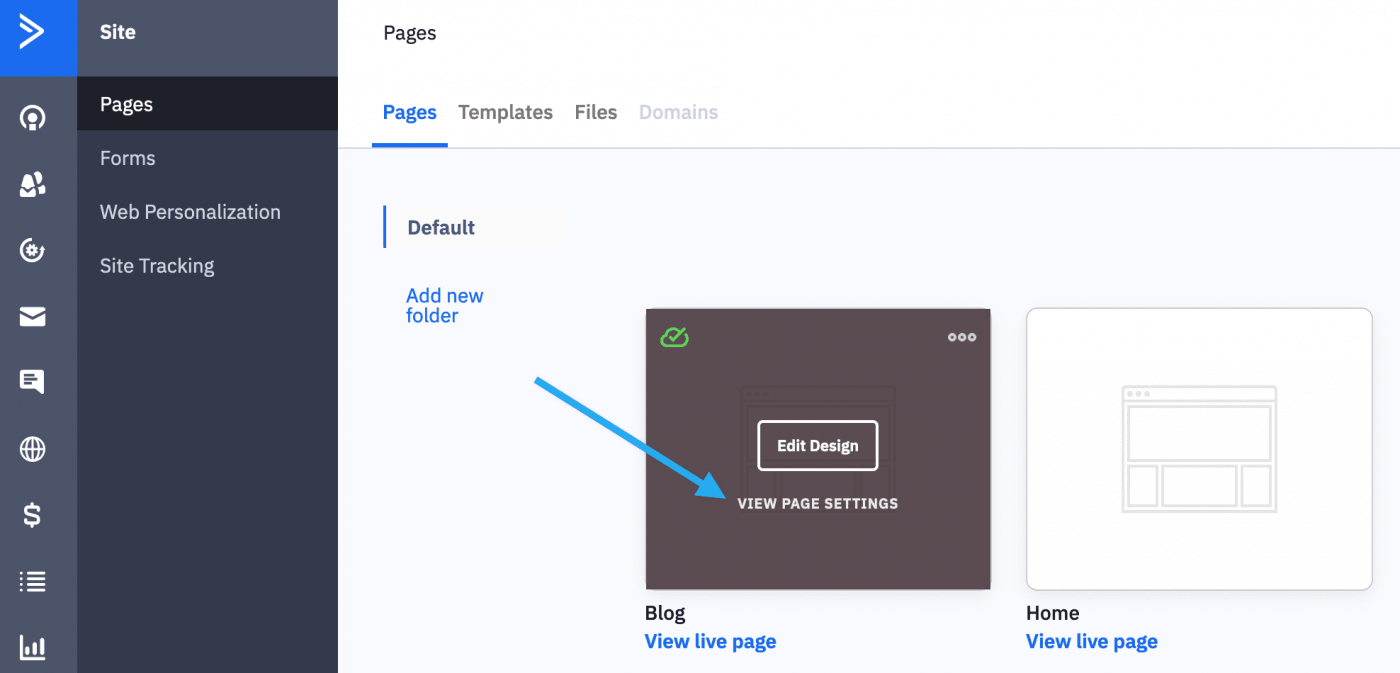
First, hover over your new blog page, and click View Page Settings.
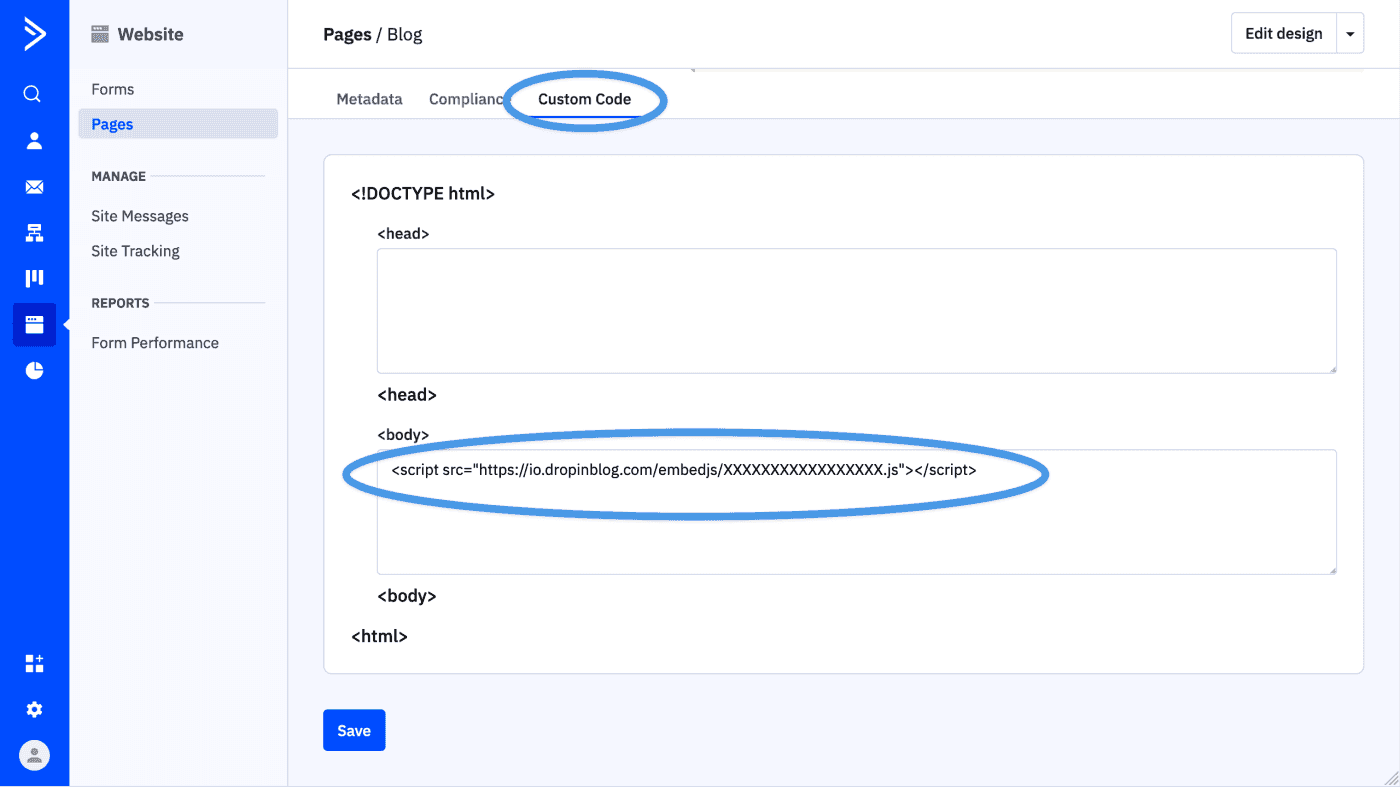
Next, open a new browser window and log in to your DropInBlog account. Navigate to the Code & Layout tab, and copy the line of code shown under Step 1. It looks like this:
<script src="https://io.dropinblog.com/embedjs/XXXXXXXXXXXXXXXXXXXX.js"></script>Finally, switch back to your ActiveCampaign blog page, and paste the code you just copied into the <body></body> area of the Custom Code section. Click Save.
Step 3: Display the Blog Posts on Your Page
Now that your accounts are connected, we need to define where on your blog page the blog posts will actually be shown.
Open your blog page by clicking Edit Design. If you’ve duplicated an existing page, you can delete anything you don’t want showing on your blog page. Otherwise, if you have a blank slate in front of you, you’re ready to rock and roll!
First, grab a Section Block and drag it to the spot on your page where you’d like your blog to be.
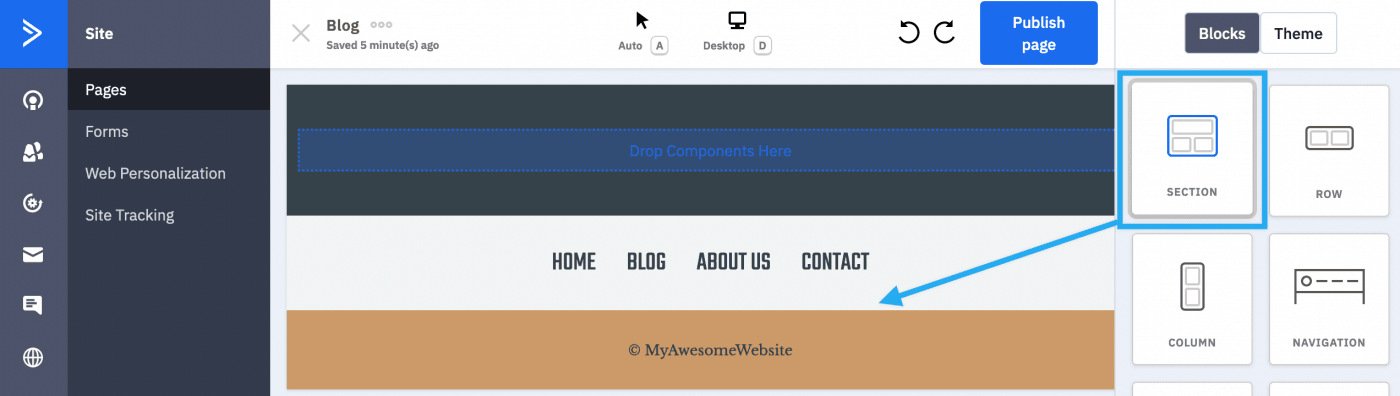
Then, grab an Embed Block and place it within the Section Block that you just set on your page.
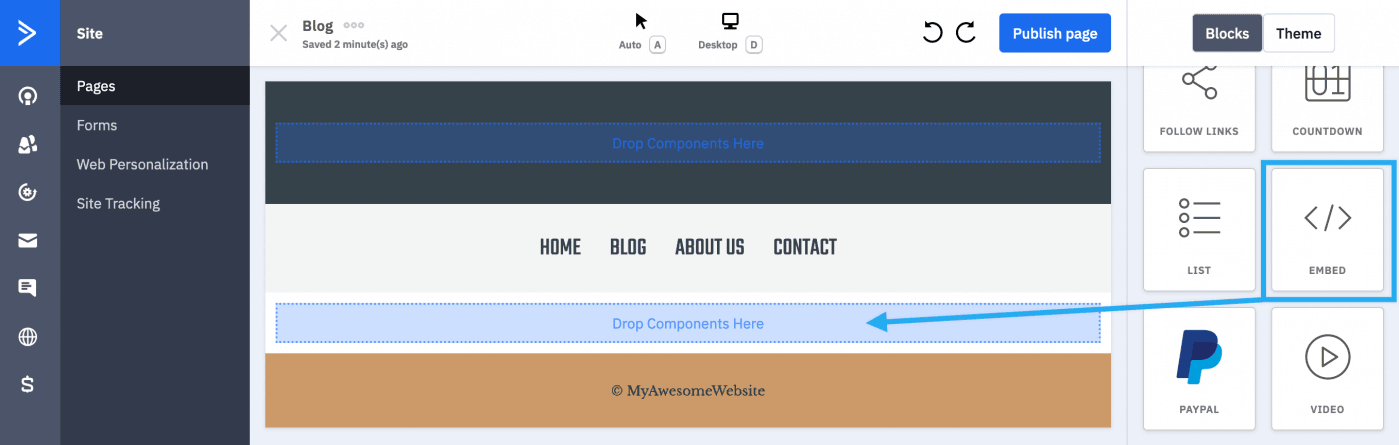
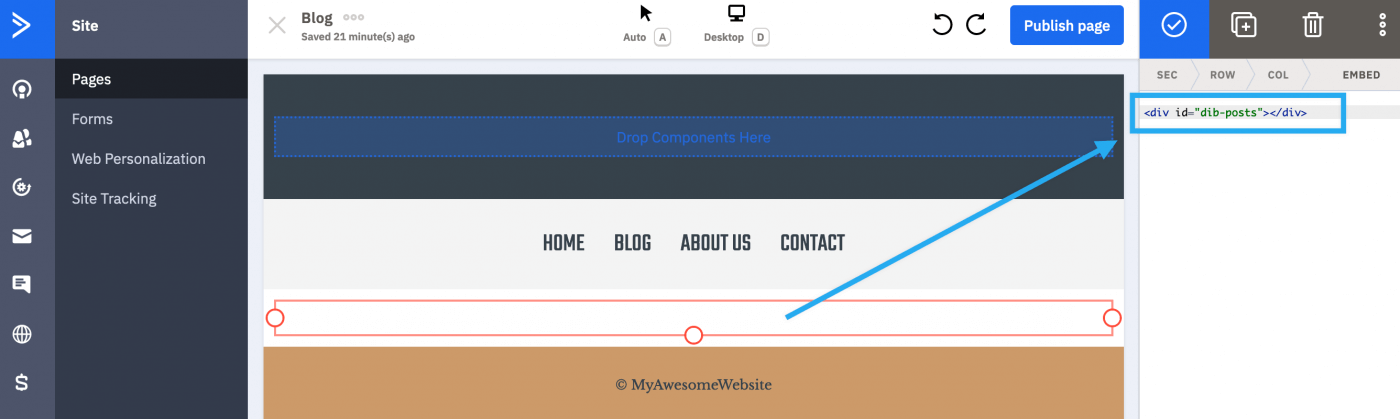
Now, head over to DropInBlog again, and copy the code shown in Step 2. It looks like this:
<div id="dib-posts"></div>Back in ActiveCampaign, click on your Embed Block, and paste the Step 2 DropInBlog code into the field that appears on the right.
Step 4: Point DropInBlog at Your Live URL
For the final integration step, head back over to DropInBlog and navigate to the Settings page. Locate the Blog URL field and input your ActiveCampaign blog page URL. Once you’ve entered this URL into DropInBlog, hit Save All Changes.
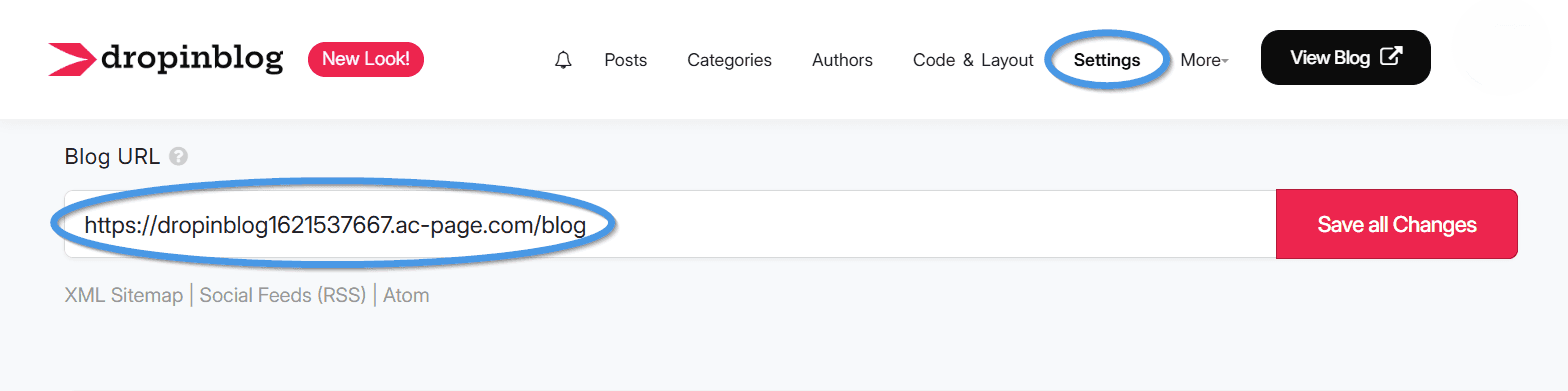
To find this URL in ActiveCampaign, just click the icon of the three dots next to your page name and select Get URL.
Step 5: Publish Your New Blog Page
To publish your new page with these changes click the Publish Page button in ActiveCampaign.
You may then navigate directly to your blog URL, click the three dots icon, and select View Live. And now... behold your beautiful new blog! ✨
Email Your Subscribers Every Time You Publish
Your blog is live, but this is where ActiveCampaign earns its place. Most platforms just host a blog, but ActiveCampaign can turn every post into an automated campaign.
DropInBlog publishes an RSS feed of your posts. ActiveCampaign can watch that feed and send an email whenever something new appears, so publishing becomes the trigger, and you never build a "new post" campaign by hand again.
Step 1: Set up the automation
Grab your blog's RSS feed URL from your DropInBlog account by navigating to Settings –> Social Feeds (RSS)
In ActiveCampaign, go to Automations and start from the Send New Blog Posts recipe.
In the recipe's start trigger, paste your RSS feed URL into the RSS feed field.
Build the email using an RSS content block. It pulls your latest post titles, summaries, and featured images automatically, so the template fills itself in on every send.
Choose which list or segment receives it, then turn the automation on.
From then on, publishing in DropInBlog is the only action required. The post appears on your site, and the email goes out.
Step 2: Use your blog as a segmentation signal
Once posts are going out by email, the clicks become data. If a contact opens your post about pricing and ignores everything else, that's intent worth acting on.
You can add a tag when someone clicks a link in a post from a given category, then branch your follow-up automations on those tags. Your blog stops being a traffic channel and starts feeding your segmentation, which is the reason to run a blog on ActiveCampaign specifically rather than any other platform.
Tips for Using ActiveCampaign
ActiveCampaign has a variety of well-designed template layouts, and DropInBlog will inherit the styles of those templates automatically.
However, if you want to add some custom styling, you can use standard CSS to adjust the look and feel of your blog. Just open the Embed Block where you posted the DropInBlog code from Step 2, and add your custom CSS within <style></style> tags to begin tweaking the design of your blog.
FAQs
Does ActiveCampaign have a built-in blog?
No. ActiveCampaign includes landing pages, forms, and a page builder, but no blogging CMS, so there's no post type, no categories, and no author pages. To add a blog, you need to create a page and embed a blogging platform like DropInBlog into it.
Which ActiveCampaign plan do I need to add a blog?
Plus or higher. Landing pages aren't available on the Starter plan, and you need a page to embed the blog into. ActiveCampaign prices by contact volume, so check their pricing page for your list size.
How do I email subscribers when I publish a new blog post?
Connect your blog's RSS feed to ActiveCampaign's Send New Blog Posts automation recipe. Paste the feed URL into the recipe's RSS trigger and build the email with an RSS content block. Every new post then emails your list automatically with no manual campaign build.
Can I add a blog to an existing ActiveCampaign site?
Yes. The blog lives on a new page, so nothing changes on your existing pages, forms, or automations. Add the page to your navigation once it's published.
Do I need WordPress to blog on ActiveCampaign?
No. A lot of ActiveCampaign blogging advice assumes you're running WordPress separately and syncing it across. You can skip that entirely: embedding a blog directly into an ActiveCampaign page means one less platform to host, secure, and update.
In Summary
The process of integrating DropinBlog into your ActiveCampaign site is super easy. However, if you’d like any assistance getting your new blog set up, please do get in touch. We’re more than happy to help out. 🤓
Happy blogging!