
Key Takeaways
- The best way to add a blog to your WildApricot site is with DropInBlog!
- The free trial and quick setup lets you to test it in a few minutes.
- DropInBlog has different pricing plans for individuals and teams.
WildApricot has a built-in Blog gadget you can add to any site page. It's fine for posting quick member updates and organizational announcements. But if you want a full-featured blog with SEO tools, cleaner post management, and detailed author profiles for your association, chapter, or nonprofit, embedding DropInBlog through WildApricot's Custom HTML gadget is the cleaner setup.
This guide walks through the DropInBlog install in about 10 minutes. There's one WildApricot-specific quirk you need to know about upfront: WildApricot blocks third-party scripts by default as a security measure, so you'll need to whitelist DropInBlog's domains before anything else. We'll cover it in Step 1.
Table of Contents
What Is WildApricot?
WildApricot is an all-in-one web platform that lets you create and manage membership sites, standard websites, subscriptions, events, and donations. Its list of clients mainly includes nonprofits, small to medium associations, and other membership-based organizations.
WildApricot is mobile-friendly and makes migration from other platforms rather easy by allowing you to import your information via a spreadsheet file. Some of the other notable features it includes are:
Automated membership renewals
A customizable database
Email automation
Email and website templates
An intuitive drag-and-drop editor
Can You Blog on WildApricot?
Yes, WildApricot includes a native Blog gadget that you can drag onto any site page, and it's part of WildApricot's Website module. WildApricot themselves document this in their Help Center.
The native gadget works if you're posting occasional member updates like announcements, event recaps, and chapter news. Its limits show up when you want to run blog content as a real communications or SEO channel: no built-in SEO scoring, no automatic schema markup, limited layout flexibility, and the blog lives inside WildApricot's page structure rather than as a fully-featured blog with categories, tags, and author profiles.
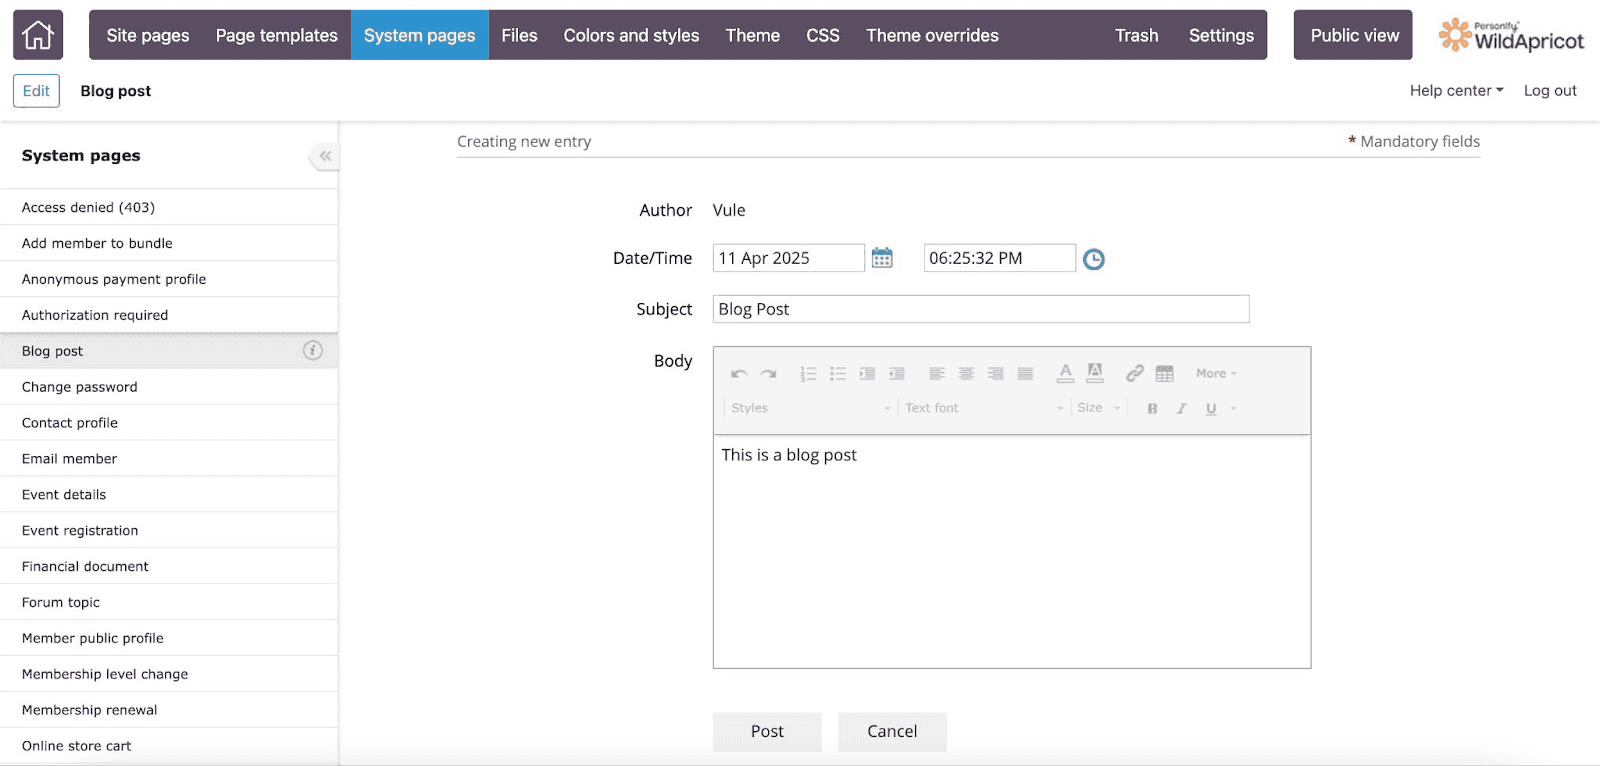
Most organizations that want a proper blog on their WildApricot site, one that Google indexes cleanly and readers can navigate the way they'd navigate any blog, embed DropInBlog through the Custom HTML gadget.
Here's how these two options compare:
Feature | Native Blog Gadget | DropInBlog |
|---|---|---|
Setup time | 2 minutes (drag onto page) | 5 minutes (whitelist + embed) |
Public/members-only access | Both, via page access settings | Both, via page access settings |
SEO tools | Basic meta tags only | SEO Analyzer, automatic schema markup, Blog Pilot™ |
Author profiles | Username + avatar | Full profiles (photo, bio, expertise, social links) |
Best fit | Internal member updates, event recaps, organizational announcements | Public-facing content: donor outreach, chapter recruitment, thought leadership |
How to Create a Blog on Your WildApricot Site
WildApricot offers a 60-day free trial, which is one of the longest trial periods in the membership software space. You can integrate DropInBlog during the trial, so it's easy to test the whole setup before committing.
After the trial, WildApricot's pricing is contact-based rather than feature-based: every plan includes the same features (including the Website Builder and Custom HTML gadget needed for DropInBlog), and you pay based on how many contacts you're managing. Plans currently start at $66/month for the 100-contact tier, but check WildApricot's pricing page for current numbers at your contact volume.
For DropInBlog: the free trial covers full setup and testing before you subscribe.
Step 1: Whitelist DropInBlog Domains
Important: This step is necessary for your blog to work.
Before your blog can appear and function correctly on your WildApricot site, you need to whitelist DropInBlog’s domains.
Why this matters:
WildApricot has built-in security that blocks any third-party services, including blog content from DropInBlog, unless you specifically allow them. This is a normal safeguard and super easy to work with. If this step is skipped, your blog simply won’t load on your site, even though everything else is set up correctly.
But don’t worry, it’s quick and painless!
Here’s what you need to do:
Just follow these instructions from WildApricot to add trusted domains. When prompted, copy and paste the following exactly as shown:
*.dropinblog.com*.dropinblog.net
This tells WildApricot it’s safe to allow content from DropInBlog to appear on your pages. Once that’s done, you’re all set to move forward with setting up and customizing your blog.
Step 2: Create a New Page and Configure It
To add a brand new page, log in to your WildApricot account and find the Website option on the left sidebar in your admin dashboard.
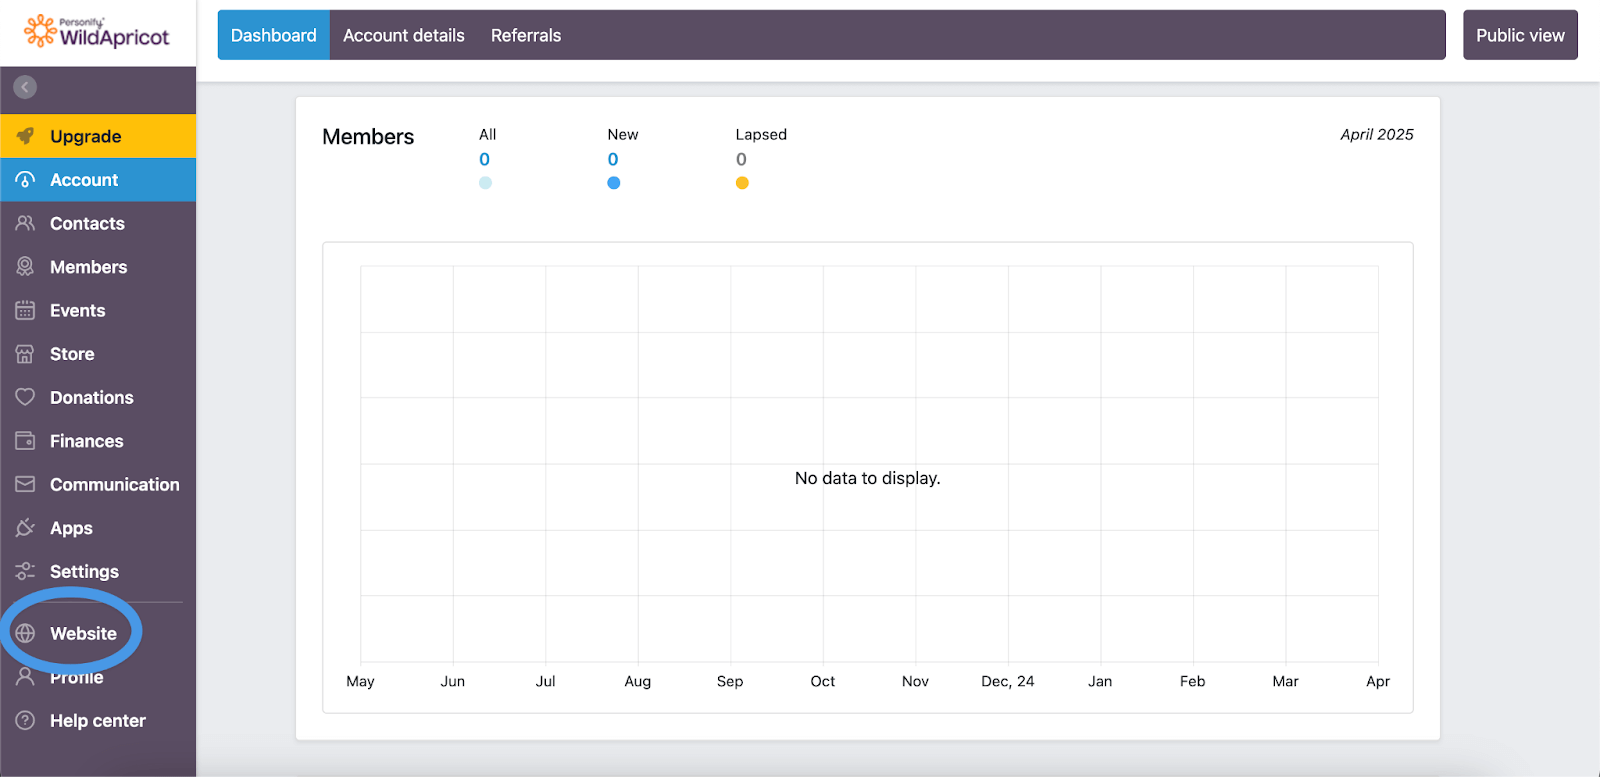
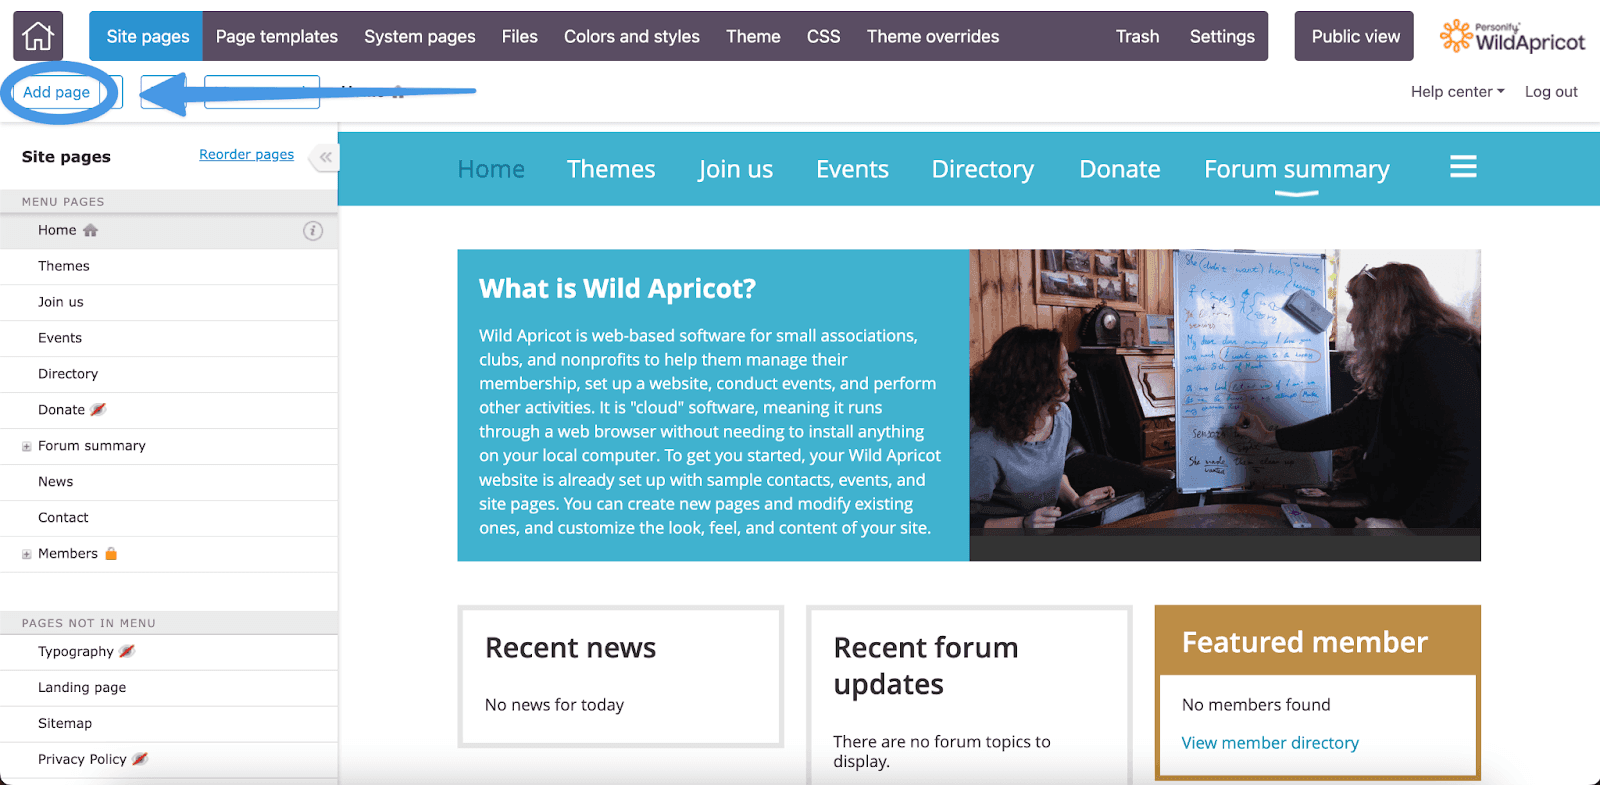
This will take you to the WildApricot site editor. In the upper left corner of the editor, you’ll find the Add page option.
When you click on Add page, the editor will show you the Page settings. Two of the available options are especially important to us: Page name and Page URL. You can give your page a name that you find suitable. We’ll call ours “Blog.” Make sure to write whichever name you choose in the Page URL field as well.
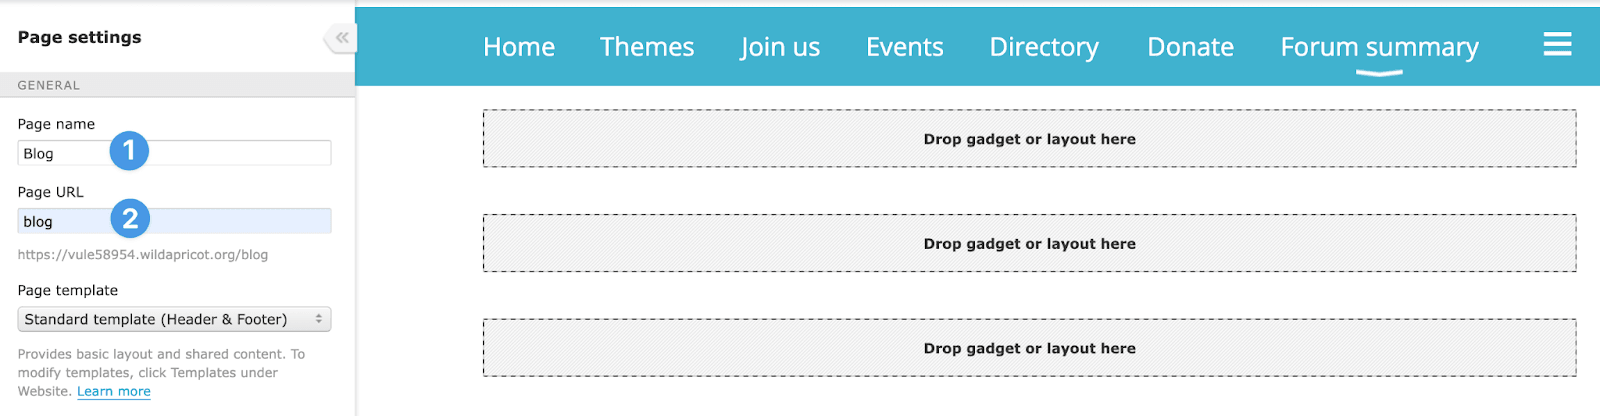
Right below the Page URL, you’ll see the Page template options. You can change the template if you want, but we’ll stick with the default Standard template.
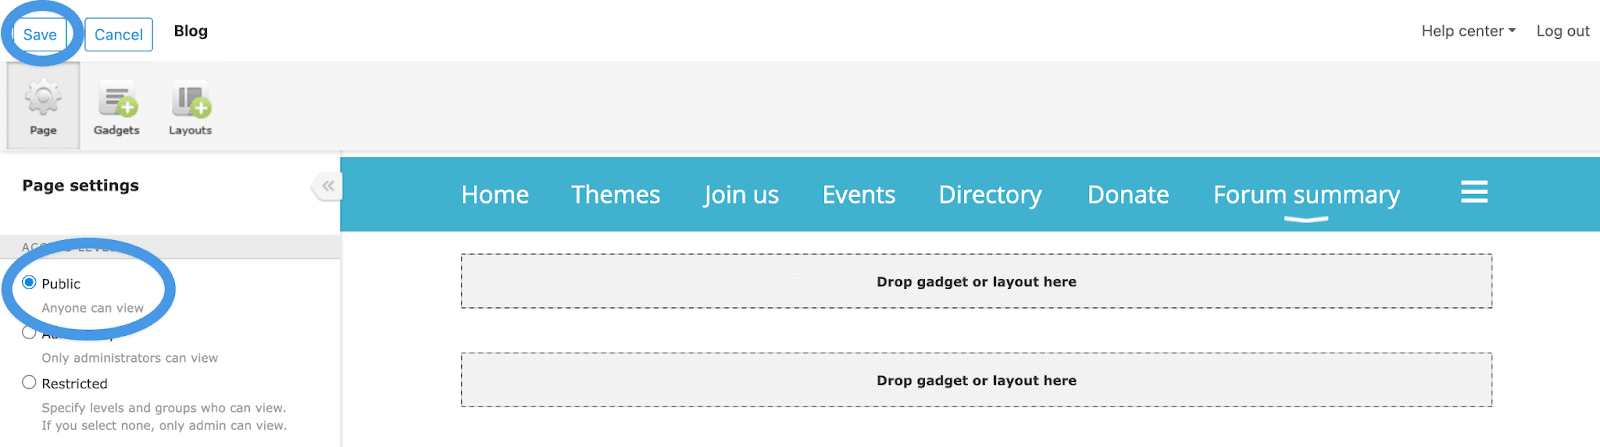
Now, scroll down until you see the Access Level section and select Public. This will allow all website visitors to view the page content, i.e., your blog. When you’re done, click on Save in the upper left corner.
Step 3: Add Custom HTML Gadget to Your Blog Page
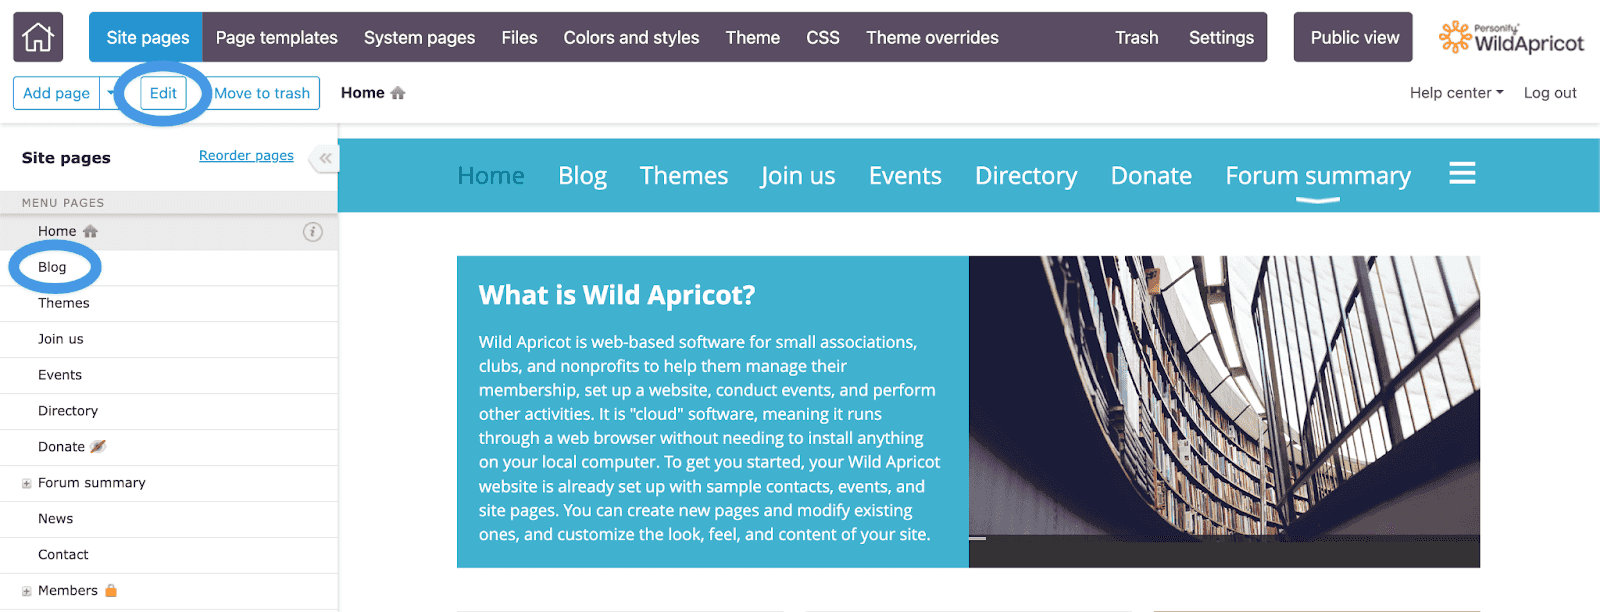
If everything goes well, you’ll be able to see your newly created blog page among the site pages on the sidebar to the left. Select your Blog page and click on the Edit button.
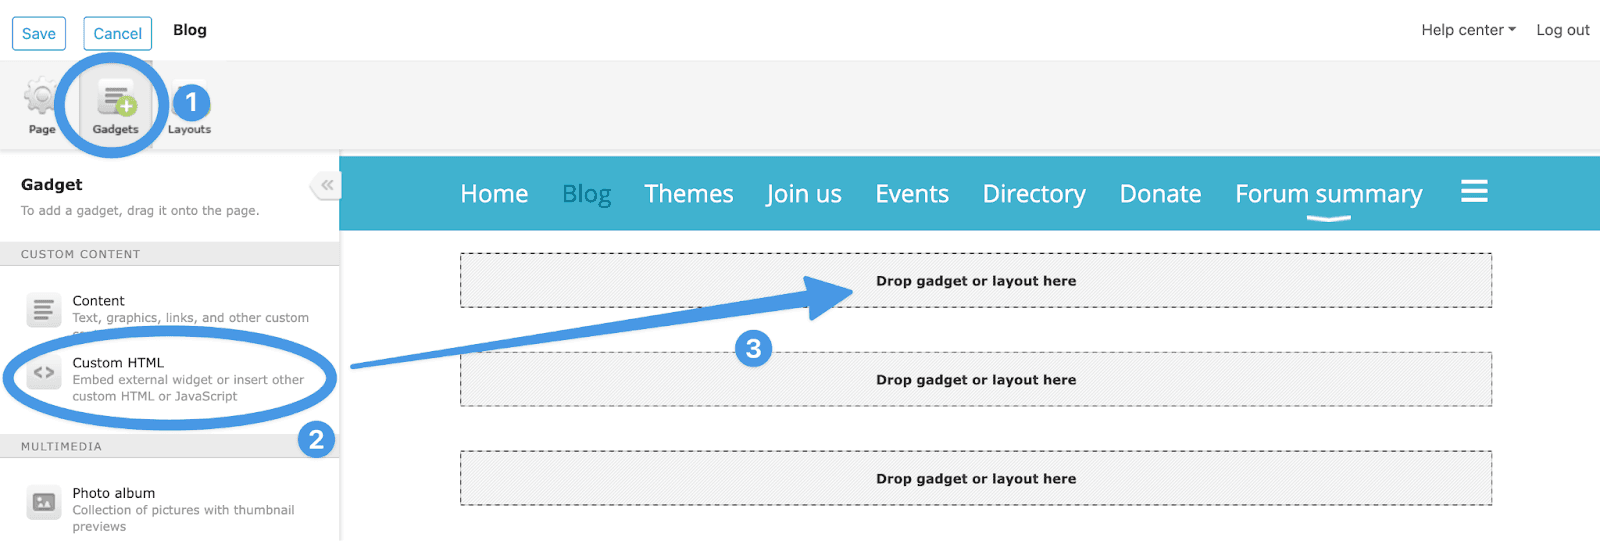
Next, you’ll see three options: Page, Gadgets, and Layouts. Select Gadgets, then grab the Custom HTML content block, drag it, and drop it into the body of the page, just like in the image below.
Step 4: Copy the Code from DropInBlog and Paste It into WildApricot
This is the most important integration step. Click on the Custom HTML block, which will present you with a new set of options.
On the left side of the WildApricot editor, you’ll see an Edit code button.
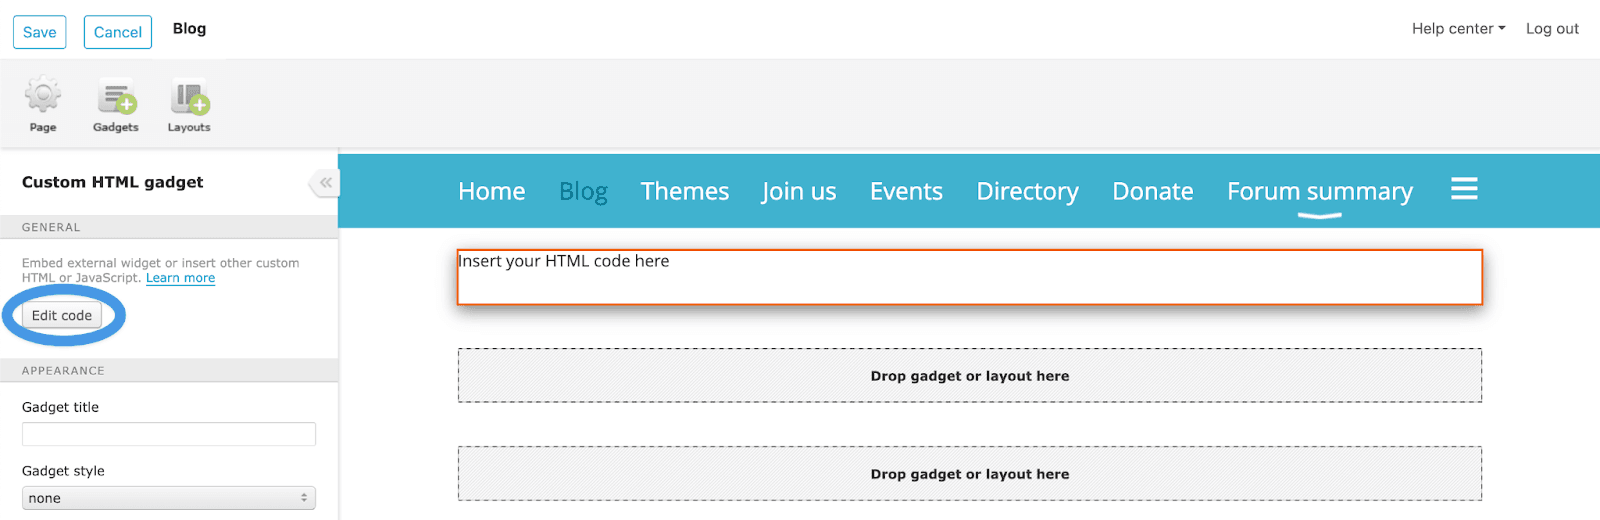
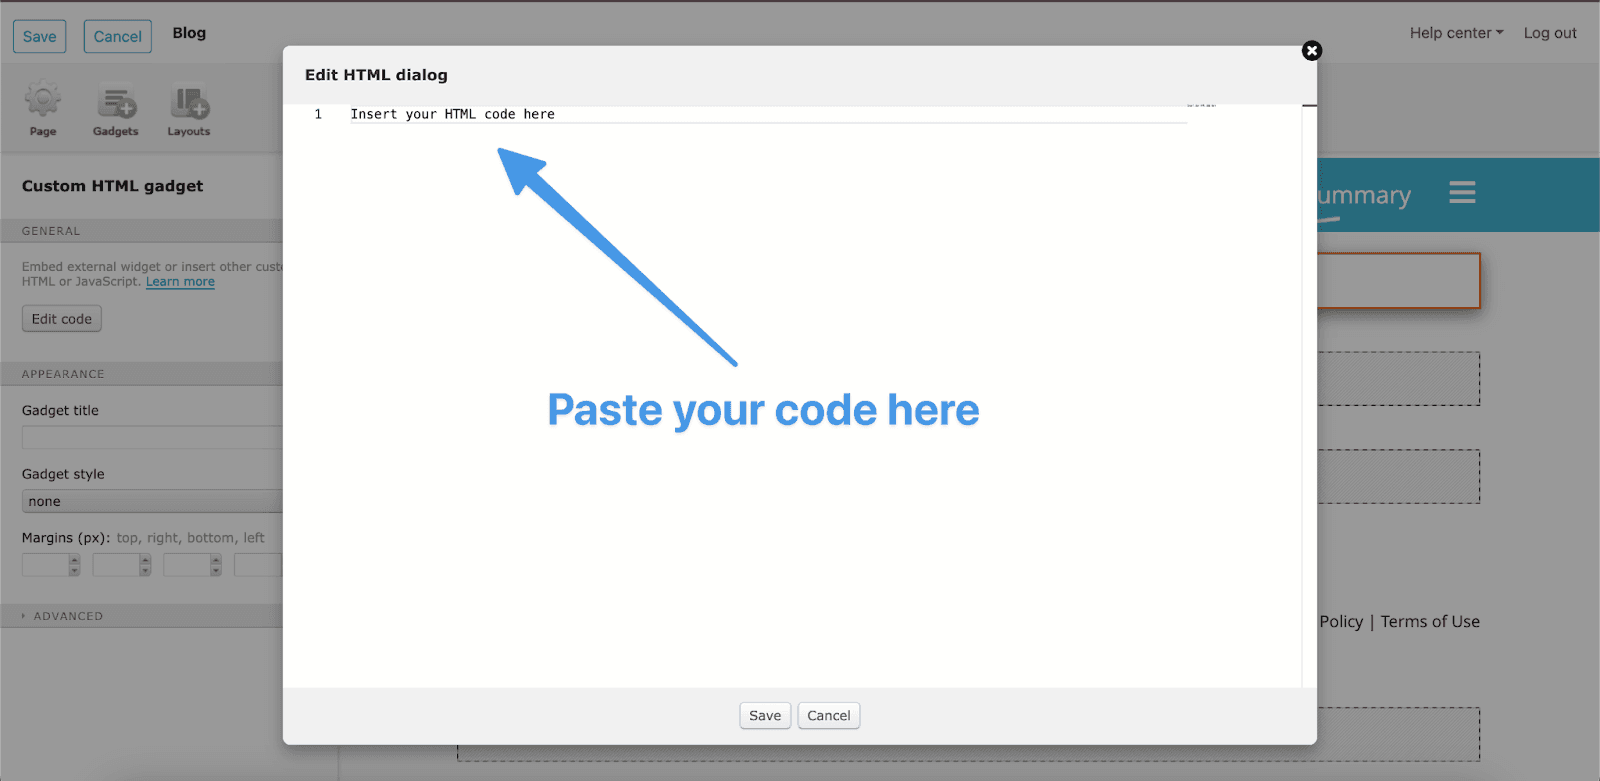
When you click on Edit code, WildApricot will show a big HTML dialog box. This is where you need to paste the few lines of integration code from DropInBlog.
To copy the code, open a new tab in the browser and log in to your DropInBlog account. Click on the Code & Layout option on the navigation bar.
This will bring you to the following page:
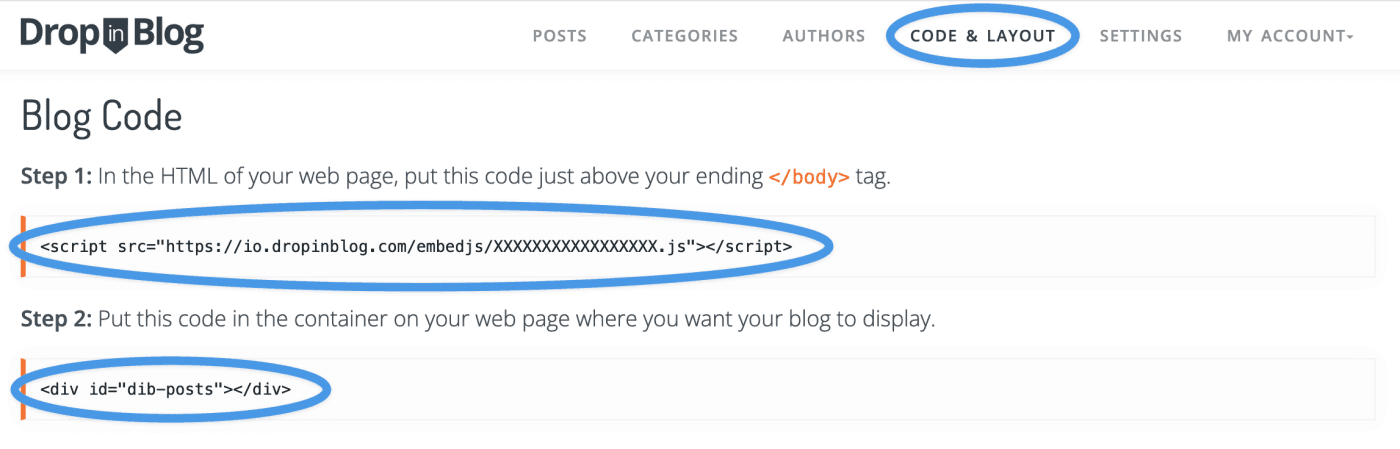
This is the code you need to copy and paste into the HTML dialog box in WildApricot. It looks like this:
Step 1:
<script src="https://io.dropinblog.com/embedjs/XXXXXXXXXXXXXXXXX.js"></script>
where “XXXXXXXXXXXXXXXXX.js” will show your unique DropInBlog ID.
Step 2:
<div id="dib-posts"></div>
Now, head back to WildApricot and paste the code snippets into the HTML dialog box.
When you click on Save, your blog posts will auto-populate into the page, and you’ll see something like this:
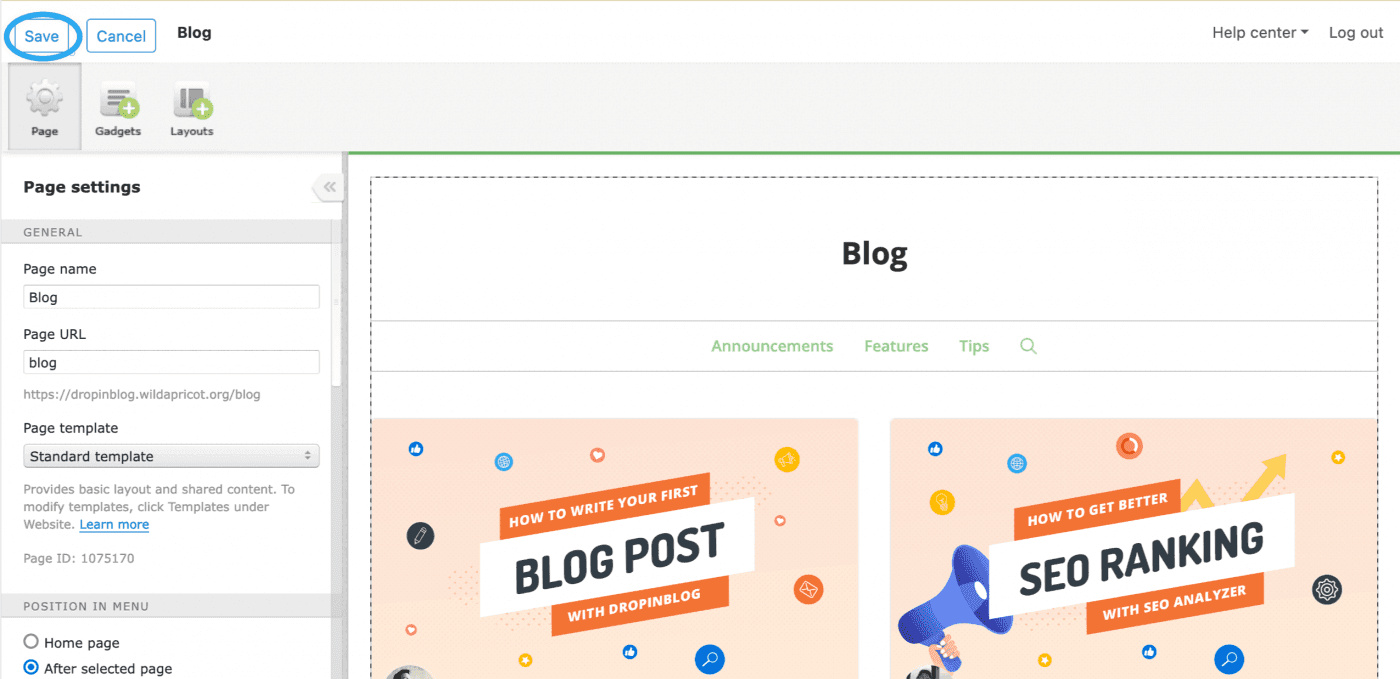
Click on the Save button, as shown in the image above, and move on to the final step of the integration.
Step 5: Copy Your Blog URL and Paste It into DropInBlog
We’re almost there; just a few more details, and you’ll have DropInBlog fully integrated with WildApricot.
After you save your changes, click on the Public view button on the admin toolbar.
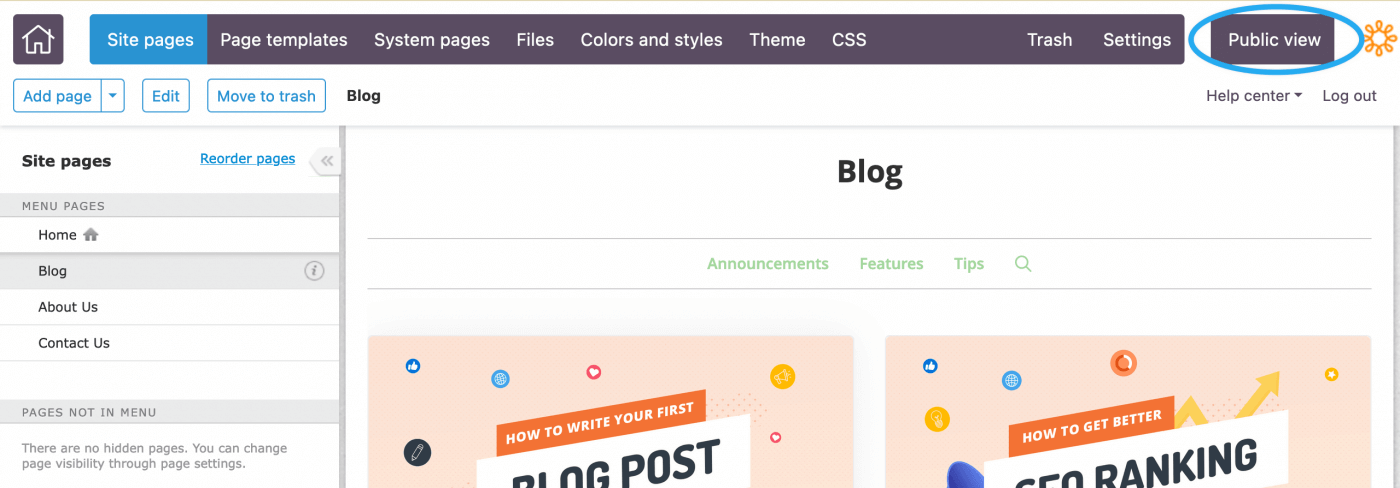
This will show you how your blog will look to your visitors. It will also allow you to see and copy your blog URL.
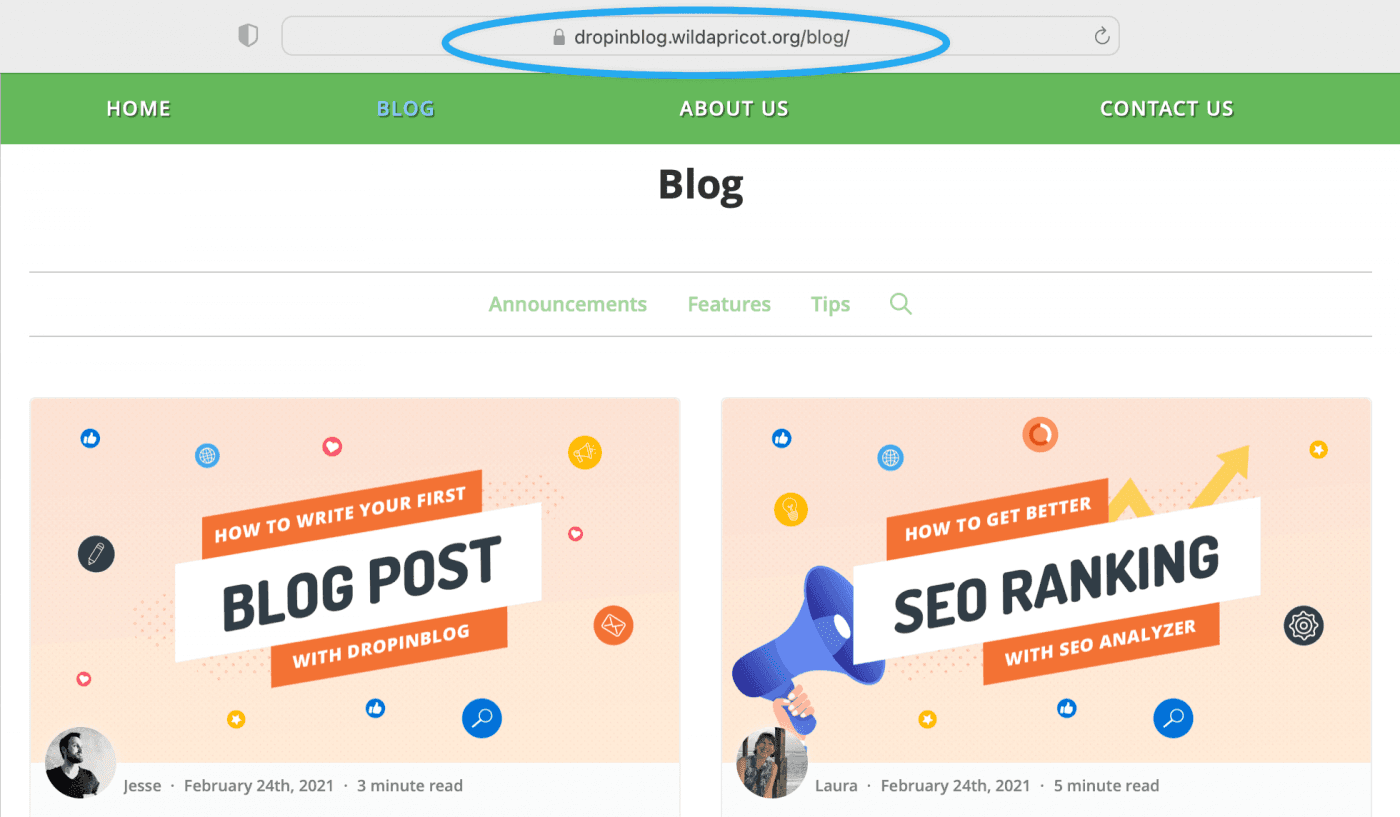
Select and copy the blog URL, then head over to your DropInBlog account again. Click on Settings in the navigation bar and paste the URL in the Blog URL field on the Settings page.
This is what it looks like when we paste our blog URL:
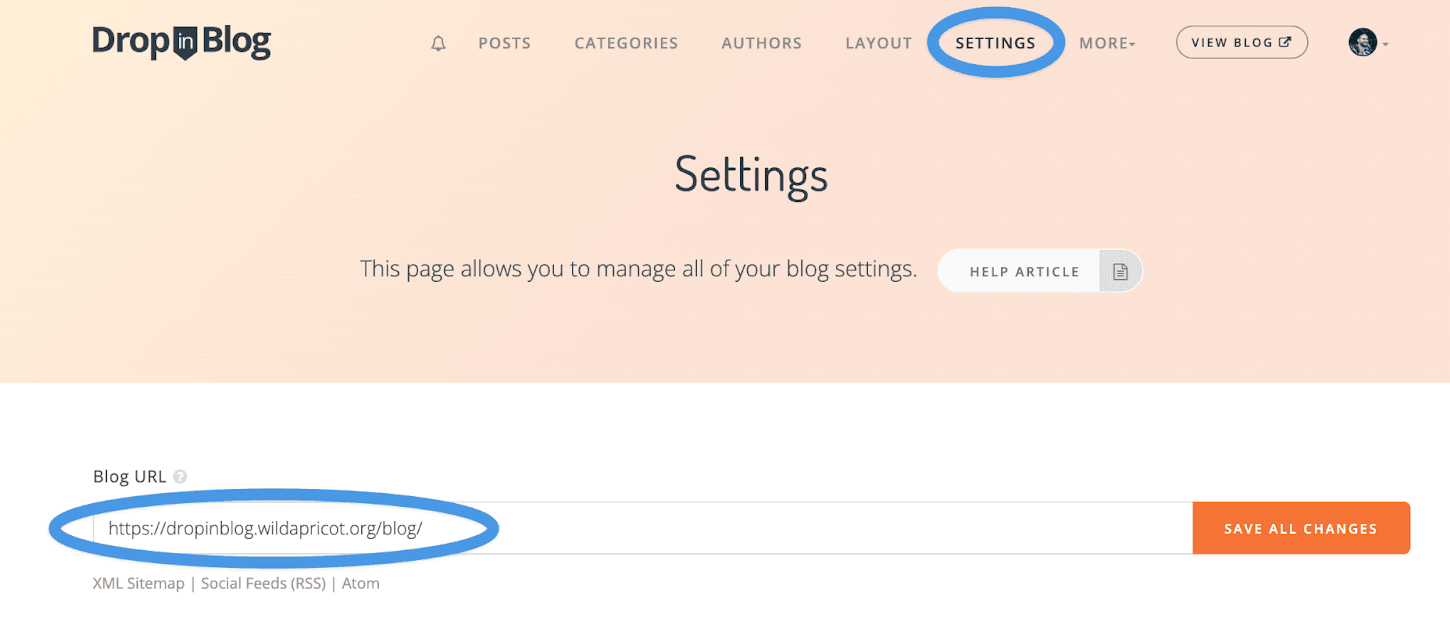
Click on the Save All Changes button, and voila – you have fully integrated DropInBlog with WildApricot!
Now you can blog on WildApricot and work on your content marketing as much as you want, knowing that DropInBlog has got your back.
Tips for Using DropInBlog with WildApricot
Once you’ve added DropInBlog to your WildApricot site, you can take things further with a few simple enhancements. From styling tweaks to adding handy widgets, here are some practical tips to help you get the most out of your blog integration.
Add Custom CSS to Your WildApricot Blog
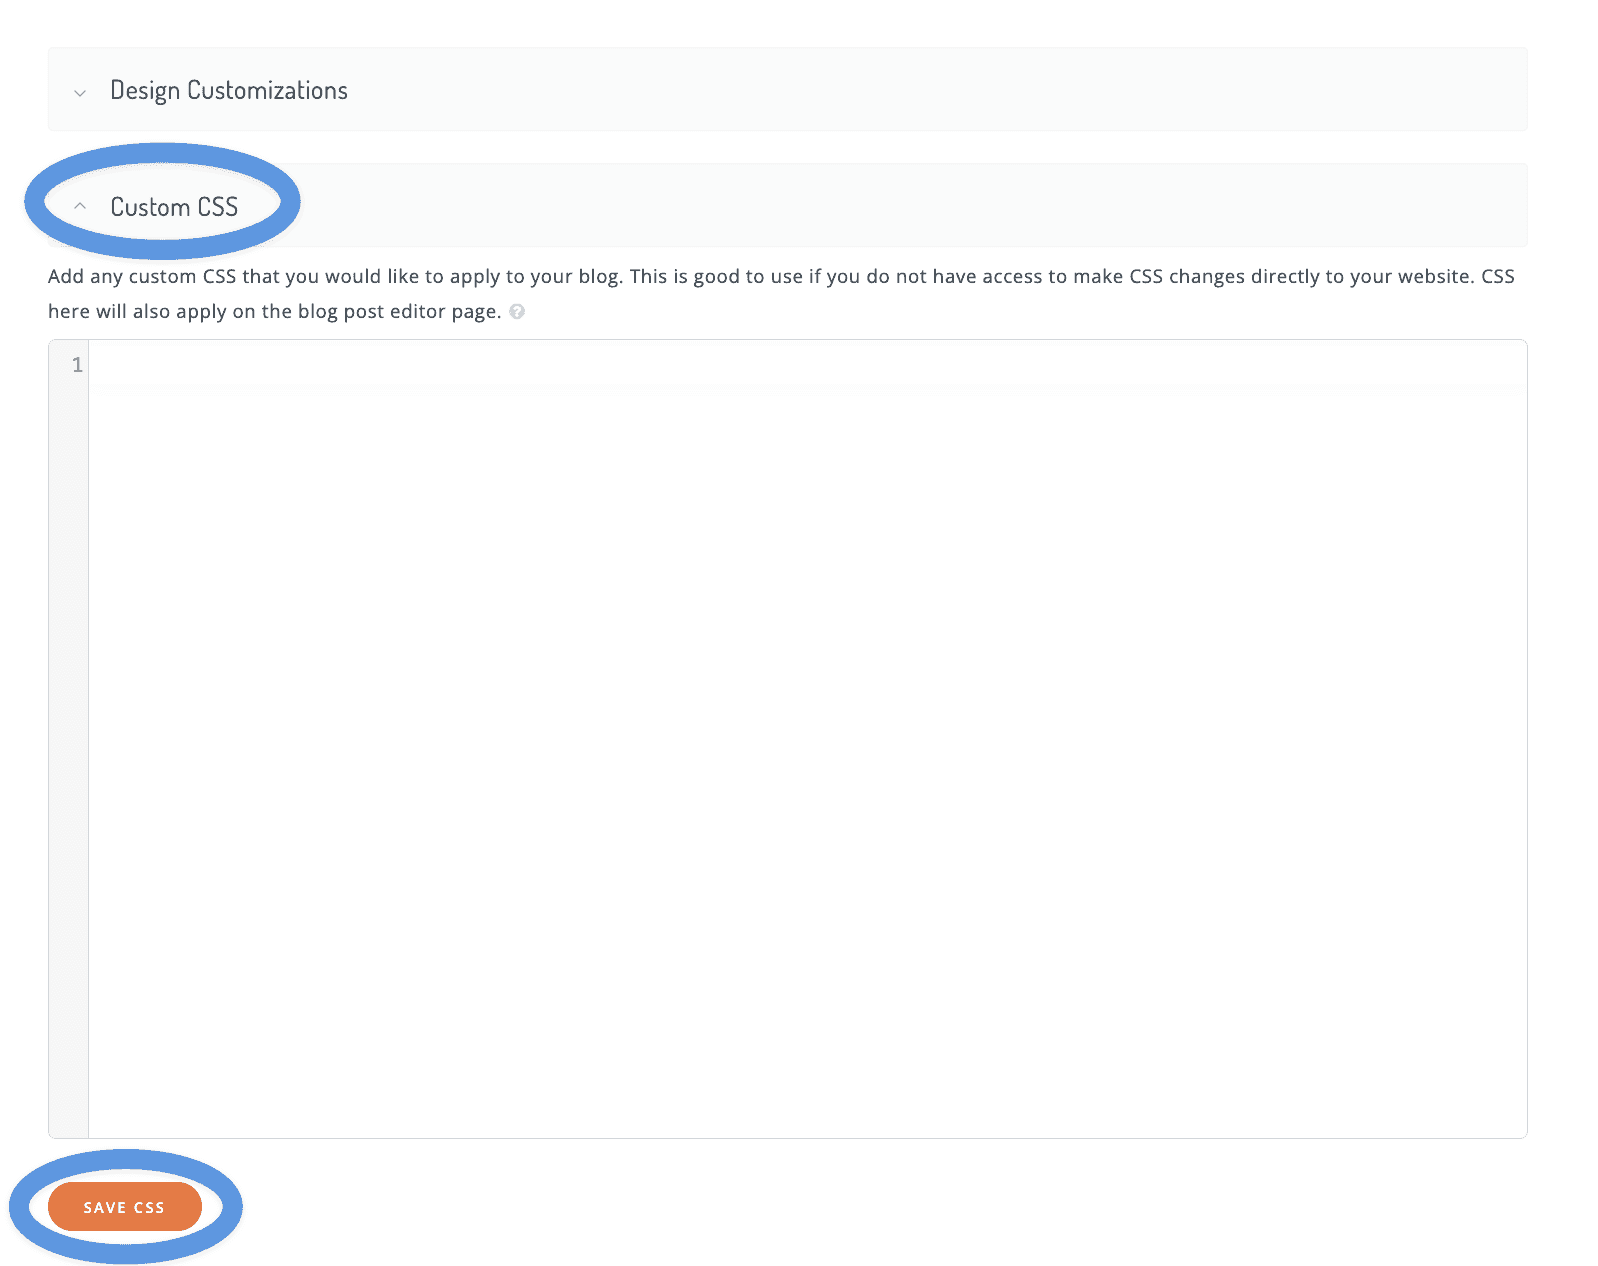
After you add DropInBlog to your WildApricot site, you can customize it with CSS. Custom styles can help you improve the appearance of your blog on WildApricot even further, and they’re super easy to add.
From the DropInBlog admin panel, go to Code & Layout and scroll down to the Custom CSS section. Write your code in the indicated area, and click on Save CSS.
Use the Design Customizations feature
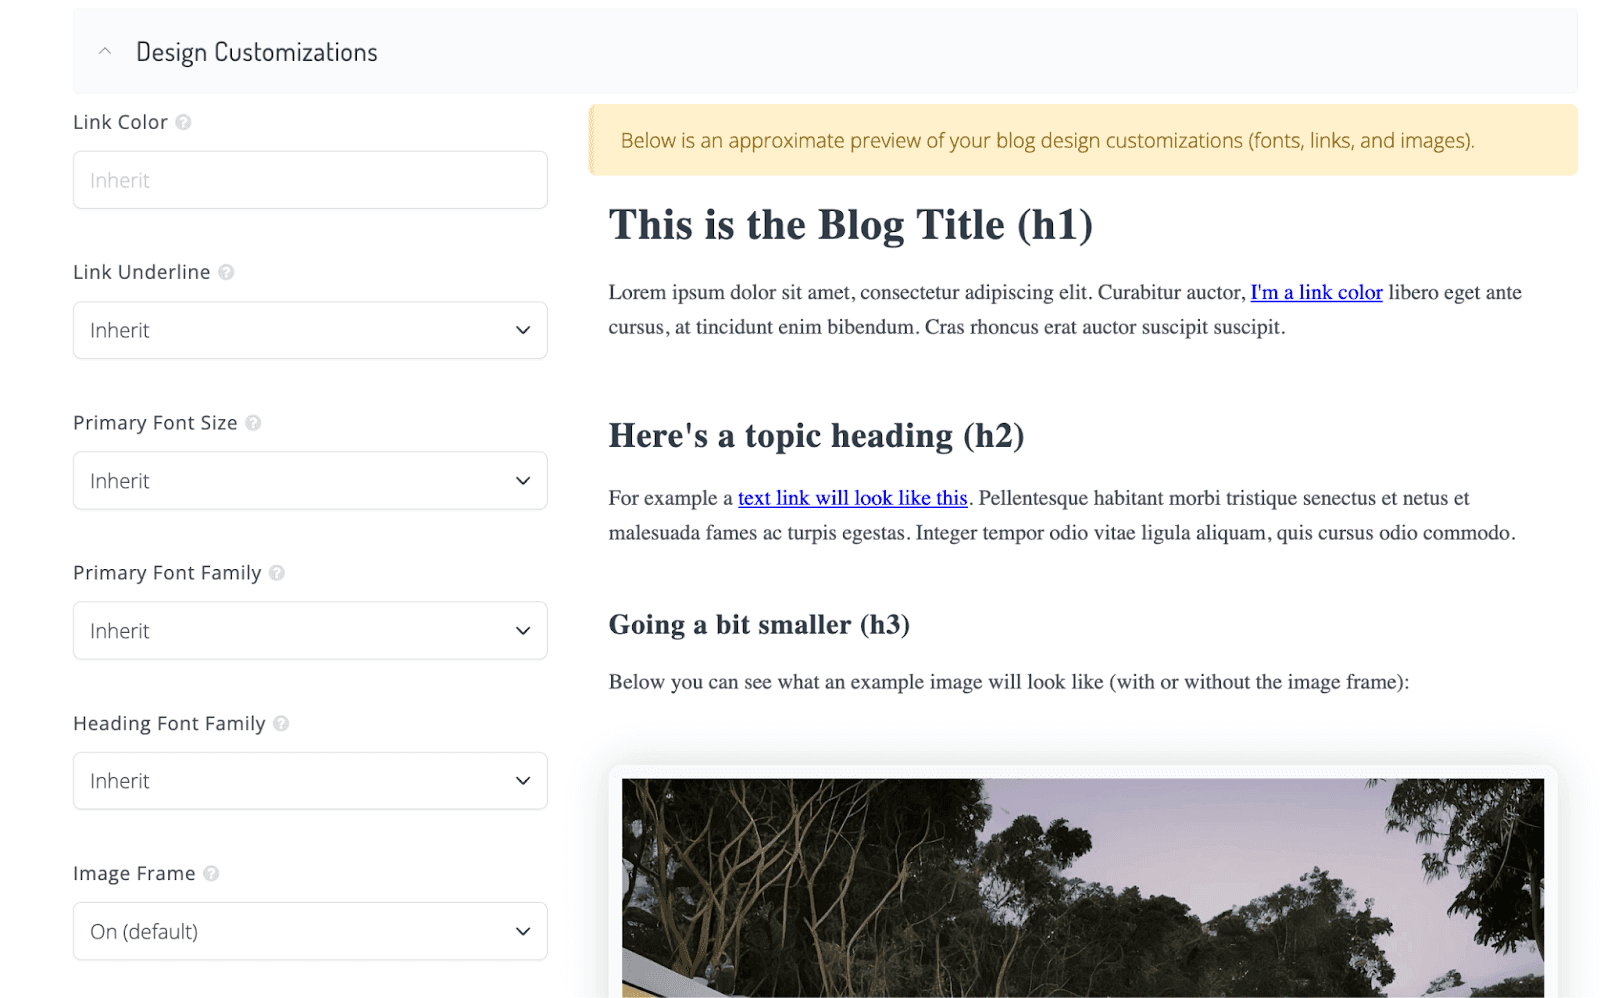
If you're not comfortable editing CSS directly, DropInBlog’s Design Customizations feature is a user-friendly alternative. It lets you adjust fonts, colors, and CTA settings through a visual interface – no coding required. This is ideal if you want a quick way to personalize your blog and match it to your WildApricot site’s theme.
Just head to the Code & Layout section in the DropInBlog admin panel and click on Design Customizations. From there, you can preview changes in real time before saving. It’s a quick way to make your blog look polished without touching a single line of code.
Add the Recent Posts Widget
In addition to adding custom CSS, you can add the Recent Posts widget from DropInBlog. As the name suggests, it shows your most recent blog posts. You can choose the number of posts as well as where they will be shown – on which page of your site and where exactly on that page.
In our opinion, adding this widget to your site’s home page is a pretty good idea. In fact, that’s exactly what we did in WildApricot:
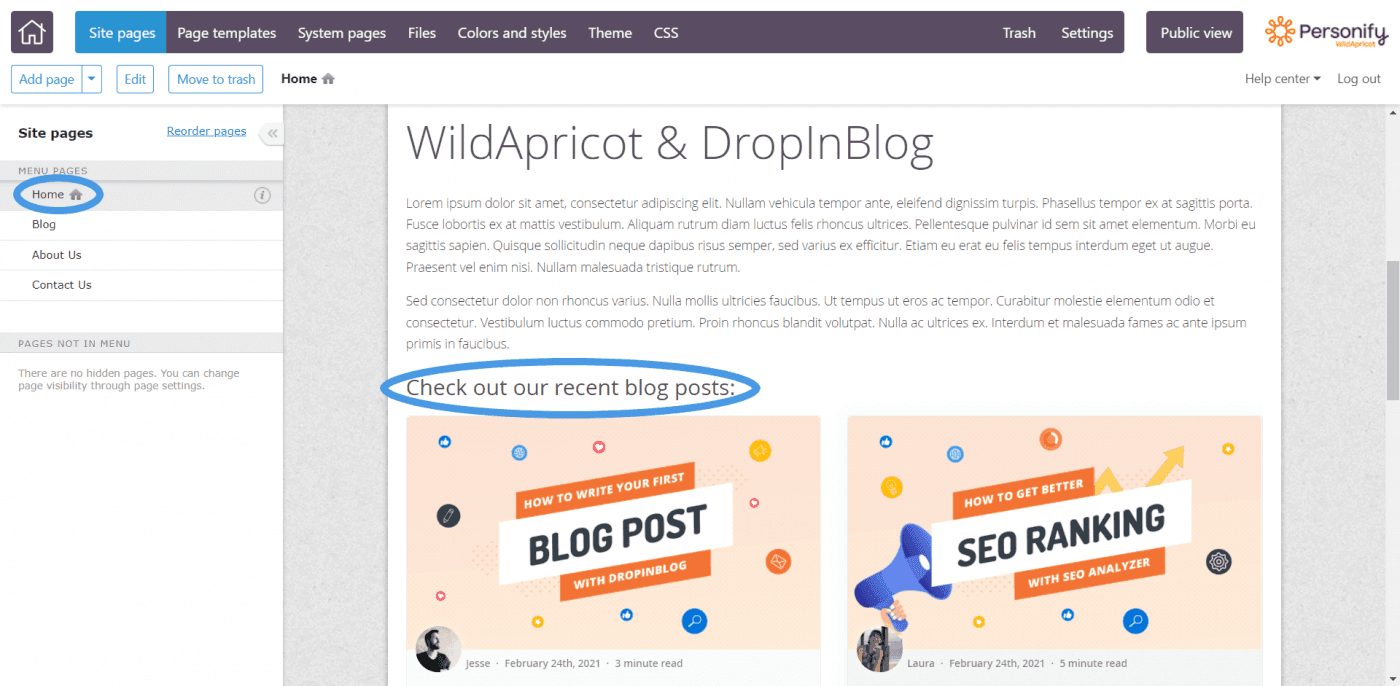
Adding this widget is similar to the integration process we described in this tutorial:
You'll add the Recent Posts widget code from DropInBlog to a custom HTML gadget on one of your WildApricot site's existing pages.
You’ll find the Recent Post widget code on the Code & Layout page under the Widget Code section near the bottom. It looks like this:
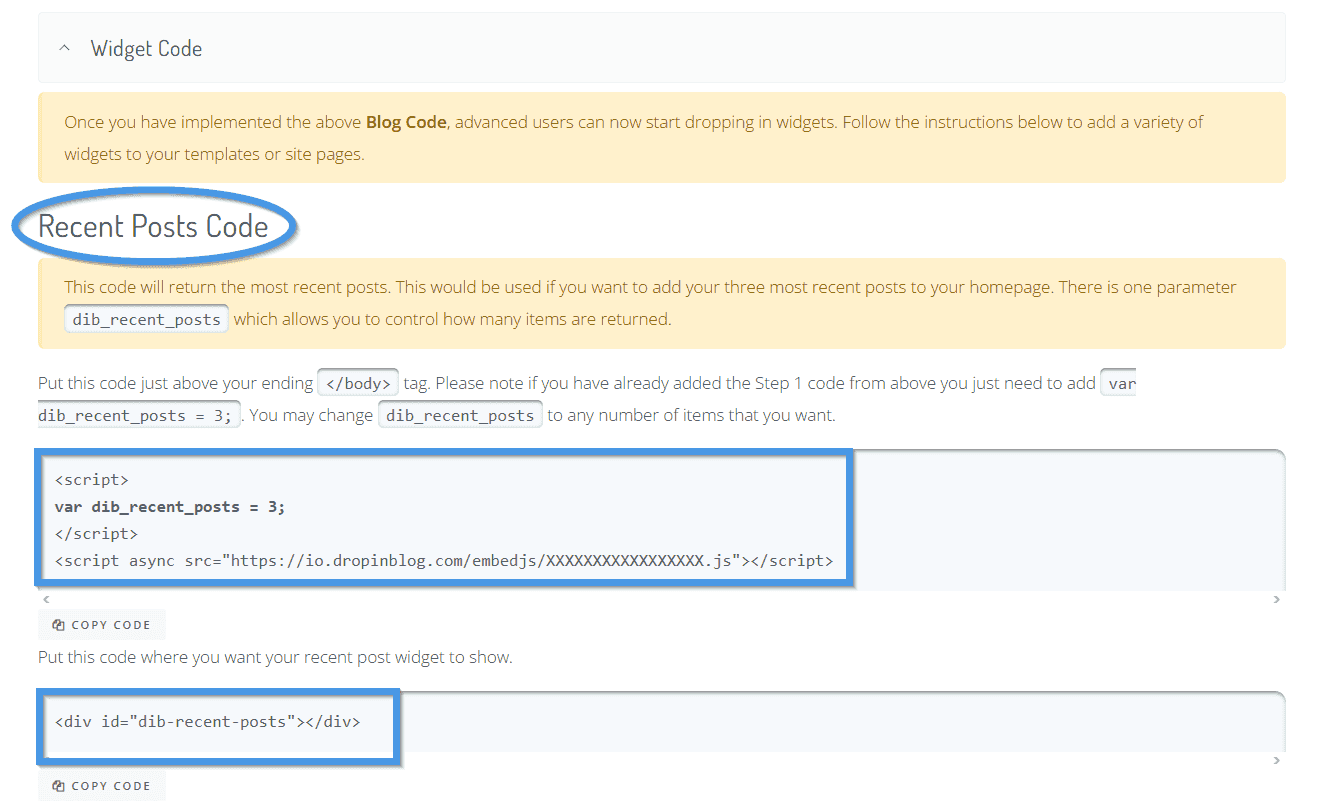
Just copy and paste these few lines of code into a Custom HTML gadget on one of your WildApricot pages, and you’ll have the Recent Posts widget added.
FAQs
Does WildApricot have a built-in blog?
WildApricot includes a native Blog gadget you can drag onto any site page via the Website module. It handles basic post creation and is well-suited for organizational updates, member communications, and event recaps.
For a full-featured blog with SEO tools and richer post management, most organizations embed a dedicated blog like DropInBlog through the Custom HTML gadget.
How can I integrate DropInBlog with WildApricot?
To integrate DropInBlog with WildApricot, you simply have to copy and paste two lines of code. It’s very easy, and there’s a short video tutorial to help you on your way.
Why do I need to whitelist DropInBlog domains?
WildApricot has a Content Security Policy (CSP) that blocks third-party scripts by default, which is a good security practice for member-facing sites. Because DropInBlog loads content from *.dropinblog.com and *.dropinblog.net, WildApricot won't let those scripts run until you explicitly allow them in your site's whitelist. This is a one-time setup step per WildApricot site.
How much does WildApricot cost?
WildApricot's pricing is contact-based, so you pay based on the number of contacts you're managing, not based on features. Every plan includes the same tools. Pricing starts at $66/month for the 100-contact tier and scales up. There's a 60-day free trial with no credit card required.
Should my blog be public or members-only?
Both are possible with DropInBlog on WildApricot since the access level is controlled by the WildApricot page you place the DropInBlog gadget on.
Set the Access Level to Public in Page Settings for a blog that anyone can read (useful for SEO and prospect outreach). Set it to Members Only if you want the blog restricted to logged-in members (useful for internal newsletters or member-exclusive content).
Start Blogging with DropInBlog!
Congrats! You’re ready to start blogging on WildApricot. And despite this being the closing section of the tutorial, we’d like to think of it more as an opportunity to say hello, instead of goodbye.
We’re here to answer any of your questions related to DropInBlog. If you need any help with the software, we’re here for you – we’ll be thrilled to help.
Happy blogging!