
Key Takeaways
- The best way to add a blog to your Framer site is with DropInBlog!
- The free trial and quick setup let you test it in a few minutes.
- DropInBlog has different pricing plans for individuals and teams.
You can add a blog to Framer in two ways: Framer's native CMS (good for portfolios, limited SEO and author tools) or an embedded blog like DropInBlog (full SEO toolset, author profiles, schema, AI content tools).
The native CMS keeps everything in Framer; the embed lets you publish without touching your Framer project. Pick the embed if blogging is part of your SEO strategy.
Table of Contents
- Key Takeaways
- TL;DR: Adding a Blog to Framer
- Can You Blog with Framer?
- What's New in Framer CMS (2026)
- Why Add a Blog to Framer?
- Option 1: Use DropInBlog (Best for Most Users)
- Option 2: Framer CMS
- Option 3: Headless CMS (Contentful, Sanity, Strapi, etc.)
- Option 4: iframe Embed
- Bonus: Change Your Navigation Link Styles
- FAQs
- Ready to Start Blogging?
TL;DR: Adding a Blog to Framer
Framer allows blogging through its CMS, but it lacks core features such as categories, tags, author pages, and advanced SEO tools.
The four main ways to add a blog to Framer are: DropInBlog, Framer CMS, a headless CMS, and iframe embeds.
DropInBlog provides fast setup, strong SEO features, detailed author profiles, rich media support, and styling that matches Framer automatically.
Integrating DropInBlog requires adding the embed component, entering your Blog ID, adding a navigation link, and applying a Framer code override for link handling.
The article includes tips for customizing blog styling and ensuring consistent navigation within Framer.
Can You Blog with Framer?
Yes. Framer has a built-in CMS that’s somewhat different from what we're used to seeing in typical no-code website builders like Wix and Squarespace. If you have some experience with Webflow, you’ll find the platform has a similar vibe.
You can create a CMS Collection for posts, design a template page, and connect your content through Framer’s no-code interface. For simple sites, this works well enough: you can publish posts, list them in a feed, and keep everything within Framer’s design system.
However, Framer’s CMS wasn’t designed with serious blogging in mind. There are some limitations to be aware of:
No dedicated blog features like categories, tags, or author pages
Limited SEO controls compared to specialized tools
More manual design and maintenance work if you want to scale beyond a handful of posts
This is why many Framer users look for alternatives that offer better SEO, easier publishing, and richer blogging features without giving up the design freedom that makes Framer popular.
What's New in Framer CMS (2026)
Framer shipped CMS 3.0 alongside Dynamic Filters in 2026, as well as a Server API for syncing CMS collections with external sources. The biggest practical changes for blogging are:
- Table view with bulk actions: edit multiple posts at once, similar to a spreadsheet
- Dynamic Filters: no-code filtering with search fields, tabs, dropdowns, and checkboxes (closer to category navigation)
- Server API: webhook triggers and scheduled jobs for external content workflows
- Wireframer + Workshop AI tools: generate layouts and components from text prompts
These updates close some gaps in Framer's native blog story, as bulk content management and filter-based navigation are genuinely useful. But Framer still lacks an SEO scoring tool, author profiles with E-E-A-T structure, automatic blog schema markup, and a built-in topic discovery workflow. If you're blogging for SEO and AI search visibility, you'll still hit those walls.
Why Add a Blog to Framer?
Framer is excellent for landing pages, portfolios, and marketing sites – but without a blog, your site risks staying static. A blog is what transforms a one-off project into a platform that grows with your audience.
Here’s why adding a blog to your Framer site matters:
SEO and visibility: Blogs let you target long-tail keywords and get indexed by search engines – something a one-page site can’t do well.
Authority and trust: Regular posts position you or your brand as an expert, building credibility with your audience.
Engagement: Useful content keeps visitors on your site longer and increases the chance they’ll convert.
Ease of publishing: With DropInBlog, you can add and optimize posts without constantly editing your Framer project.
In short, if you want your Framer site to drive ongoing traffic and conversions, not just look great, adding a blog is the way forward. Here’s a quick breakdown of the four main ways to add a blog to Framer:
| Method | Best for | Ease of use | SEO | Maintenance |
|---|---|---|---|---|
DropInBlog | Most users, marketers | ★★★★★ | ★★★★★ | Low |
Framer CMS | Simple blogs built natively in Framer | ★★★☆☆ | ★★☆☆☆ | Medium |
Headless CMS | Dev teams needing an advanced CMS | ★★☆☆☆ | ★★★★★ | Medium–High |
iframe Embed | Quick fixes/external blogs | ★★★★☆ | ★☆☆☆☆ | Low |
Option 1: Use DropInBlog (Best for Most Users)
Best for: Most users and marketers who want fast setup and SEO tools.
One of the easiest and most powerful ways to add a blog to a Framer site is with DropInBlog, a cloud-based blogging platform that plugs directly into your project with two lines of code.
Instead of trying to bend Framer’s CMS into something it wasn’t built for, DropInBlog gives you a full-featured blogging system that’s SEO-friendly, styled to match your site, and ready in minutes.
What DropInBlog Gives You
With DropInBlog, you can:
Schedule posts and assign roles – great for teams and contributors
Add multiple authors to meet Google’s EEAT standards
Easily find your next blog topic with Blog Pilot™
Optimize every post with the built-in SEO Analyzer
Boost key terms with Mention Boost™ so AI models surface your content
Add rich media: images, videos, tables of contents, product embeds
Make site-wide changes instantly with Smart Snippets™
Turn posts into podcasts with Blog Voice AI™
Customize layout and styling so your blog matches your Framer project
Create fast, indexable posts with clean URLs
All of this is managed in a simple dashboard – no need to update Framer every time you publish. DropInBlog automatically inherits your Framer fonts and styles, so your blog looks native from day one.
Pros and Cons of Using DropInBlog with Framer
| Pros | Cons |
|---|---|
✓ Super quick setup (2 snippets, 5 minutes) | ✗ Paid tool (free trial available) |
✓ SEO Analyzer, schema, Mention Boost™ | |
✓ Inherits Framer’s styles automatically | |
✓ Rich editor with media, embeds, and audio | |
✓ Multiple authors and permissions support | |
✓ Fast, indexable posts with clean URLs | |
✓ Low maintenance – no CMS to update |

How to Add a Blog to Framer Using DropInBlog (Step-by-Step)
Step 1: Create a new "Blog" page in Framer
In the Framer admin panel, open Pages.
Click the ➕ icon → New Page.
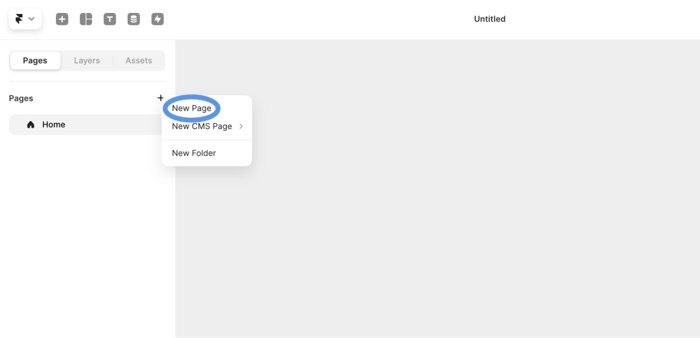
Rename the page to something SEO-friendly like "blog."
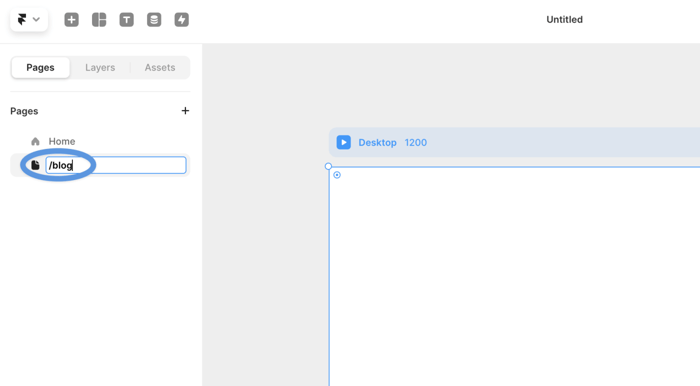
💡 Pro Tip: Keep your URL slug short and SEO-friendly (/blog).
Step 2: Add the DropInBlog Embed Component
Next, copy the DropInBlog embed component:
https://framer.com/m/EmbedJs-PAnj.js@UBuvnkomPujy2cfffKEkThen, select the blog page you previously created and paste the embed component.
Step 3: Add Your Blog ID
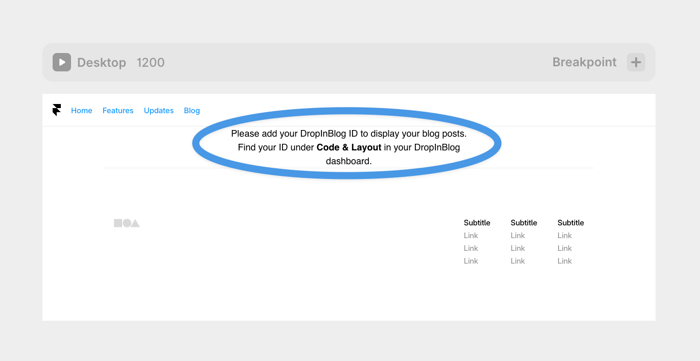
At this point, you need to add your blog ID to the embed component you’ve just added. To do that, click on the DropInBlog embed component, and look for the Embed section and Blog ID on the right side of the screen.
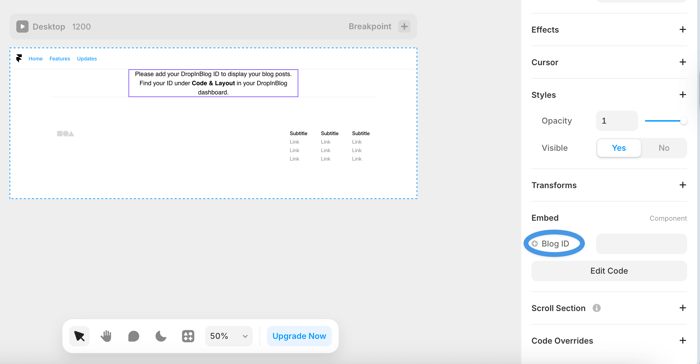
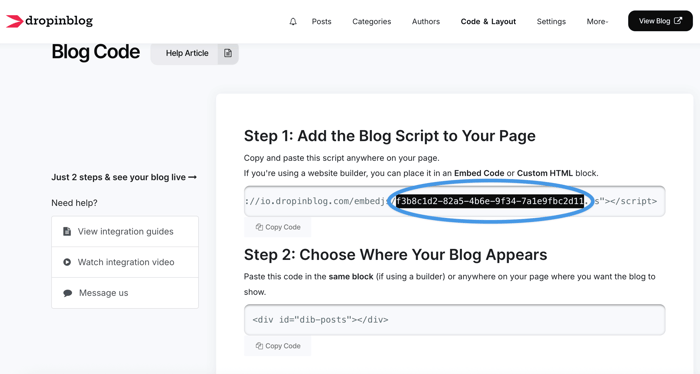
You’ll find your blog ID on the Code & Layout page of your DropInBlog account. The blog ID looks like the one shown in the screenshot below.
After you copy your blog ID, return to Framer and paste the ID inside the Blog ID field.

Click the Publish button to save your changes.
Step 4: Add a Blog Link to Your Site’s Menu
To make it possible for your visitors to view your blog, make sure you’ve added a blog link to your site’s navigation.
We’re using a component, so we’ll just copy one of the menu items, rename it to blog, and link it to our new blog page.

Step 5: Add a Code File to Your Framer Site
To ensure your new blog page fully loads the moment your visitors access it from your site’s navigation, you need to create a new code file. You don’t need to code anything, though. Just copy and paste the code provided below.
If you skip this step, your visitors will have to reload your blog page to view the content.
Using the Assets tab in Framer, scroll down to the Code section. Click on the plus sign, then select New Code File.
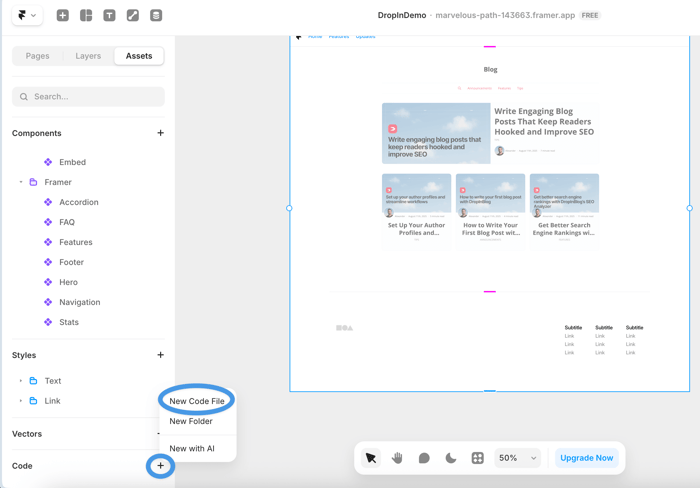
In the pop-up that opens, name your file “DropInBlogOverride,” and choose the New Override option.

When you click on the Create button, you’ll be taken to the code editor. First, delete the default code, then paste the following code into the editor:
// dropinblogOverride.ts
import { Override } from "framer"


export function DropInBlogLink(): Override {
   return {
       onClick: (e: MouseEvent) => {
           e.preventDefault()
           e.stopPropagation()


           const el = e.currentTarget as HTMLElement
           const href = el.getAttribute("href")


           if (href) {
               window.location.href = href
           }
       },
   }
}
Step 6: Apply the Code Override to Your Site’s Navigation
Now that you’ve created a new code override, all that’s left is to apply it to your site’s navigation menu.
If your navigation code is in a component, double-click on it to edit it.
On the right side of the editor, click on the plus sign next to Code Overrides to expand the options menu.

In the dropdown next to File, select DropInBlogOverride, and in the dropdown next to Override, select DropInBlogLink.
Save our changes by hitting the Publish button in the top-right of the page.
Your blog is now live.
Test your live site: click through to your new blog page, open a few posts, and check that everything loads and responds correctly.
Pro Tip: When you connect your DropInBlog account to Cloudflare, you can use another blog integration method for your site. Read more about this method in our support doc.
Option 2: Framer CMS
Best for: Designers or small site owners who want a native Framer blog.
Framer CMS comes with pre-built blog templates that you can adapt to your site. It’s a native solution, but keep in mind it requires more setup time than DropInBlog and offers fewer SEO tools out of the box.
How to set it up:
Create a new page in Framer.
Select a Blog template from the CMS options.
Add fields for title, author, date, and body content.
Connect these fields to your content collections.
Publish your site with the CMS-enabled blog.
Pros and Cons of Using Framer CMS
| Pros | Cons |
|---|---|
✓ Built directly into Framer (no external tools) | ✗ Limited SEO features |
✓ Templates available for faster setup | ✗ Takes time to configure collections and fields |
✓ Free with Framer (on CMS-enabled plans) | ✗ Less flexible for scaling or advanced needs |
Framer CMS is fine for simple, personal blogs – but if you want better SEO and faster publishing, DropInBlog is still the stronger option.
Option 3: Headless CMS (Contentful, Sanity, Strapi, etc.)
Best for: Developer teams that need maximum flexibility and are comfortable managing API-driven workflows.
Headless CMS platforms are powerful but complex. They’re best suited for large or content-heavy sites where scalability and integrations matter more than speed of setup.
How to set it up:
Sign up for a headless CMS (e.g., Contentful, Sanity, Strapi).
Create a content model for blog posts (title, body, categories, authors).
Connect the CMS API to Framer using custom code or an integration layer.
Build your blog template in Framer to fetch and display posts dynamically.
Publish your Framer site and manage content from the CMS dashboard.
Pros and Cons of Using a Headless CMS
| Pros | Cons |
|---|---|
✓ Extremely flexible content modeling | ✗ Requires coding knowledge and setup time |
✓ Scalable for large or complex sites | ✗ Ongoing maintenance across two platforms |
✓ API-driven (integrates with other apps) | ✗ Overkill for most solo creators or small businesses |
A headless CMS gives you enterprise-level power, but for most Framer users, it’s too complex compared to the quick and SEO-friendly DropInBlog solution.
Option 4: iframe Embed
Best for: Site owners who already have a blog elsewhere (WordPress, Ghost, Medium) and just want to display it inside Framer.
An iframe embed is the quickest way to display a blog in Framer, but it comes with major SEO drawbacks – search engines don’t crawl iframe content. It can also look mismatched with your site’s design.
How to set it up:
Create or host your blog externally.
In Framer, add a new frame or section.
Paste an <iframe> embed code pointing to your external blog URL.
Adjust width and height to fit your layout.
Pros and Cons of Using iframe
| Pros | Cons |
|---|---|
✓ Very fast to set up | ✗ Limited SEO value for the host page |
✓ Works with almost any external blog (WordPress, Ghost, etc.) | ✗ Styling rarely matches your Framer site |
✓ Low maintenance once embedded | ✗ Feels less integrated for visitors |
An iFrame embed can work for quick fixes, but if you want a professional blog that looks native and ranks well in search, DropInBlog is the better route.
Bonus: Change Your Navigation Link Styles
Once your blog is live, you may notice the navigation menu links don’t perfectly match your site’s styling. Fortunately, you can easily fix this with DropInBlog’s design customization options.
How to do it:
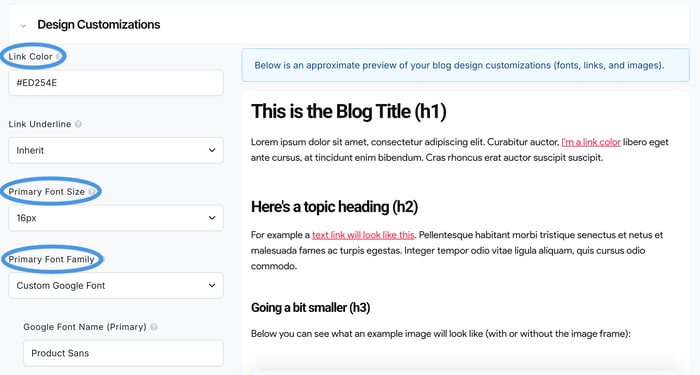
In your DropInBlog dashboard, go to Code & Layout → Advanced → Design Customizations.
Update Link Color, Font Family, and Font Size to match your site.
Click Save Design Customizations to apply changes.
Return to your Framer blog page and refresh it. The navigation link color and size have changed. Click on whichever blog post you want to check if everything works fine. If it does, congratulations!
💡 Pro Tip: Keep styling consistent across your blog and main site – this builds trust and makes the blog feel native to Framer.
FAQs
What is Framer used for?
Framer is a no-code site builder that can be used to create and design personal websites, portfolios, professional websites, and blogs.
Is Framer good for blogging?
Framer is a good choice for bloggers seeking a versatile and effective platform, particularly for those comfortable with a steeper learning curve. While it's not the easiest tool for beginners, its capabilities for dynamic and interactive content are significant.
For streamlined blogging and content management, integrating DropInBlog with Framer can be highly beneficial, offering a user-friendly blogging solution.
Is Framer good for SEO?
Framer is indeed beneficial for SEO. It optimizes your pages for excellent SEO performance by default, offering complete control over SEO markup, indexing rules, redirects, and more. This ensures a strong foundation for search engine optimization.
Additionally, when used with DropInBlog's SEO Analyzer, you gain further insights and tools to enhance your blog's SEO, making your content more visible and effective in search engine rankings.
Can I create a blog with Framer’s free plan?
Yes, if you use Framer’s built-in blogging tool, you can create a small blog even on the free plan.
You can also stay on the free plan with other blog integration methods, including DropInBlog. The blogging tool only requires the option to create a new page, which you can do on all Framer plans.
How do I add a blog post in Framer?
Access your CMS page from the Framer editor, then click on the New item to start a new blog post. Using the slide-out window, add your post’s title, content, featured image, and other relevant information.
With DropInBlog, on the other hand, you have access to a user-friendly WYSIWYG editor, an SEO analysis tool below the editor, and a host of other features that make creating new blog posts easy.
Ready to Start Blogging?
By now, you’ve seen multiple ways to add a blog to Framer – from native CMS templates to headless setups. Each has pros and cons, but for most users, DropInBlog is the fastest, most SEO-friendly, and easiest way to go live with a professional blog.
What makes DropInBlog different:
Launch a blog in minutes, not hours.
SEO Analyzer, schema, and Mention Boost™ built in.
Works seamlessly with Framer’s responsive design.
In the meantime, if you have any questions, reach out – we'd be happy to help in any way we can. Happy blogging!


