

Key Takeaways
- The best way to add a blog to your Instapage site is with DropInBlog!
- The free trial and quick setup lets you to test it in a few minutes.
- DropInBlog has different pricing plans for individuals and teams.
In this guide, you’ll learn how to create a blog on Instapage by integrating DropInBlog with your Instapage account.
A blog can be a very cost-effective organic traffic driver, and it just so happens that we’ve got a pretty neat blogging solution that can help you reap these benefits. You can have your landing page builder and a professional blog – all in one.
Table of Contents
What Is Instapage, and Can You Blog With It?
Instapage is a landing page platform that offers a boatload of tools to help you achieve higher conversion rates. Multivariate and A/B testing, a data-driven personalized user experience, AMPs (accelerated mobile pages), and the Thor Render Engine (Instapage’s proprietary software) comprise just a fraction of Instapage’s wide array of features.
However, if there’s one important thing missing from the Instapage assortment of tools, it’s blogging functionality. Of course, considering that Instapage is a platform exclusively focused on high-converting landing pages, the lack of blogging functionality isn’t too much of a surprise.
The value-to-investment ratio of adding a blog to your marketing strategy is pretty high. Blogging requires a relatively low financial commitment, but the returns in terms of traffic, leads, and ultimately, conversions can be very rewarding. A blog is a no-brainer for any serious business, regardless of size, as the bulk of today’s successful companies can attest.
With its SEO Analyzer, modern design, and many other features, DropInBlog is an excellent tool that can help you make the most of blogging. Let’s see how you can add it to Instapage.
Prerequisites
A DropInBlog account and a subscription to (at least) the Instapage Build plan are all it takes to start building your blog with Instapage. Any level of DropInBlog account will do.
Even if you don’t have a paid DropInBlog account yet, you can still enjoy its benefits: just register for the free trial and start learning the nitty-gritty of the platform. You won’t regret it.
Create a New Page
Creating a new page with Instapage is the initial step toward building your blog.
Click the Landing Pages option in the left sidebar. After that, you’ll see a Create Page button on the right. Click this button and choose Standard Landing Page.
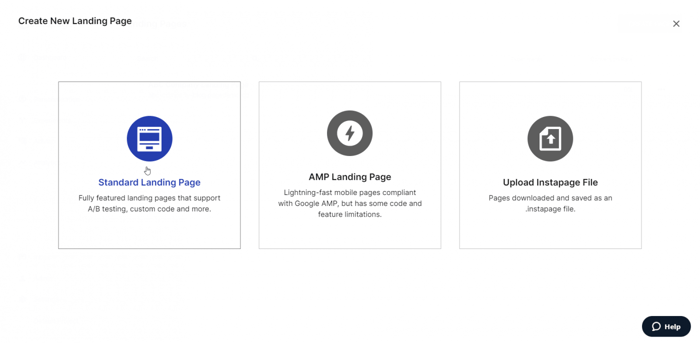
Then, select Blank Page and give your page a name. “Blog” is generally what most people go with. When you check your dashboard, you’ll see your newly created page under the name you’ve given it.
That’s the first step. Now let’s see what else you need to do.
Add the Embed Codes
You have your blog page created. Now, it’s time to add the embed code from your DropInBlog account. Although any mention of code may seem daunting if you’re a beginner, don’t worry – it’s as straightforward as it gets.
Click on your page in the dashboard, choose Edit Design, and select the Html (<>) icon at the bottom of the left menu.
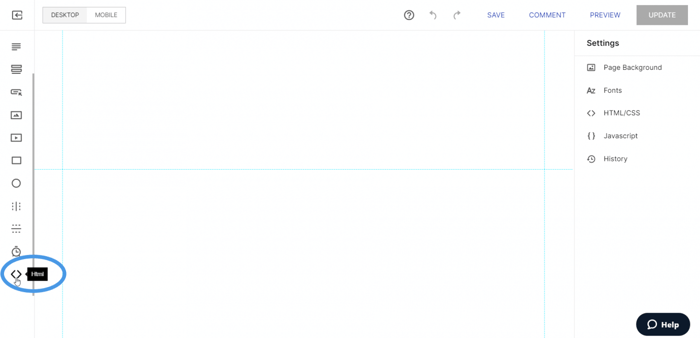
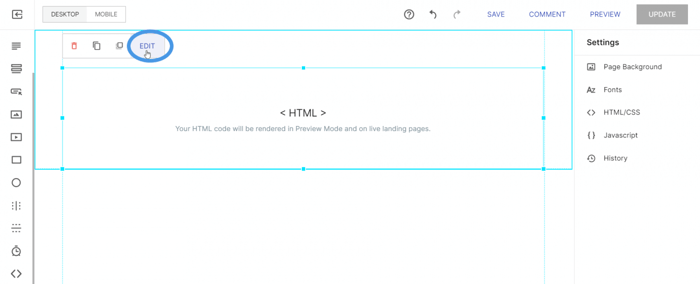
You’ll now see an HTML box has been added to your page. Drag the HTML box to the desired location on the page, and increase its width to match the page. Click Edit after you’ve done this. It’ll look something like this:
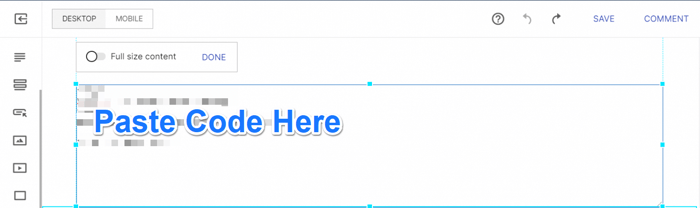
Now you’re ready to copy the embed codes from DropInBlog. Open a new tab in your browser, log in to your DropInBlog account, and click Code & Layout. This will lead you to the page with your personal blog embed code. You need to copy the code from both Step 1 and Step 2 and paste it into the HTML block you’ve just added to your blog page on Instapage.
This is the DropInBlog code from Step 1:
<script src="https://io.dropinblog.com/embedjs/XXXXXXXXXXXXXXXXX.js"></script>Keep in mind that your personal DropInBlog ID will be a combination of uppercase letters and numerals. Here, we’re showing blanks or Xs just for illustrative purposes.
The code from Step 2 looks like this:
<div id="dib-posts"></div>Once you paste the Step 1 and Step 2 blog embed code, you’ll see something like this:
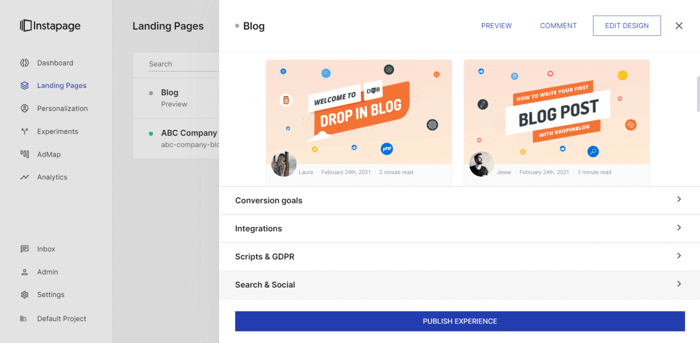
Now click Done on the HTML box, and then click Save in the navigation bar at the top of the page. You can now exit the page builder.

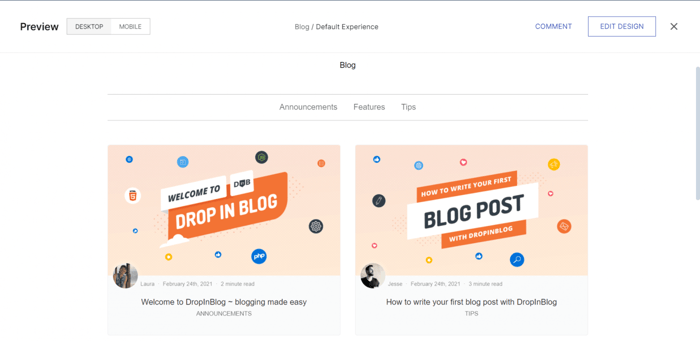
After you exit the page builder, you’ll see a preview of what your blog looks like:
Next, you need to click Publish Experience, after which you’ll see four available options:
- Publish through a custom domain
- Publish through WordPress
- Publish through Drupal
- Publish via pagedemo.co for testing purposes
You’ll most likely choose the first option and use your own personal domain. Although, for our purposes here, I’m going to use a pagedemo.co URL. After you finish up the publishing process, you can head over to your published blog page to see it in its full glory.
Paste the Blog URL into Your DropInBlog Account
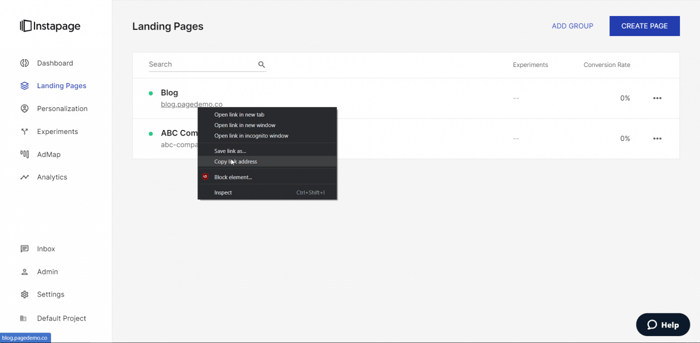
Pasting the blog URL into your DropInBlog account is the final step. Go to your Instapage dashboard and find your blog page. Right-click on the URL link below the name of your page and select Copy link address.
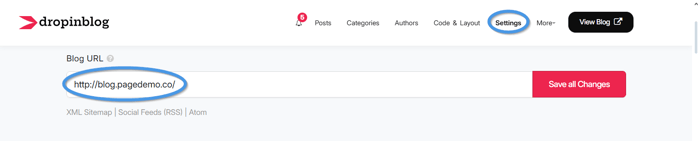
Now, head back to your DropInBlog account and click Settings in the navigation bar. Paste your Instapage blog URL into the Blog URL field. Make sure to Save All Changes before leaving the page.
This last step fully connects your Instapage blog page to your DropInBlog account. You can now create and manage blog posts from within the DropInBlog dashboard.
And voilà! You’re all set to embark on your blogging journey.
Recent Posts Widget
Your Instapage blog is all set, but in case you want to dive deeper into DropInBlog and make use of the other powerful features it offers, you can head over to the Code & Layout page and add some more functionalities. The ones that we’ll show you here are optional but highly recommended.
To display a preview of your recent blog posts on any of your landing pages, you can simply add the DropInBlog recent posts widget.
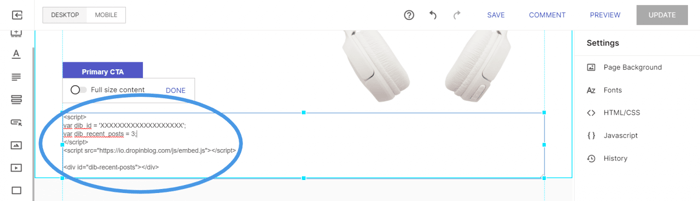
To do that, go to the Code & Layout page in DropInBlog. Under Advanced, you’ll find the Widget Code section. Under Recent Posts Code, you’ll see these few lines:
<script>
var dib_id = 'XXXXXXXXXXXXXXXXXXX';
var dib_recent_posts = 3;
</script>
<script src="https://io.dropinblog.com/js/embed.js"></script>
You can change the number of recent posts according to your own liking. It can be any number that makes sense to you and best fits your page.
In addition to the above, there’s one more piece of code that you’ll need in order to display the recent posts widget on your landing page:
<div id="dib-recent-posts"></div>Copy these two snippets of code and go to your Instapage landing page. The procedure is the same as the one we used before; click on your landing page, click Edit Design, scroll down, and choose the Html block (<>).
Drag the box and place it wherever you want your recent blog posts to show. Adjust the size of the box to your liking, and paste the two snippets of code from above.
After you’ve pasted the code, click Done, Update, Confirm, and then you can Exit Builder. Open your page to see the changes. There might be some additional adjustments you need to make if your recent blog posts overlap with other elements on your page, but this is all it takes to add the recent posts widget.
If you’re adding the widget while creating a landing page for the first time, the procedure will be the same as what we did earlier when we built our blog page. So, after clicking Done, you’ll need to click Save, Exit Builder, Publish Experience, and, lastly, choose to either publish through your custom domain or publish for testing purposes.
Tips for Using DropInBlog with Instapage
While playing around with your new blog, you’ll definitely want to explore the DropInBlog SEO Analyzer, which draws on SEO best practices to evaluate your blog posts before publishing. It also gives you tips on how to improve your SEO score and achieve higher search engine rankings – which is what we all want.
DropInBlog also allows you to automate posting by scheduling your posts for any time in the future. Furthermore, your blog inherits the already existing styles of your landing page template, so it will match your design aesthetic right out of the box. No more endless and time-consuming design tweaking to get the pages to match.
However, if you want, you can customize the design of your blog. One way to do that is, again, by adding a new HTML block and adding your own CSS code between <style></style> tags.
FAQs
Does Instapage allow you to start a blog?
The primary purpose of Instapage is lead generation and landing pages. While blogging is an important part of a marketing strategy, it’s not the focus of Instapage, so there is no built-in blogging feature.
That’s not the end of the story, though. Instapage allows you to integrate a variety of apps, including DropInBlog. So, you can have your brilliant landing pages and include a blog.
How can I integrate DropInBlog with Instapage?
Integration is very simple. All you have to do is copy and paste a couple of lines of code, and you’re done. The team from DropInBlog has developed an easy-to-follow tutorial guide, or you can watch the video.
Conclusion
In short, there’s a ton you can do with DropInBlog. It effortlessly fills the gaps and gives you the ability to blog like a pro. If you need any help with the integration process or you just have some general questions, please do not hesitate to contact us – we’ll be more than glad to help.


