
Key Takeaways
- The best way to add a blog to your Webflow site is with DropInBlog!
- The free trial and quick setup let you test it in a few minutes.
- DropInBlog has different pricing plans for individuals and teams.
When you create a website on Webflow, the next logical step is to add a blog to it. However, Webflow isn't particularly suited for blogging, and its native blogging features can be overwhelming, especially for beginners. The complexity of setting up collections, fields, and lists can deter many from using Webflow's blog functionality to its full potential.
DropInBlog stands out as an alternative to blogging with Webflow. It allows you to focus on creating engaging content while effortlessly managing the technical aspects.
So, in this guide, we’ll show you how to create a blog on Webflow:
Using the platform’s native blogging features.
By embedding a specialized blogging app, DropInBlog, into your site.
What's New in Webflow (May 2026)s
Webflow rolled out its biggest plan restructure in years. The CMS and Business plans are now a single Premium plan ($25/mo annual) that includes 20,000 CMS items and 40 Collections, doubling the old content limit and removing CMS add-ons.
The Basic plan ($15/mo annual) now supports 300 static pages, and AI credits are now bundled into every Workspace plan. For bloggers, the headline is simple: content limits just got far more generous, so your platform decision now comes down to workflow and SEO, not caps.
Summary: Adding a Blog to Webflow
You can create a blog on Webflow using the platform’s CMS collections, but this method comes with a learning curve and separate collections for post content, categories, and authors.
DropInBlog is the recommended blog integration method for Webflow sites, offering a user-friendly content editor, rich author profiles, a built-in SEO analysis tool, and reusable content blocks.
To create a blog on Webflow with DropInBlog, create a new page with a Custom Embed element and paste two blog snippets inside of it.
Table of Contents
- Key Takeaways
- What's New in Webflow (May 2026)s
- Summary: Adding a Blog to Webflow
- Is Webflow Good for Blogging? (An Honest Take)
- How to Create a Blog on Webflow (Native Method)
- Create a Blog on Webflow with DropInBlog (Recommended, SEO-Friendly Method)
- How to Create a Blog on Webflow
- Adding a Blog Page to the Navigation Menu
- Advanced Tips and Features for Managing Your Webflow Blog with DropInBlog
- SEO Best Practices for Webflow Blogs (2026)
- Webflow Blog Examples
- FAQs
- Start Blogging on Webflow with DropInBlog
Is Webflow Good for Blogging? (An Honest Take)
Honest answer: Webflow is excellent at design and decent at blogging, but it asks more of you than a dedicated blogging tool does. If you want your blog to look exactly like a beautifully designed site and you're willing to learn the CMS, Webflow delivers. If your main job is publishing content rather than designing layouts, the setup overhead adds up fast, and that's where DropInBlog saves you days. Here's the full picture so you can decide.
Webflow allows you to organize your blog’s content through CMS collections. Using collections, you can structure your blog posts by choosing the fields you want to show on every post. Webflow supports text images, videos, and HTML embeds, allowing you to create visually appealing content.
Apart from that, blog content created in Webflow is dynamic, meaning that when updated in one place, it automatically updates across all your blog’s pages. The platform is also regarded as SEO-friendly, allowing you to create fast-loading blogs.
Another convenient thing about creating a blog on Webflow is that you can start with a blog template if you don’t want to start from scratch. The visual site builder allows you to clone a template, which is a faster way to get your blog online. Also, if you plan on starting a simple blog, using a Webflow blog template will probably meet your requirements.
So, why isn’t everyone blogging with Webflow?
Well, learning how to create a blog on Webflow can be challenging. The whole concept of CMS collections and collection lists and items is complex, so the learning curve is steep. Another obvious reason is that Webflow doesn’t offer some basic blogging features out of the box, such as automatic ToCs and an FAQ builder, but relies on coding and templates.
While trying to simplify databases, Webflow created a general-purpose CMS that can imitate a blogging platform but actually lacks many of the necessary features that purpose-built blogging platforms like WordPress or Weebly provide.
Other potential downsides of blogging with Webflow’s CMS include:
The lack of ready-made categories and author features. Although you can add categories to your blog, you have to build them through collections. The same applies to authors and author profiles.
The pages and items created with CMS collections can’t be exported with Webflow’s export tool.
There’s no SEO scoring and keyword analysis tools out of the box, meaning you have to manage additional aspects of your blog’s SEO through a third-party app.
As a result, you may spend days or weeks perfecting your website, and when the time comes to add a blog, you could find that Webflow’s native blogging solution requires even more effort, as well as a lot more time, than you had initially expected.
The blog feels clunky, and you’re left wondering why you can’t just write a simple blog post and have it show up on your site.
Quick Comparison: Webflow CMS Blog vs. DropInBlog
| Feature | Webflow native blog | DropInBlog |
|---|---|---|
| Setup time | 1–3 hours | 3 minutes |
| SEO tools | Basic | ✓ SEO Analyzer ✓ Schema markup ✓ Smart Snippets™ |
| CMS limits | Up to 20,000 items on the Premium plan; add-ons no longer needed | No |
| Author management | Manual | Built-in author profiles |
| Speed | Good | Excellent |
| Best for | Designers, advanced users | Marketers, busy teams |
Choose Webflow CMS if you want full custom control. Choose DropInBlog if you want the simplest, most SEO-friendly blogging experience.
How to Create a Blog on Webflow (Native Method)
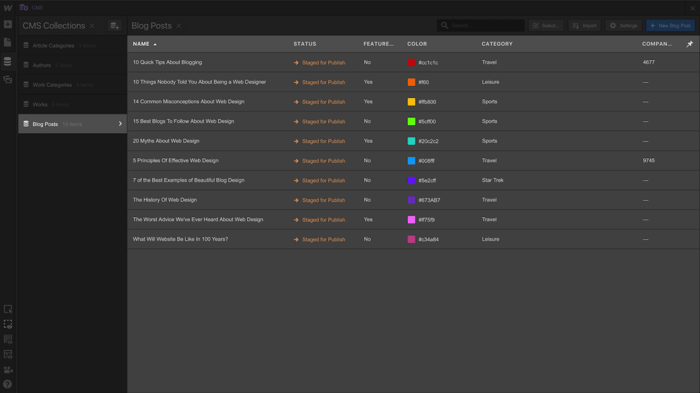
Using Webflow’s native blogging features, you can create dynamic content for your blog through CMS collections.
Step 1: Create a CMS Collection
Start by opening the CMS dashboard from within Webflow’s Designer. Then click on the plus sign next to CMS Collections and select Blog Posts under Collection Templates.
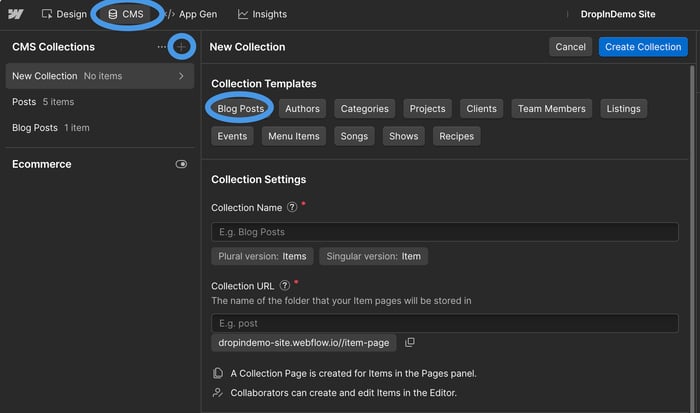
Name your collection, then add the field types you want to show in your blog post.
By default, the Blog Posts collection includes a name and a slug. Add other fields you think are necessary.
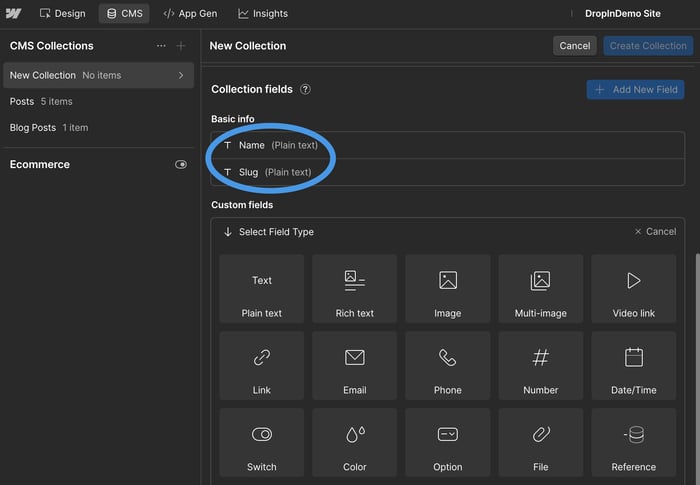
Pro Tip: Adding rich text and image field types will add the post content and featured image to your blog posts. You can edit your collection later to create a more advanced post structure.
After you’ve customized the Blog Posts template and saved your collection, you’ll be prompted to generate sample items.

Perform this step to create dynamic content right away. Or add new items manually.
Step 2: Build a Blog Post Template
Open the Designer, select Pages using the left-hand menu, and find and click on the collection you’ve previously created.

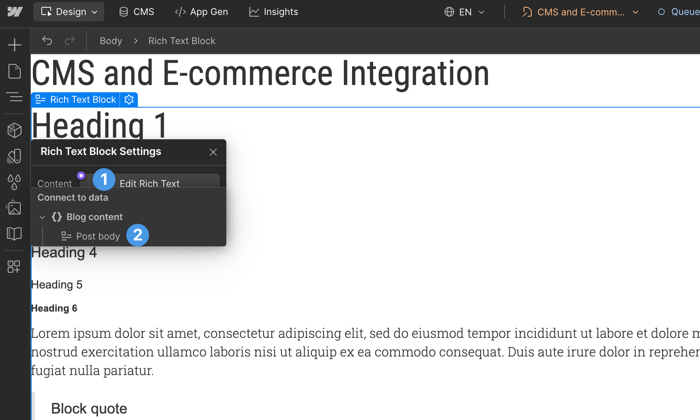
When you click on your CMS collection, you’ll see a blank page. Use the Elements menu (plus sign on the left) to add headings, images, and any other field types you’ve included in your collection.

Pro Tip: Add a heading block for the post title, rich text for the post content, and an image for the featured image if your collection contains rich text and image field types.
When you drag and drop these elements onto the page, you’ll see a purple-and-white circle next to each. When you click on it, you can connect your collection field type to the selected element.
At this point, your blog content is dynamic.
Step 3: Add Posts List to Your Site
To ensure you have a place on your site where all of your blog posts will be shown, select the page where you want these posts to show. You can choose an existing page or create a new one. We’ll use our homepage.
From within the designer, click on the plus icon and locate Collection List, then drag and drop it onto the page.
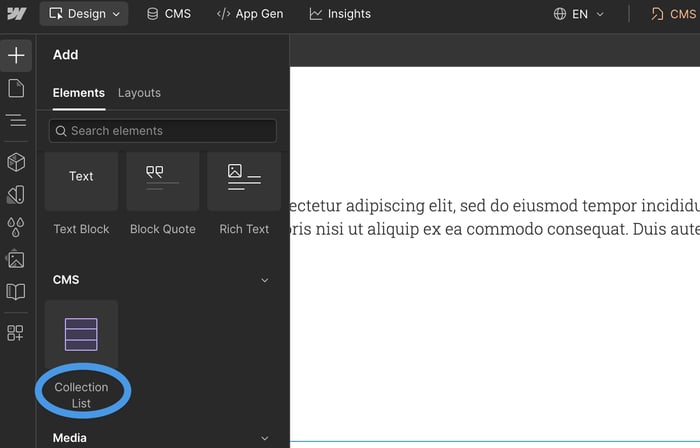
Once you place the Collection List element onto the page, a window will appear. Here, you should click on the dropdown next to Source and select your collection.

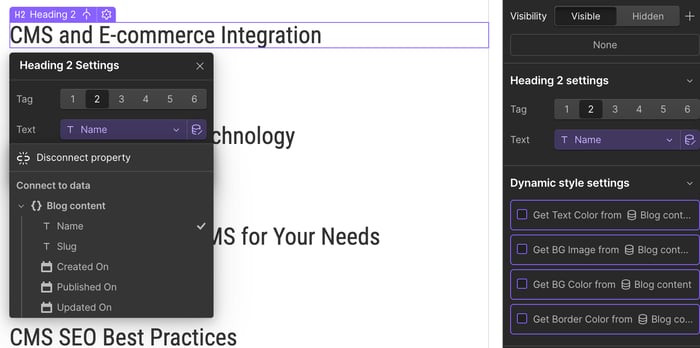
Now, use the plus icon on the left to drag the Heading element into the first collection list item, and connect it to the Name field in your collection.
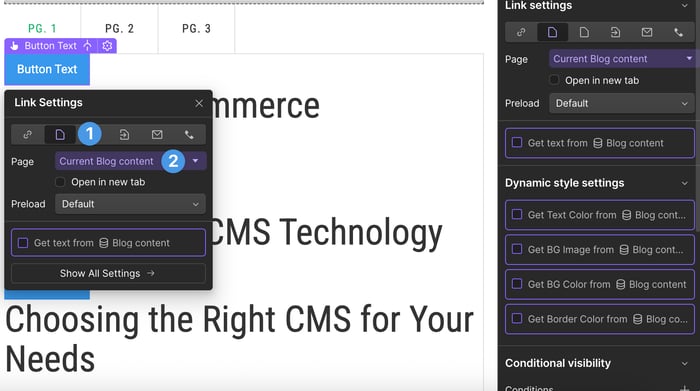
Then drag a button element into the same collection list item, click on the Collection Page icon (second on the left), and select Current Blog content from the Page dropdown.
Once you complete all of these steps, we recommend you create two more CMS collections – one for blog categories and the other for authors.
Pro Tip: Add a header and a footer section to individual blog posts to make it possible for your users to easily browse your blog.
Create a Blog on Webflow with DropInBlog (Recommended, SEO-Friendly Method)
Although you can blog on Webflow using the platform’s native blogging features, you can also opt for a much simpler alternative, like DropInBlog, the most user-friendly blogging tool that allows you to skip the complexity of the blogging method we previously explained.
There are no CMS collections to set up, and you don't have to manually configure each part of your Webflow template. You just copy and paste a couple of lines of code into your layout, and DropInBlog handles the rest.
How to Create a Blog on Webflow
Before we begin, you should know that in order to add custom code to Webflow, you'll need either a paid account or paid hosting for your site. Webflow has a range of pricing plans to choose from, but you can also check out our review of the different plan options to see which one is best for you.
Step 1: Create a New Blog Page
In your Webflow site builder, open the Pages tab in the left-hand toolbar.
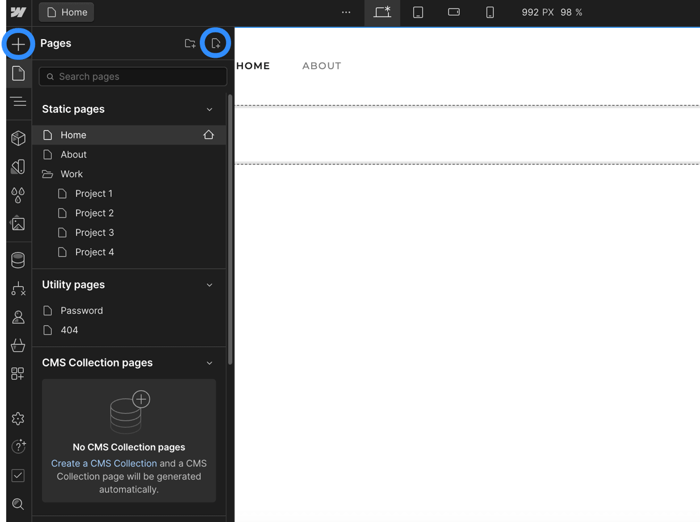
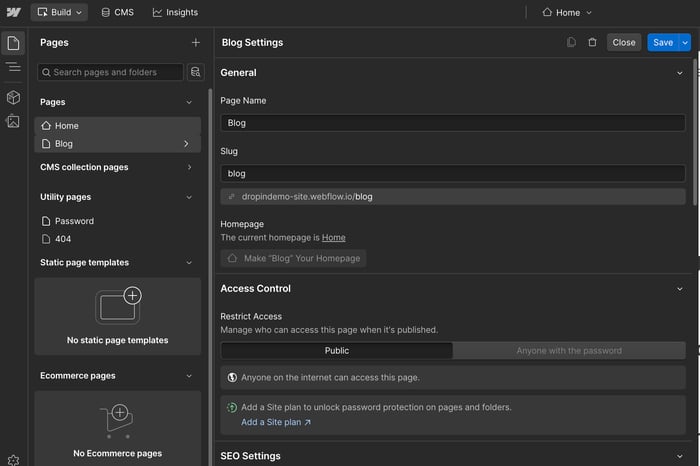
Then, add a new page and name it “Blog” or any title of your choice. Make sure to click on Create so your new blog page is saved.
Since the page is blank, add your navigation menu and footer. You do that by clicking on Components on the left sidebar and then on Navigation.
Find the header and footer components you’d like to add to your page, then drag and drop them onto your page.

Your newly created blog page will now have a navigation menu and a footer.
Step 2: Add an Embed Element
After you have created a blog page, you need to decide where you want your blog posts to display on the page. The best place would be between the navigation menu and the footer. To do that, place the cursor by clicking on the header.
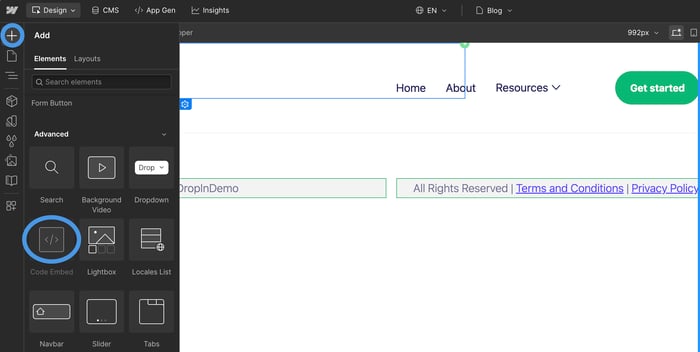
Then go to the left sidebar, click on Add Elements, and then scroll down under the Advanced category and select Custom Embed.
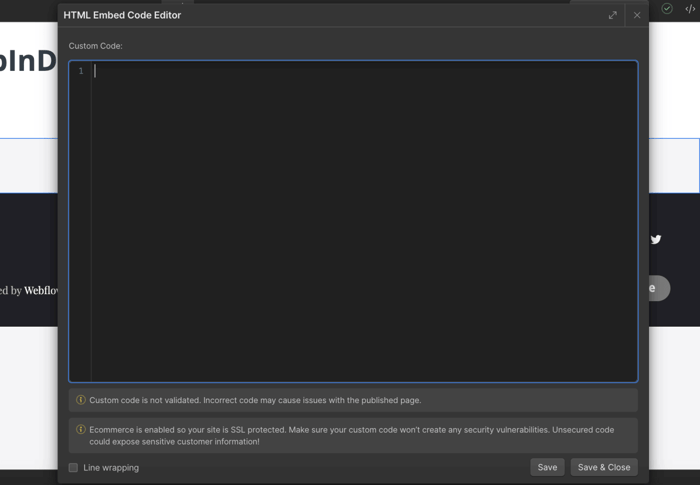
A new pop-up window will appear – this is where you need to add two snippets of code from your DropInBlog account.
Step 3: Copy the Snippets
If you haven’t done so already, you need to get a DropInBlog account to complete this step.
Go ahead and log in to your DropInBlog account and find the Code & Layout page. There, you'll see the two snippets used for connecting Webflow to your DropInBlog content.

Copy these two snippets and paste them into the HTML Embed Code Editor.
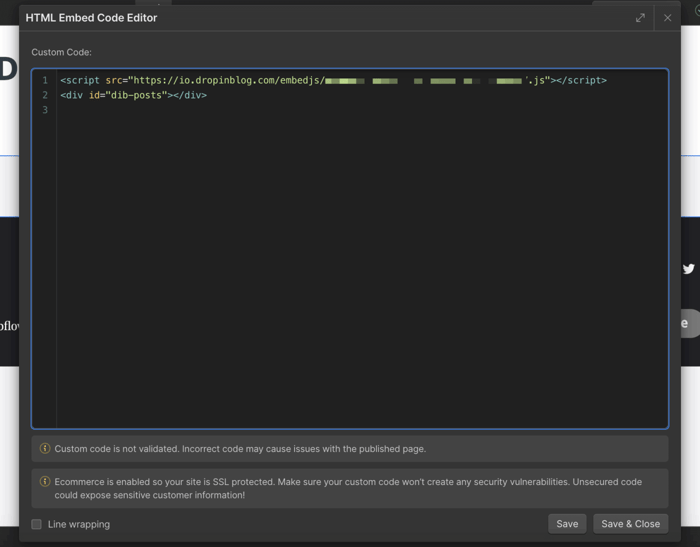
Once you’ve added the code, click on Save & Close to save these changes.
Step 4: Publish Your Blog Page
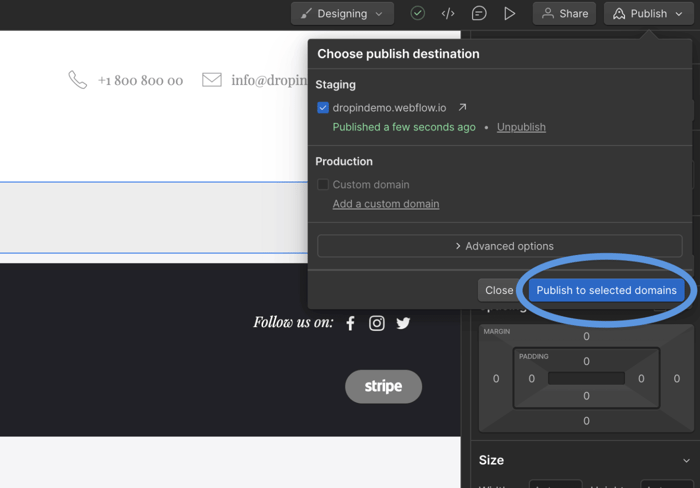
It's now time to publish your new Webflow site. On the top right of the site builder, you'll find the publish tab with a cute little rocket ship. Just select your site from the dropdown, and hit Publish to selected domains, then proceed to Step 5.
Step 5: Add Your Blog URL to Your DropInBlog Account
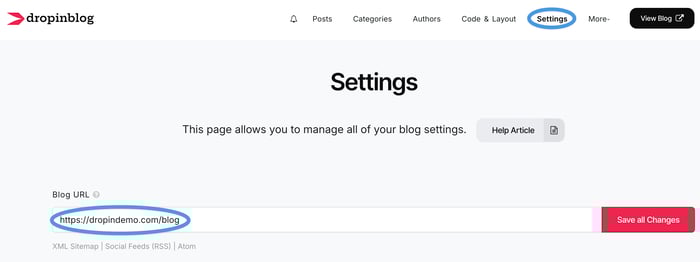
To connect Webflow to DropInBlog, just copy the URL of your published blog page, head over to the Settings page on your DropInBlog account, and paste it into the Blog URL input field. Make sure to click Save All Changes. Now, unless there are any other settings you want to tinker with, you're all set!
Adding a Blog Page to the Navigation Menu
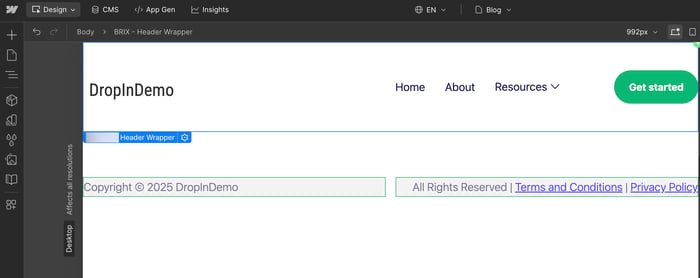
Double-click on the navigation menu until you see the blue border around it (like in the screenshot below).

Next, right-click on one of the existing menu items and choose Duplicate.

Once you've created a duplicate menu item, you need to adjust its settings. Click on the menu item that you want to rename and open the Nav Link Settings (the gear icon on the right of the blue bar).
Within the Nav Link Settings pop-up, enter the name of your blog page in the field next to Text. Additionally, from the Page dropdown, select your blog page.
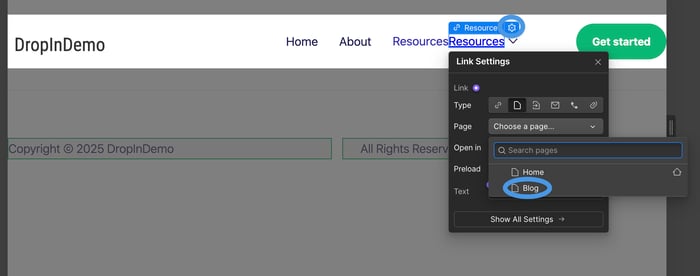
Finally, make sure to click on Publish to selected domains to save these changes. The navigation now displays the blog page and links to it, as shown in the image below.
If you want to add a blog link to the footer, you can repeat this process.
Advanced Tips and Features for Managing Your Webflow Blog with DropInBlog
Once your blog is live, you can use DropInBlog’s features to fine-tune and optimize your blog for online searches by:
Finding topics for your blog in a couple of minutes
Assigning authors and categories to your blog posts.
Converting your written content into audio.
Optimizing your content for traditional and AI-based searches.
Customizing your blog’s design with the Design Customizer and custom CSS.
Discovering Blog Topics
Adding a blog to a Webflow site is easy. The challenging part is finding the right topics for your blog. That’s why many blogs only have a few posts created months or even years ago. People start blogging and run out of topic ideas or write off-topic content. To avoid doing the same, you can use DropInBlog’s AI content tool, Blog Pilot™. It will automatically generate blog post title ideas and create outlines for you.
To start, launch Blog Pilot™ from the left-hand side menu in your DropInBlog account. Wait for it to recommend topic ideas, then click on the Explore Topics button to review them.
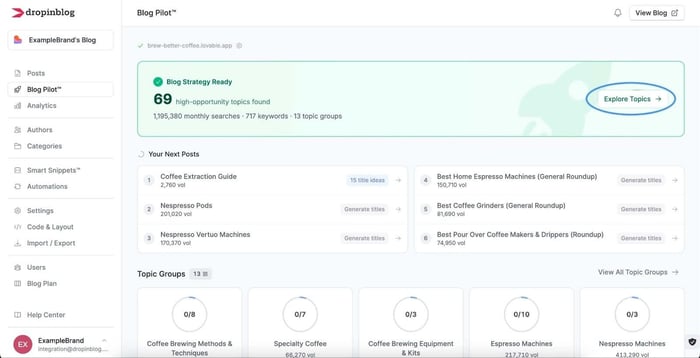
Next to each topic, you’ll find the Generate Post Ideas button. Clicking on it will give you inspiration for your new post. To select a post idea, just click the Generate Outline button. This action will prompt Blog Pilot™ to create a blog post outline, which you can then move directly into the DropInBlog editor and start adding your content.
Managing Blog Authors and Categories
When you start creating content for your Webflow blog, you’ll be doing so from your DropInBlog account. Here, you’ll find dedicated pages for creating and managing authors and categories.
Unlike with Webflow, you won’t need to create collections and assign field types to create author profiles and categories. The platform’s intuitive interface already has pre-built fields for all the data you want to add to your blog.
You’ll also notice that the editor on the Authors page is the same as the post editor.
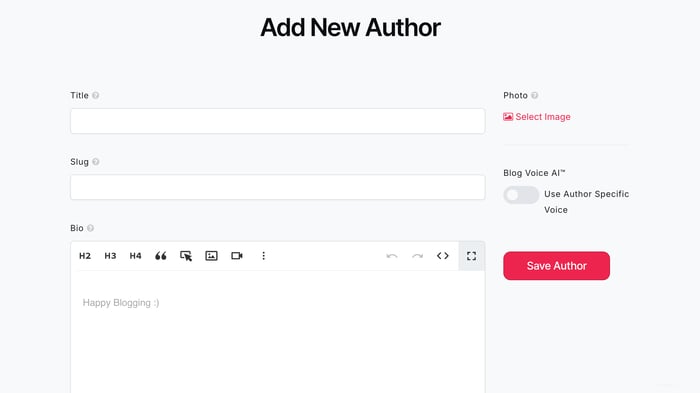
That means that creating rich author profiles is as easy as creating a blog post!
Then, when you start a post, you can easily assign authors and categories to your content using the right-hand side of the editor. Just select an author and category from the dropdown or add new ones from within the editor.
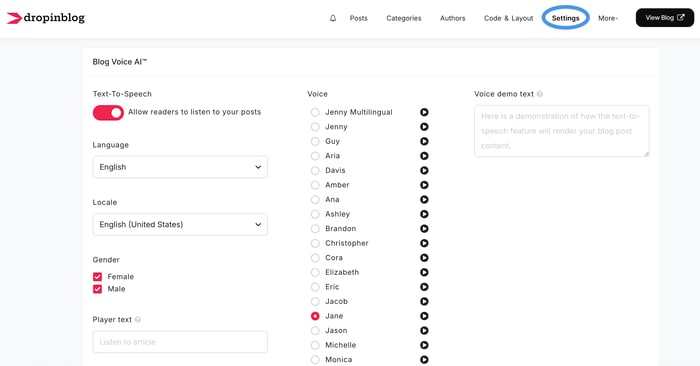
The Blog Voice AI™ Text-to-Speech Engine
Once you publish your first post, you’ll notice an audio player right before your post’s content. This is DropInBlog’s text-to-speech player that converts what you wrote into audio.
If you want to turn on and customize the sound of your blog, head over to the Settings page of your DropInBlog account and select the option that works best for you.
Optimize Your Content for Search Engines with DropInBlog
DropInBlog’s SEO Analyzer is an interactive tool that assists you as you’re writing your posts and gives you immediate feedback. You’ll find this tool under the post editor.
It analyzes your post and provides a simple bullet point list of things you can do to improve your SEO. This may be something simple, like including your main keyword in the meta-description, or something more advanced, like adding an alt tag image description.
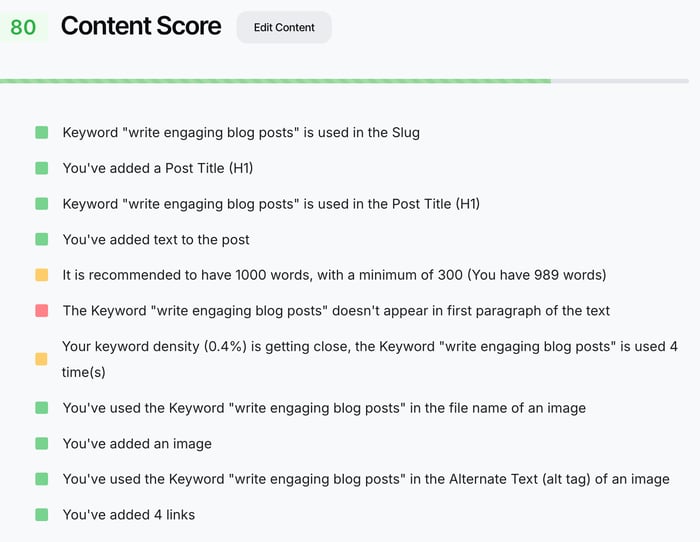
As you’re writing your post, the tool grades your content and gives you a score out of 100. In general, anything between 90 and 100 is considered a good SEO score, which means that the chance of attracting organic traffic through search engines is high.
Apart from the SEO Analyzer, you can use another tool from within the DropInBlog editor: Mention Boost™. Much like the SEO Analyzer, Mention Boost™ is an interactive tool that checks your content in real time. However, unlike the SEO Analyzer, it checks your content’s readiness for AI-based searches.
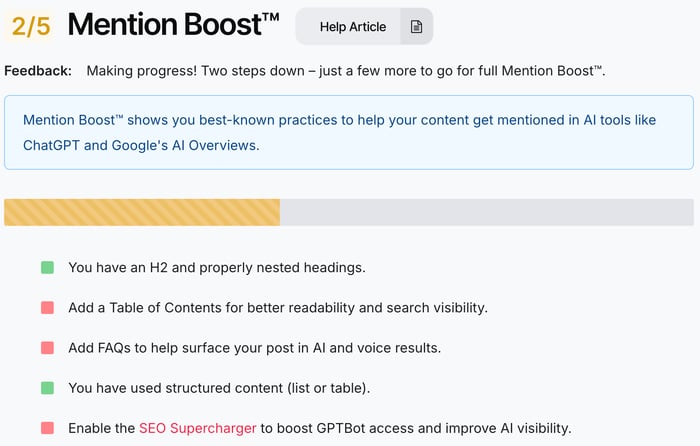
Following the suggestions from this tool helps your content become more visible in ChatGPT, Google’s AI Overviews, and other AI-powered searches. Ultimately, your blog can earn AI mentions, which is known to improve a site’s credibility and traffic.
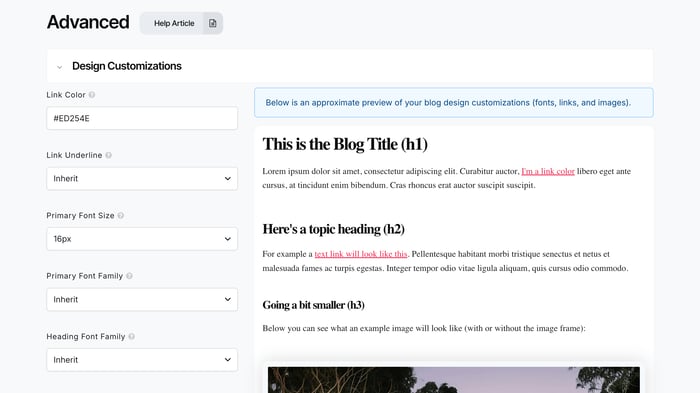
Design Customizations
DropInBlog automatically inherits your Webflow site’s design, but if you want, you can further adjust the look of your blog. In the Design Customizations section, located on the Code & Layout page under the Advanced section, you can change the following aspects of your blog:
Link color and underline style
Font family and size
The number of posts to be displayed per page
The default background and font color of your call-to-action buttons
The Designer Customizer tool has a preview option, so you can view your changes without publishing them live.
If you want to make bigger changes, use the Custom CSS section located on the same page. Here, you can apply different CSS styles to your blog.
SEO Best Practices for Webflow Blogs (2026)
Ranking a Webflow blog comes down to a handful of fundamentals. Here's how to handle Webflow blog SEO, whether you're on the native CMS or using DropInBlog:
Use Webflow’s SEO settings: Optimize your site’s pages using Webflow’s built-in title tags, meta descriptions, canonical URLs, site indexing, and Open Graph settings. For blog post optimization, use DropInBlog’s SEO title and meta description settings, and customizable URLs.
Add image alt text: Alt text contributes to your site’s accessibility and helps search engines index your images correctly. You can manage this aspect from within the DropInBlog editor.
Use DropInBlog’s SEO Analyzer for keyword optimization: The SEO Analyzer analyzes your content based on the keyword you feed it. You’ll get actionable insights on how to make your content SEO-friendly and rank for the selected keywords more easily.
Add internal linking: Linking from one blog post to another helps search engines understand the relationship between your blog posts. With DropInBlog, you can link your blog posts from within the editor, as well as have more control over your links through relationship attributes.
Use schema markup: With DropInBlog, you don’t have to manually create schema – BlogPosting, FAQPage, and VideoObject schema will be automatically applied to your blog posts.
Fast-loading images: Large images can slow your site's load time. Webflow blogs created with DropInBlog aren’t affected by this, as DropInBlog compresses your images automatically.
Prepare posts for AI Overviews: You can use DropInBlog’s Mention Boost™ to improve your visibility in AI searches. Simply follow the tool’s suggestions related to your content’s structure.
Use a table of contents for long posts: DropInBlog automatically creates a table of contents from your post’s headings. So even with long-form content, your readers can easily navigate your posts.
Webflow and DropInBlog – The Perfect Union
General-purpose CMSs like Webflow’s are not ideal blogging solutions – simply put, when a platform wasn't built from the ground up for blogging, it shows. In contrast, DropInBlog was specifically built for one purpose: to make adding a blog to any site painless and simple.
With the power of both platforms, you'll now have:
A blog that is simple to implement and maintain
A ton of options at the flick of a switch
A purpose-built blogging platform
Blog posts that are optimized for search engines
Webflow Blog Examples
Take a look at some Webflow blogs made using DropInBlog below and discover its capabilities for yourself.

Why it stands out: The Marion Community Bank site is a great example of how you can create a simple site with Webflow and add more advanced features, such as an online banking portal. The blog is built with DropInBlog and uses categories to separate informational how-to guides from company news.

Why it stands out: The site uses Webflow to create a professional company website. It implements clean design, good typography, and rich interactions. The site’s blog is powered by DropInBlog and uses an AI-powered text-to-speech engine to deliver AI-related content.
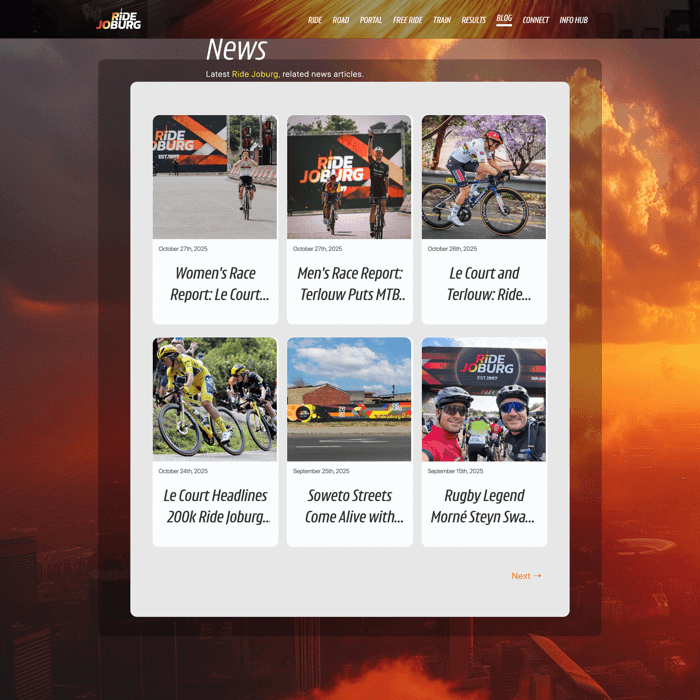
Why it stands out: Ride Joburg is an example of a Webflow site built for a public sporting event. Its visual focus (large headers, videos, and images) attracts visitors, while the DropInBlog-powered blog provides event updates.

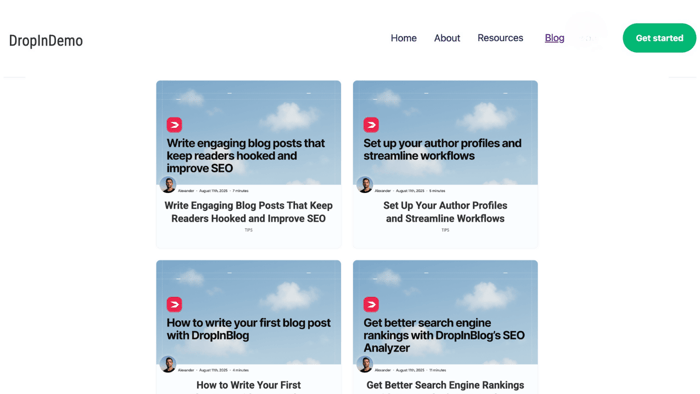
Why it stands out: The site uses a SaaS-specific landing page to educate site visitors about the product. It strategically places comparison charts, call-to-action buttons, and reviews to increase conversions. The blog is created with DropInBlog, showcasing the latest articles on the site’s homepage.
FAQs
What is Webflow used for?
Webflow is a web design tool, CMS, and hosting platform that allows users to design, build, and launch responsive websites visually, without coding. It's widely used for creating professional websites, blogs, e-commerce sites, and custom web applications. Webflow's visual interface makes it popular among designers, while its robust features cater to developers' needs.
Can I create a blog on Webflow?
Yes, you can create a blog on Webflow using CMS collections, collection lists, and items. However, creating a blog with Webflow’s native features comes with a learning curve and takes time. An alternative to adding a blog to Webflow is to use a specialized blogging app, such as DropInBlog, to eliminate the learning curve and access advanced blogging features.
Is Webflow good for blogging in 2025?
Yes, Webflow is a solid blogging option because it supports dynamic content and lets you create fast-loading sites and blogs. On the other hand, it comes with a steep learning curve, which is why many users are looking for a less complex blogging alternative.
Does Weblow support categories?
Webflow allows you to add categories to your blog posts, but to make that happen, you have to create a CMS collection. This approach can be a bit overwhelming if you’ve just started using Webflow, so you may want to consider a more straightforward blogging solution.
How much does Webflow cost?
Webflow offers two types of pricing plans: General and E-commerce. The General pricing plans include the free Starter Plan for hobby sites, the Basic Plan at $14/month (billed yearly) for static sites, the CMS Plan at $23/month (yearly) for content-driven sites, and the Business Plan at $39/month (yearly) for larger sites. For enterprise-grade solutions, Webflow provides a customizable Enterprise Plan, with details available upon contact.
The E-commerce plans include Standard, Plus, and Advanced, priced at $29, $74, and $212 per month, respectively. These prices apply to yearly subscriptions, while their core differences are the number of e-commerce and CMS items and transaction fees.
Is Webflow good for SEO?
Webflow-built websites are SEO-friendly, and the platform prioritizes clean code and light, well-designed website structure – both factors that play a big part in crawlability. You'll be able to optimize your URLs, meta titles, and descriptions. That said, DropInBlog's built-in SEO Analyzer streamlines this whole process and helps you improve your on-page SEO.
Start Blogging on Webflow with DropInBlog
You can use Webflow for blogging, but you’ll need some time to get a grasp of the platform’s CMS collections. On the other hand, DropInBlog offers an easy way to add a blog to your Webflow site. It integrates seamlessly with the no-code platform, offers advanced blogging features, and has a user-friendly interface.
No CMS collection or data mapping – just open the DropInBlog editor and start adding your content.
If you’re building a Webflow site and need a blog that’s simple, fast, and SEO-optimized, DropInBlog is the easiest solution. Try it free and see how fast the setup can be.
If there was any part of this integration process you had trouble with, or you have suggestions for how we could improve DropInBlog, feel free to message us.
Happy blogging!


